HP Color LaserJet CM4730 MFP CM4730 MFP CM4730f MFP Getting Started Guide Guide de mise en route Erste Schritte Guida rapida Guía de instalación inicial Guia de primers passos Beknopte handleiding Guia de introdução CM4730fsk MFP CM4730fm MFP Read Me First A lire en premier Zuerst lesen Informazioni preliminari Lea esto primero Llegiu això primer Lees dit eerst Leia-me primeiro
Copyright and License © 2007 Copyright Hewlett-Packard Development Company, L.P. Copyright et licence © 2007 Copyright Hewlett-Packard Development Company, L.P. Reproduction, adaptation or translation without prior written permission is prohibited, except as allowed under the copyright laws. La reproduction, l’adaptation ou la traduction, sans autorisation écrite préalable, sont interdites, sauf dans le cadre des lois sur le copyright.
Overview Descripción general Généralités Descripció general In-box documentation Documentation Documentació que hi ha a la caixa Meegeleverde documentatie Übersicht Overzicht Mitgelieferte Dokumentation Documentação contida na caixa Documentazione acclusa alla confezione MFP location Emplacement du MFP Aufstellen des MFP-Geräts Ubicació del perifèric multifunció Plaatsing van de MFP Localização da MFP Unpack the MFP Déballage du MFP Auspacken des MFP-Geräts Desembalatge del perifèric multi
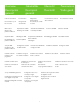
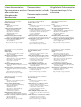
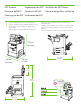
In-box documentation Documentazione acclusa alla confezione Meegeleverde documentatie Documentation Mitgelieferte Dokumentation Documentación incluida Documentació que hi ha a la caixa Documentação contida na caixa CM4730 Customer Documentation: Getting Started Guide Wall Poster • Control Panel information • MFP features Software/Customer information CD • Getting Started Guide Video • User Guide • Install Notes • Hp Jet Direct • Fax Guides • Embedded Web Server • Software Drivers HP Digital Sending Softwa
MFP location Emplacement du MFP Aufstellen des MFP-Geräts Posizione dell’MFP Ubicación del MFP Ubicació del perifèric multifunció Plaatsing van de MFP Localização da MFP 1 Select a well-ventilated, dust-free area to position the MFP. Choisissez une zone correctement ventilée et exempte de poussière pour installer le MFP. Stellen Sie den MFP an einem gut belüfteten, staubfreien Ort auf. Scegliere un’area ben ventilata e priva di polvere in cui collocare l’MFP.
136 kg. 298 lbs. 124 kg. 273 lbs. 2 Power/Current specifications. Specifiche di alimentazione/ corrente. Voeding-/stroomspecificaties. Spécifications relatives à l’alimentation/au courant. Especificaciones de potencia/ corriente Versorgungsspannung/ Stromaufnahme Característiques de potència i corrent Especificações de energia/ corrente. 110-volt models • 110 to 127 volts • 50/60 Hz Current: • 9.0 Amps • 15 Amps 220-volt models • 220 to 240 volts • 50/60 Hz Current: • 4.
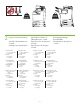
Unpack the MFP Déballage du MFP Auspacken des MFP-Geräts Disimballaggio dell’MFP Desembalar el MFP De MFP uitpakken Retire a MFP da embalagem Desembalatge del perifèric multifunció 1 Remove the outer box and the packing foam. Retirez le carton et l’emballage en mousse. Entfernen Sie die äußere Verpackung und den Schaumstoff. Rimuovere la confezione esterna e il polistirolo d’imballaggio. Retire la caja de embalaje y la espuma. Retireu la caixa exterior i l’escuma de protecció.
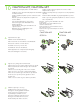
3 Install the ramps, remove cardboard, bag and foam supports. Installez les rampes, retirez le carton, l’emballage et les supports en mousse. Installieren Sie die Rampenelemente, entfernen Sie die Pappe, die Hülle und das Schutzmaterial. Installare i piani inclinati e rimuovere il cartone, la busta e i supporti di polistirolo. Instale las rampas, retire la estructura de cartón, la bolsa y las piezas de espuma. Instal·leu les rampes, traieu el cartró, la bossa i l’escuma de protecció.
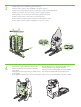
5 6 7 8 9 Remove the shipping tape. Retirez le ruban adhésif utilisé pour l’expédition. Retire la cinta de embalaje. Traieu la cinta per al transport. Verwijder de transporttape. Open scanner lid and remove foam. Aprire il coperchio dello scanner e rimuovere il polistirolo. Open de deksel van de scanner en verwijder het schuimrubber. Entfernen Sie das Transportklebeband. Ouvrez le panneau du scanner et retirez la protection en mousse. Abra la tapa del escáner y retire la espuma.
CM4730fsk MFP, CM4730fm MFP Install the optional stapler/stacker or multi-bin mailbox. Installez l’agrafeuse/le bac d’empilement ou la trieuse à bacs multiples fournis en option. Installieren Sie den optionalen Hefter/Stapler oder die Mailbox Installare la casella postale a più scomparti o la cucitrice/impilatrice mit mehreren Fächern. opzionale. Instale la grapadora/apilador opcional o el buzón de varias Instal·leu la bústia multisafata o la grapadora/apiladora opcional. bandejas.
D Plug accessory cable into the MFP. Branchez le câble de l’accessoire au MFP. Schließen Sie das Zubehörkabel am MFP-Gerät an. Collegare il cavo dell’accessorio all’MFP. Conecte el cable del accesorio al MFP. Endolleu el cable de l’accessori al perifèric multifunció. Sluit de kabel van het accessoire op de MFP aan. Conecte o cabo do acessório à MFP.
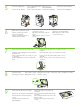
Set up the MFP Configuration du MFP Einrichten des MFP-Geräts Installazione dell’MFP Configurar el MFP De MFP instellen Configure a MFP Configuració del perifèric multifunció 1 Change the control panel language overlay (if necessary). Changez le cache de la langue du panneau de commande (si nécessaire). Wechseln Sie die Sprachschablone für das Bedienfeld (falls erforderlich). Cambiare la mascherina della lingua del pannello di controllo (se necessario).
2 Connect a Network cable (optional). Anschließen eines Netzwerkkabels (optional). Branchez le câble réseau (facultatif). Collegare il cavo di rete (opzionale). Conecte un cable de red (opcional). Sluit een netwerkkabel aan (optioneel). Connecteu un cable de xarxa (opcional). Conecte um cabo de rede (opcional). • • • • Connect a network cable to the MFP. Schließen Sie ein Netzwerkkabel an das MFP-Gerät an. Conecte un cable de red al MFP. Sluit een netwerkkabel op de MFP aan.
3 Connect the fax (optional). Branchez le télécopieur (facultatif). Anschließen des Faxes (optional). Collegare il fax (opzionale). Conecte el fax (opcional). Connecteu el fax (opcional). Sluit de fax aan (optioneel). Conecte o fax (opcional). CM4730f MFP, CM4730fsk MFP, CM4730fm MFP Connect the phone cord to the MFP (optional). Schließen Sie das Telefonkabel an das MFP-Gerät an (optional). Conecte el cable telefónico al MFP (opcional). Sluit het telefoonsnoer op de MFP aan (optioneel).
5 Plug in the power cord, turn on the MFP and wait for green ready light. Branchez le cordon d’alimentation, allumez le MFP et attendez que le voyant vert s’allume. Schließen Sie das Netzkabel an, schalten Sie das MFP-Gerät ein und warten Sie, bis die grüne Bereitschaftsanzeige aufleuchtet. Collegare il cavo di alimentazione, accendere l’MFP e attendere l’accensione della spia verde Pronta. Conecte el cable de alimentación, encienda el MFP y espere a que se ilumine la luz verde de preparado.
6 Set language, date, time, and fax settings (if necessary). If prompted, select your language, the date, and the time. Follow the instructions on the control panel touch screen. Paramétrez la langue, la date, l’heure et les paramètres de télécopie (si nécessaire). Si un message vous le demande, sélectionnez votre langue, la date et l’heure. Suivez les instructions apparaissant sur l’écran tactile du panneau de commande.
8 Adjust the paper guide(s). Réglez le ou les guides du papier. Stellen Sie die Papierführung(en) ein. Regolare le guide della carta. Ajuste la(s) guía(s) de papel. Ajusteu les guies de paper. Stel de papiergeleider(s) bij. Ajuste a(s) guia(s) de papel. NOTE: For tray media auto sensing information, refer to the User Guide. REMARQUE : Pour toute information sur la détection automatique du support dans le bac, reportez-vous au Guide de l’utilisateur.
11 Verify functionality by printing a configuration page. From the control panel, A) scroll to and touch Administration. B) Touch Information. C) Touch Configuration Status Pages. D) Touch Configuration Page. E) Touch Print. If you are connected using a network cable, the IP address will be on the Jetdirect page, under “TCP/IP”. Note: You might need to assign an IP address depending on the type of network that is installed. See “Configure an IP address (if necessary)” on the next page, for more information.
12 Configure the IP address (if the IP address shows 192.0.0.192 or 169.254.x.x). A) On the control panel, scroll to and touch Administration. B) Scroll to and touch Initial Setup, and then touch Networking and I/O. C) Touch Embedded Jetdirect, TCP/IP and IPV4 Settings. D) Touch Config Method, set to Manual, and touch Save. E) Touch Manual Settings, and then enter the IP Address, Subnet Mask, and Default Gateway. Configurez l’adresse IP (si l’adresse IP est affichée sous la forme 192.0.0.192 ou 169.254.x.
13 Verify copy. Place configuration page, print side-up, in the ADF (Automatic Document Feeder), and press the Start button. The ADF will automatically feed the paper through the scanner and the copied page will be ejected into the output bin. Vérifiez la copie. Placez la page de configuration, face à imprimer vers le haut, dans le BAA (bac d’alimentation automatique) et appuyez sur le bouton Démarrer.
Install Windows software Installation du logiciel sous Windows Installieren der Windows-Software Installazione del software Windows Instalar el software en Windows Instal·lació del programari Windows Windows-software installeren Instale o Windows Note: Do not connect a USB or parallel cable until prompted during the software installation. Remarque : Ne connectez pas le câble USB ou parallèle avant d’y avoir été invité lors de l’installation du logiciel.
1 Install software. A) Insert the Software/Customer CD that came with the printer. B) At the welcome screen, click Install. The Setup Wizard appears. C) If installing a fax driver (send fax from the computer) click on “custom” install. If not installing fax driver, click on “basic” install. D) Follow the on screen instructions. Note: If the welcome screen does not appear, click Start and then click Run. Type X:SETUP, where X corresponds to the CD-ROM drive letter, and then click OK. E) Click Finish.
2 Test the software installation. Print a page from any program to make sure that the software is correctly installed. Note: If the installation failed, reinstall the software or see the troubleshooting section in the User Guide. Testez l’installation du logiciel. Imprimez une page à partir de n’importe quel programme pour vous assurer que le logiciel est correctement installé. Remarque : Si l’installation a échoué, réinstallez le logiciel ou reportez-vous à la section Dépannage du Guide de l’utilisateur.
Install Mac software Installation du logiciel sous Mac Installieren der Mac-Software Installazione del software Mac Instalar el software en Mac Instal·lació del programari per al Mac Mac-software installeren Instale o Mac 1 Connect MFP to a Macintosh computer. Connect a USB cable between the MFP and the computer. Connectez le MFP à un ordinateur Macintosh. Connectez un câble USB reliant le MFP et l’ordinateur. Schließen Sie das MFP-Gerät an einen Macintosh-Computer an.
2 Place the CD in the CD-ROM drive and run the installer. Complete an “easy” install. Insérez le CD dans le lecteur de CD-ROM et exécutez le programme d’installation. Effectuez une installation « standard ». Legen Sie die CD in das CD-ROM-Laufwerk ein und führen Sie das Installationsprogramm aus. Wählen Sie die „einfache“ Installation. Inserire il CD nell’unità CD-ROM ed eseguire il programma di installazione. Completare l’installazione tipica. Inserte el CD en la unidad de CD-ROM y ejecute el instalador.
5 From the Printer Browser window, select the HP printer from the Printer Name section. For Mac OS X v10.4: If HP software is installed, the printer software should be automatically configured. Make sure that the HP Color LaserJet CM4730 MFP model name is selected in the Print Using pull down list. Note: Mac OS X v10.2 and v10.3 might require you to manually select the printer model from the Printer Model drop-down list.
7 Under Model Name, select your device and click Add. Sous Modèle d’imprimante, sélectionnez votre périphérique et cliquez sur Ajouter. Wählen Sie das Gerät unter Modellname aus und klicken Sie auf Hinzufügen. In Modello, selezionare la periferica e fare clic su Aggiungi. En Nombre de modelo, seleccione el dispositivo y haga clic en Agregar. A Model Name (Nom de model), seleccioneu el dispositiu i feu clic a Add (Afegeix). Selecteer uw apparaat onder Model Name en klik op Toevoegen.
CM4730f, CM4730fsk, CM4730fm Install the send fax driver (optional) Installez le pilote d’envoi du télécopieur (facultatif) Installieren des Send Fax-Treibers (optional) Installazione del driver di invio fax (opzionale) Instalar el controlador de envío de fax (opcional) Instal·lació del controlador d’enviament de faxos (opcional) Het Send Fax-stuurprogramma installeren (optioneel) Instale o driver de envio de fax (opcional) Windows only Windows uniquement Només per al Alleen Windows Windows nur Windows Ap
Install send fax driver. A) Insert the software/customer CD that came with the device. B) On the welcome screen, if the printer driver is already installed click Modify Installation, otherwise click Install Printer. The setup wizard appears. C) Choose the “custom installation” option, and select the Send Fax Driver in the installation options. D) Follow the onscreen instructions. Installez le pilote d’envoi du télécopieur. A) Insérez le CD du logiciel /client fourni avec l’imprimante.
Set up the embedded digital send features for network connection Paramétrez les fonctions d’envoi numérique intégrées pour la connexion réseau Einrichten der integrierten Funktionen für digitales Senden für die Netzwerkverbindung Configurazione delle funzioni di invio digitale incorporate per la connessione di rete Configurar las funciones de envío digital incorporado para la conexión de red Configuració de les opcions d’enviament digital incrustat per a la connexió a la xarxa De geïntegreerde digitale verz
2 Configure the General Settings. A) Open a web browser. B) Input device IP address or hostname (found on the embedded Jetdirect configuration page) in the the URL window. C) Select the Digital Sending tab. D) Complete the information under General Settings: name, address, and other information. Configurez les paramètres généraux. A) Ouvrez un navigateur Web. B) Entrez l’adresse IP ou le nom de l’hôte (que vous trouverez sur la page de configuration JetDirect intégrée) dans la fenêtre de l’URL.
3 Configure E-mail Settings. A) On the left navigation menu, select E-mail Settings. B) Input the SMTP server address, use the default From and Subject fields. Note: If you are using an ISP (Internet Service Provider) for internet access and e-mail, you may need to contact your ISP to obtain the SMTP server name, and to determine if you need to enter an account name and password for SMTP authentication. Configurez les paramètres de la messagerie électronique.
4 Configure E-mail Address Book. A) On the left navigation menu, select E-mail Address Book, to enter frequently-used e-mail addresses and e-mail distribution lists. Note: The Fax Address Book and Fax Speed Dials is also located in the left navigation area. These two features allow you to manage frequently-used fax numbers and speed dial lists. Configurez le carnet d’adresses électroniques.
5 Configure Send to Folder. A) To scan a document to your PC or network share folder, use the Send To Folder option (on the left navigation bar) to set up one or more folder destinations. For more information on configuring Send to Folder, consult the Embedded Web Server (EWS) User Guide found on the software/customer information CD. Note: See http://www.hp.com/support for more information about the digital send features. Configurez l’option Envoyer vers dossier.
http://www.hp.com/support http://www.hp.
© 2007 Hewlett-Packard Development Company, L.P. www.hp.