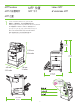
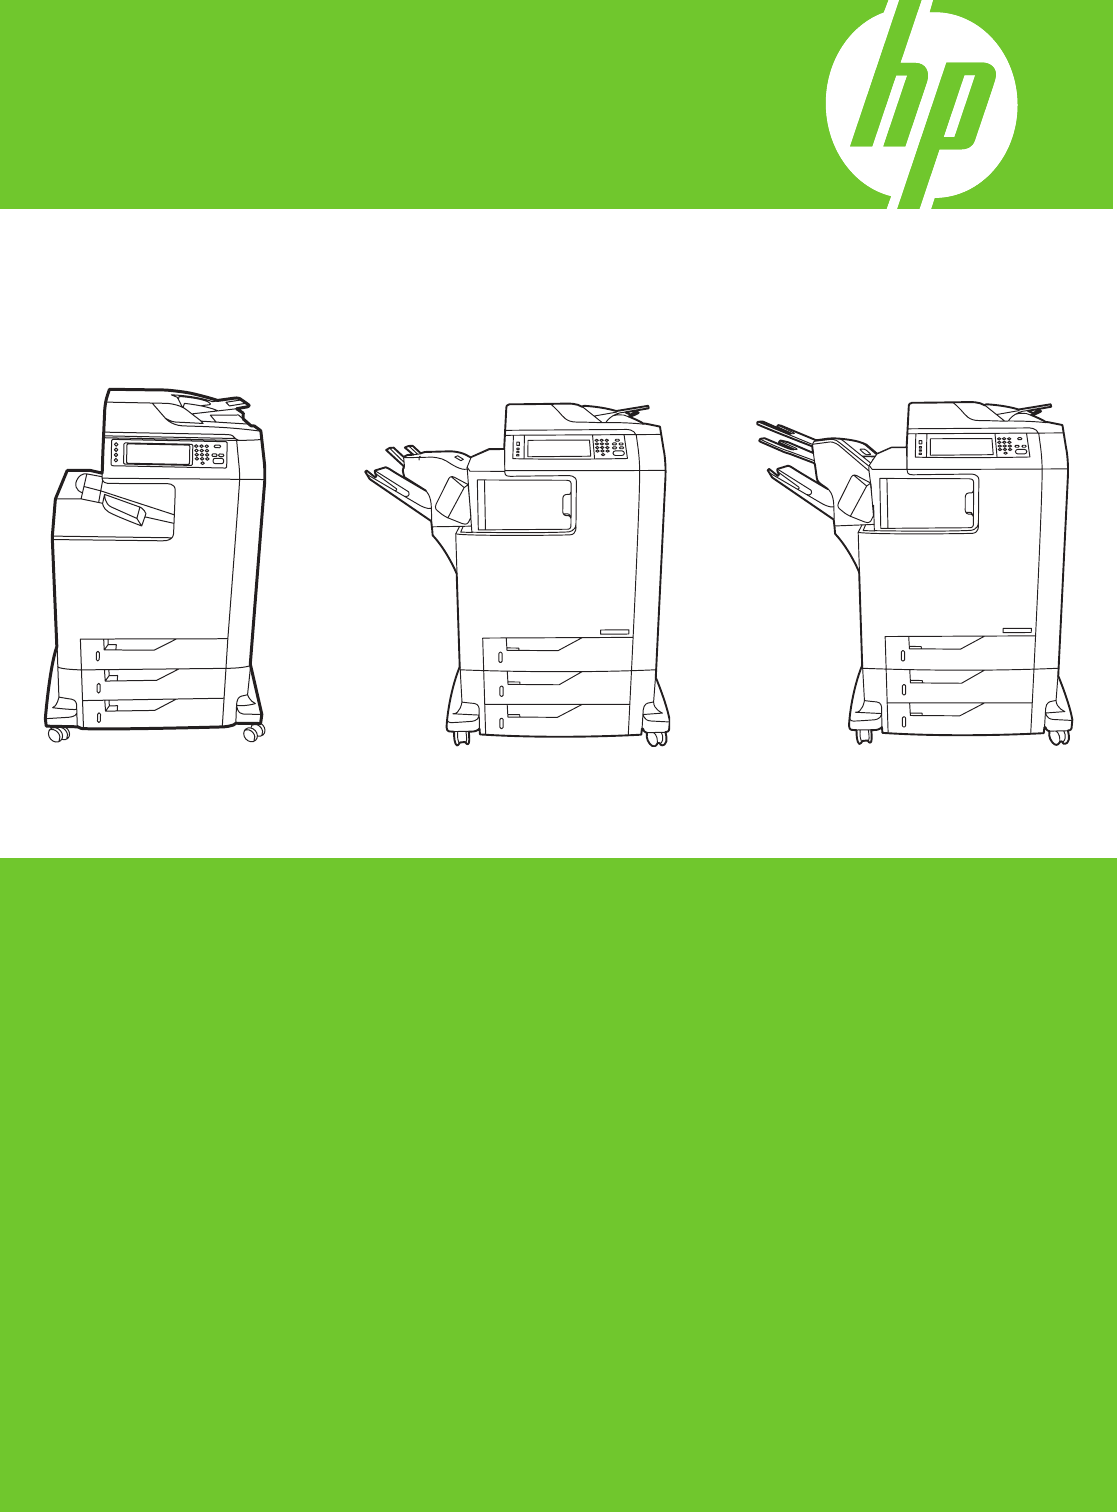
HP Color LaserJet CM4730 MFP CM4730 MFP CM4730f MFP CM4730fsk MFP CM4730fm MFP Getting Started Guide Read Me First 入门指南 必读文档 Panduan Penggunaan Baca Dulu Saya はじめにお読みください 먼저 읽어보십시오.
Copyright and License © 2007 Copyright Hewlett-Packard Development Company, L.P. 版权与许可 © 2007 版权所有 Hewlett-Packard Development Company, L.P. Reproduction, adaptation or translation without prior written permission is prohibited, except as allowed under the copyright laws. 未经事先书面许可,严禁进行任何形式的复制、改编或翻 译,除非版权法另有规定。 The information contained herein is subject to change without notice.
Overview 概要 概述 概述 개요 Tinjauan Umum ภาพรวม In-box documentation 包装箱附带的说明文档 Dokumentasi dalam kotak 同梱されている文書 隨附文件 제품 설명서 เอกสารที่อยู่ในกล่อง MFP location MFP 位置 Lokasi MFP MFP の設置場所 MFP 위치 ตำ�แหน่งของ MFP Unpack the MFP 拆开 MFP 包装 Membongkar MFP MFP の開梱 MFP 포장 풀기 แกะกล่อง MFP Setup the MFP 安装 MFP Menyiapkan MFP MFP の設定 MFP 설정 ตั้งค่า MFP Install the software 安装软件 Menginstal perangkat lunak ソフトウェアのインストール 安裝軟體 소프트웨어 설치 ติดตั้งซอฟต์แวร์ Install the send fax driver 安装发送传真驱动程序 M
In-box documentation 包装箱附带的说明文档 Dokumentasi dalam kotak 同梱されている文書 제품 설명서 เอกสารที่อยู่ในกล่อง CM4730 Customer Documentation: Getting Started Guide Wall Poster • Control Panel information • MFP features Software/Customer information CD • Getting Started Guide Video • User Guide • Install Notes • Hp Jet Direct •Fax Guides • Embedded Web Server • Software Drivers HP Digital Sending Software 4.
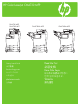
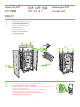
MFP location MFP 位置 Lokasi MFP MFP の設置場所 MFP 위치 ตำ�แหน่งของ MFP MFP 位置 1 Select a well-ventilated, dust-free area to position the MFP. 请选择一个通风良好、无尘的区域来放置 MFP。 Pilih tempat yang berventilasi cukup, bebas debu untuk menempatkan MFP. MFP の設置場所には、換気がよく、埃の少ない場所を選択します。 환기가 잘 되고 먼지가 없는 곳을 선택하여 MFP를 내려 놓습니다. เลือกวาง MFP ไว้ในบริเวณที่ปราศจากฝุ่น และอากาศถ่ายเทสะดวก 選擇一個通風情況良好且沒有灰塵的區域來放置 MFP。 381 mm 15 inches 1153 mm 45.4 inches 1524 mm 60 inches 639 mm 788 mm 25.2 inches 31 inches 1033.8 mm 40.
2 124 kg. 273 lbs. 136 kg. 298 lbs. Power/Current specifications. 电源/电流规格。 Spesifikasi Daya/Arus listrik. 電源/電流仕様 전원/현재 사양 ข้อกำ�หนดรายละเอียดเกี่ยวกับกำ�ลังไฟ/กระแสไฟฟ้า 電源/電流規格。 110-volt models • 110 to 127 volts • 50/60 Hz Current: • 9.0 Amps • 15 Amps 220-volt models • 220 to 240 volts • 50/60 Hz Current: • 4.5 Amps • 8 Amps 110 伏机型 • 110 到 127 伏 • 50/60 Hz 电流: • 9.0 安培 • 15 安培 220 伏机型 • 220 到 240 伏 • 50/60 Hz 电流: • 4.5 安培 • 8 安培 Model 110-volt • 110 s.d.
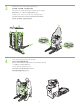
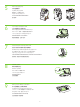
Unpack the MFP 拆开 MFP 包装 Membongkar MFP MFP の開梱 MFP 포장 풀기 แกะกล่อง MFP 拆開 MFP 1 Remove the outer box and the packing foam. 拆除外包装箱和包装泡沫材料。 Keluarkan kotak luar dan gabus kemasan. 箱と梱包材を取り外します。 상자와 스티로폼을 제거합니다. ดึงกล่องด้านนอกและโฟมรองเครื่องออก 取下外層包裝盒與包裝包棉。 1 t LaserJe HP Color Series 4700 XX* X-XXX *XXXX xxxxx-xxxxx © 2004 Company, L.P. Development Hewlett-Packard HP Color LaserJet 4700 Series 4 2 3 2 Insert Software/Customer Information CD to view a Getting Started Guide Video.
3 Install the ramps, remove cardboard, bag and foam supports. 安装坡道,拆除纸板、包装袋和泡沫架。 Pasang rel luncuran, lepaskan lapisan karton, kantung dan gabus penyangga. 傾斜台を取り付け、ボール紙、袋、および梱包材を取り外します。 승강대를 부착하고 보드지와 비닐 및 형태 보호용 포장재를 제거합니다. ใส่รางสำ�หรับวางเครื่อง ก่อนแกะกระดาษแข็ง ถุงพลาสติกและโฟมรองเครื่องออก 安裝斜板,取下厚紙板、包裝袋和包棉支撐物。 4 Use two people to gently roll the device off of the pallet. 由两个人轻轻将设备滚离货盘。 Minta dua orang untuk menyorong perangkat dengan perlahan-lahan dari pallet.
5 Remove the shipping tape. 拆除运输胶带。 Lepaskan pita pengiriman. 搬送用テープを取り外します。 포장용 테이프를 제거합니다. แกะเทปทั้งหมดที่ติดมากับผลิตภัณฑ์ออก 撕下膠帶。 6 Open scanner lid and remove foam. 打开扫描仪盖并拆除泡沫。 Buka sungkup pemindai dan keluarkan busanya. スキャナ カバーを開いて、梱包材を取り除きます。 스캐너 덮개를 열고 스티로폼을 제거합니다. เปิดฝาปิดเครื่องสแกน และนำ�โฟมออก 開啟掃描器護蓋,並取下包棉。 7 Clean scanner glass with a dry, lint-free cloth. 使用干的无绒布擦拭扫描仪玻璃板。 Bersihkan kaca pemindai dengan kain kering tanpa serat.
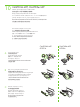
CM4730fsk MFP, CM4730fm MFP Install the optional stapler/stacker or multi-bin mailbox. 安装可选的订书机/堆栈器或多槽邮箱。 Pasang penjilid/penumpuk atau kotak surat multi nampan. オプションのステイプラ/スタッカまたはマルチビン メールボックスを取り付けます。 선택사양 스테이플러/스태커 또는 다용도 우편함을 설치합니다. ใส่อุปกรณ์เย็บเล่ม/เรียงชุดหรือกล่องจดหมายพร้อมถาดรับหลายๆ ถาดที่เป็นอุปกรณ์เสริม 安裝選購的釘書機/堆疊器或多槽信箱模組。 Note: Discard install guides in accessory box. 注:请丢弃附件盒中的安装导板。 Catatan: Lepaskan panduan menginstal dalam kotak aksesori.
D Plug accessory cable into the MFP. 将附件电缆插入 MFP。 Colokkan kabel aksesori ke dalam MFP. アクセサリのケーブルを MFP に接続します。 부속품 케이블을 MFP에 꽂습니다.
Set up the MFP 安装 MFP Mengatur MFP MFP の設定 MFP 설정 ตั้งค่า MFP 設定 MFP 1 Change the control panel language overlay (if necessary). 更改控制面板的语言贴面(如有必要)。 Ganti pelat muka panel kontrol (jika perlu). コントロール パネルの言語オーバーレイを交換します (必要に応じて)。 제어판의 언어 오버레이를 변경합니다(필요한 경우). เปลี่ยนแผ่นปะหน้าสำ�หรับภาษาบนแผงควบคุม (หากจำ�เป็น) 變更控制面板語言貼紙 (如有需要)。 NOTE: Four print cartridges are already installed, no action is required.
2 Connect a Network cable (optional). Menghubungkan kabel Jaringan (opsional). 네트워크 케이블 연결(선택 사항) 連接網路電纜 (選用)。 连接网络电缆(可选)。 ネットワーク ケーブルを接続します (オプション)。 ต่อสายเคเบิลเครือข่าย (เลือกทำ�) • Connect a network cable to the MFP. • 将网络电缆连接到 MFP。 • Hubungkan kabel jaringan ke MFP. • ネットワーク ケーブルを MFP に接続します。 • MFP에 네트워크 케이블을 연결합니다. • ต่อสายเคเบิลเครือข่ายเข้ากับ MFP • 將網路電纜線連接到 MFP。 NOTE: Connection required for MFP network features and utilities.
3 Connect the fax (optional). 连接传真(可选)。 Menghubungkan faks (opsional) ファックスを接続します (オプション)。 팩스 연결(선택 사항) ต่อโทรสาร (เลือกทำ�) 連接傳真 (選用)。 CM4730f MFP, CM4730fsk MFP, CM4730fm MFP Connect the phone cord to the MFP (optional). 将电话线连接到 MFP(可选)。 Hubungkan kabel telepon ke MFP (opsional). 電話コードを MFP に接続します (オプション)。 전화선을 MFP에 연결합니다(선택 사항). ต่อสายโทรศัพท์เข้ากับ MFP (เลือกทำ�) 將電話線連接到 MFP (選用)。 4 Lock the wheels on the printer stand. 锁定打印机底座上的滚轮。 Kunci roda-roda pada dudukan printer.
5 Plug in the power cord, turn on the MFP and wait for green ready light. 插入电源线,打开 MFP 并等待绿色的就绪指示灯亮起。 Colokkan kabel listrik, nyalakan MFP dan tunggu sampai muncul lampu ready [siap] warna hijau. 電源コードを接続し、MFP の電源を入れ、緑の印字可ランプが点灯するまで待機します。 전원 코드를 꽂고 MFP을 켠 후 녹색 준비 표시등이 켜질 때까지 기다립니다. เสียบปลั๊กไฟ เปิด MFP และรอจนกระทั่งไฟแสดงสถานะพร้อมติดเป็นสีเขียว 插入電源線、開啟 MFP 電源並等候綠色就緒指示燈亮起。 Note: A plastic sheet will automatically be sent to the MFP output tray when turned on, no action is required.
6 Set language, date, time, and fax settings (if necessary). If prompted, select your language, the date, and the time. Follow the instructions on the control panel touch screen. 如有必要,设定您的语言、日期、时间和传真设置。出现提示时,请选择语言、日期和时间。请按照控制面板触摸屏 上的指示进行操作。 Menyetel bahasa, tanggal, waktu dan pengaturan faks (jika perlu). Jika diminta, pilih bahasa Anda, tanggal, dan waktu. Ikuti petunjuk di layar sentuh panel kontrol.
8 Adjust the paper guide(s). 调整纸张导板。 Menyesuaikan pemandu kertas. 用紙ガイドを調節します。 용지 조정대를 조정합니다. ปรับตัวกั้นกระดาษ 調整紙張導板。 NOTE: For tray media auto sensing information, refer to the User Guide. 注:有关纸盘中介质自动检测的信息,请参阅《用户指南》。 CATATAN: Untuk mendapatkan informasi penginderaan otomatis media di baki, bacalah Panduan Pengguna. 注意: トレイのメディア自動感知については、ユーザー ガイドを参照してください。 주: 용지함에서 용지를 자동 인지하는 것과 관련된 정보는 사용 설명서를 참조하십시오.
11 Verify functionality by printing a configuration page. From the control panel, A) scroll to and touch Administration. B) Touch Information. C) Touch Configuration Status Pages. D) Touch Configuration Page. E) Touch Print. If you are connected using a network cable, the IP address will be on the Jetdirect page, under “TCP/IP”. Note: You might need to assign an IP address depending on the type of network that is installed. See “Configure an IP address (if necessary)” on the next page, for more information.
12 Configure the IP address (if the IP address shows 192.0.0.192 or 169.254.x.x). A) On the control panel, scroll to and touch Administration. B) Scroll to and touch Initial Setup, and then touch Networking and I/O. C) Touch Embedded Jetdirect, TCP/IP and IPV4 Settings. D) Touch Config Method, set to Manual, and touch Save. E) Touch Manual Settings, and then enter the IP Address, Subnet Mask, and Default Gateway. 配置 IP 地址(如果 IP 地址显示 192.0.0.192 或 169.254.x.
13 Verify copy. Place configuration page, print side-up, in the ADF (Automatic Document Feeder), and press the Start button. The ADF will automatically feed the paper through the scanner and the copied page will be ejected into the output bin. 检查复印。将配置页的打印面朝上放在 ADF(自动文档进纸器)中,然后按开始按钮。ADF 将自动送纸穿过扫描仪,并且复印页将弹 入出纸槽中。 Verifikasi lembar salinan. Taruh lembar halaman konfigurasi bagian yang dicetak menghadap ke atas di ADF (Automatic Document Feeder), lalu tekan tombol Start [Mulai].
Install Windows software Menginstal perangkat lunak Windows Windows 소프트웨어 설치 安裝 Windows 軟體 安装 Windows 软件 Windows ソフトウェアのインストール ติดตั้งซอฟต์แวร์ของ Windows Note: Do not connect a USB or parallel cable until prompted during the software installation. 注:在软件安装过程中,没有提示时不要连接 USB 或并行电缆。 Catatan:Jangan menghubungkan dulu kabel USB atau kabel Paralel sampai diperintahkan sewaktu penginstalan perangkat lunak.
1 Install software. A) Insert the Software/Customer CD that came with the printer. B) At the welcome screen, click Install. The Setup Wizard appears.C) If installing a fax driver (send fax from the computer) click on “custom” install. If not installing fax driver, click on “basic” install. D) Follow the on screen instructions. Note: If the welcome screen does not appear, click Start and then click Run. Type X:SETUP, where X corresponds to the CD‑ROM drive letter, and then click OK. E) Click Finish.
2 Test the software installation. Print a page from any program to make sure that the software is correctly installed. Note: If the installation failed, reinstall the software or see the troubleshooting section in the User Guide. 测试软件安装是否成功。通过任意程序打印一页,以确保软件的安装正确无误。注:如果安装失败,请重新安装该软 件,或参阅《用户指南》中的故障排除部分。 Menguji penginstalan perangkat lunak. Cetak halaman dari program apa saja untuk memastikan perangkat lunak telah diinstal dengan benar.
Install Mac software 安装 Mac 软件 Menginstal perangkat lunak Mac Mac ソフトウェアのインストール Mac 소프트웨어 설치 ติดตั้งซอฟต์แวร์สำ�หรับเครื่อง Mac 安裝 Mac 軟體 1 Connect MFP to a Macintosh computer. Connect a USB cable between the MFP and the computer. 将 MFP 连接至 Macintosh 计算机。用 USB 电缆连接 MFP 和计算机。 Hubungkan MFP ke komputer Macintosh. Hubungkan kabel USB antara MFP dan komputer. MFP を Macintosh コンピュータに接続します。USB ケーブルで MFP とコンピュータを接続します。 MFP를 Macintosh 컴퓨터에 연결합니다. USB 케이블을 MFP와 컴퓨터에 연결합니다.
2 Place the CD in the CD-ROM drive and run the installer. Complete an “easy” install. 将 CD 放入 CD-ROM 驱动器,然后运行安装程序。完成“简易”安装。 Masukkan CD ke drive CD-ROM dan jalankan installer-nya. Selesaikan "easy" install [instalasi mudah]. CD-ROM ドライブに CD を挿入し、インストーラを実行します。 「簡易」インストール手順を完了します。 CD-ROM 드라이브에 CD를 넣고 설치 프로그램을 실행합니다. "간편" 설치를 완료합니다.
5 From the Printer Browser window, select the HP printer from the Printer Name section. For Mac OS X v10.4: If HP software is installed, the printer software should be automatically configured. Make sure that the HP Color LaserJet CM4730 MFP model name is selected in the Print Using pull down list. Note: Mac OS X v10.2 and v10.3 might require you to manually select the printer model from the Printer Model drop-down list. 在打印机浏览器窗口中,从“打印机名称”部分中选择 HP 打印机。对于 Mac OS X v10.
7 Under Model Name, select your device and click Add. 在型号名称下,选择设备并单击添加。 Di bawah Model Name [Nama Model], pilih perangkat Anda lalu klik Add [Tambah]. [機種名] から使用するプリンタを選択して、[追加] をクリックします。 모델 이름 에서 장치를 선택하고 추가 를 누릅니다. ใต้ Model Name (ชื่อรุ่น) เลือกเครื่องพิมพ์ของคุณและคลิก Add (เพิ่ม) 在「機型名稱」下,選擇您的裝置,並按一下「新增」。 8 Test the software installation. Print a page from any program to make sure that the software is correctly installed.
CM4730f, CM4730fsk, CM4730fm Install the send fax driver (optional) 安装发送传真驱动程序(可选) Menginstal driver send fax [kirim faks] (opsional) ファックス送信ドライバのインストール (オプション) 팩스 전송 드라이버 설치(선택 사항) ติดตั้งไดรเวอร์ส่งโทรสาร (เลือกทำ�) 安裝傳送傳真驅動程式 (選用) Windows only 仅限于 Windows Hanya pada Windows Windows のみ Windows 전용 Windows เท่านั้น 僅適用於 Windows Note: If fax driver has not been installed, install it now. 注: 如果尚未安装传真驱动程序,请立即安装。 Catatan: Jika driver faks belum diinstal, instal sekarang.
Install send fax driver. A) Insert the software/customer CD that came with the device. B) On the welcome screen, if the printer driver is already installed click Modify Installation, otherwise click Install Printer. The setup wizard appears. C) Choose the “custom installation” option, and select the Send Fax Driver in the installation options. D) Follow the onscreen instructions.
Set up the embedded digital send features for network connection 为网络连接设置内嵌式数字发送功能 Mengatur fitur pengiriman digital terpadu untuk koneksi jaringan ネットワーク接続用の内蔵デジタル送信のセットアップ 네트워크 연결을 위한 내장 디지털 전송 기능 설정 ตั้งค่าคุณสมบัติส่งแบบดิจิตอลฝังตัวสำ�หรับการเชื่อมต่อเครือข่าย 設定網路連線的內嵌式數位傳送功能 NOTE: For network connected MFPs only. 注:仅限于连接网络的 MFP。 CATATAN: Hanya untuk MFP yang terhubung ke jaringan. 注意: ネットワーク接続された MFP のみ。 주: 네트워크가 연결된 MFP 전용입니다.
2 Configure the General Settings. A) Open a web browser. B) Input device IP address or hostname (found on the embedded Jetdirect configuration page) in the the URL window. C) Select the Digital Sending tab. D) Complete the information under General Settings: name, address, and other information. 配置常规设置。 A) 打开 Web 浏览器。B) 在 URL 窗口中输入设备 IP 地址或主机名(在内嵌式 Jetdirect 配置页 上找到的)。C) 选择数字发送选项卡。D) 在常规设置下填写以下信息:名称、地址和其它信息。 Mengkonfigurasi Pengaturan Umum. A) Buka browser web.
3 Configure E-mail Settings. A) On the left navigation menu, select E-mail Settings. B) Input the SMTP server address, use the default From and Subject fields. Note: If you are using an ISP (Internet Service Provider) for internet access and e-mail, you may need to contact your ISP to obtain the SMTP server name, and to determine if you need to enter an account name and password for SMTP authentication.
4 Configure E-mail Address Book. A) On the left navigation menu, select E-mail Address Book, to enter frequently-used e-mail addresses and e-mail distribution lists. Note: The Fax Address Book and Fax Speed Dials is also located in the left navigation area. These two features allow you to manage frequently-used fax numbers and speed dial lists. 配置电子邮件通讯簿。 A) 在左侧的导航菜单中,选择电子邮件通讯簿,以输入常用电子邮件地址和电子邮件分发列 表。注:传真通讯簿和传真快速拨号也位于左侧导航区中。您可以使用这两个功能来管理常用传真号和快速拨号列 表。 Mengkonfigurasi Buku alamat E-mail.
5 Configure Send to Folder. A) To scan a document to your PC or network share folder, use the Send To Folder option (on the left navigation bar) to set up one or more folder destinations. For more information on configuring Send to Folder, consult the Embedded Web Server (EWS) User Guide found on the software/customer information CD. Note: See http://www.hp.com/support for more information about the digital send features.
http://www.hp.com/support http://www.hp.
© 2007 Hewlett-Packard Development Company, L.P. www.hp.