HP Color LaserJet CM4730 MFP CM4730 MFP CM4730f MFP Getting Started Guide Introduktionsvejledning Aloitusopas µ Komme i gang Introduktionshandbok Başlangıç Kılavuzu מדריך לתחילת העבודה CM4730fsk MFP CM4730fm MFP Read Me First Start med at læse dette Lue tämä ensin Δ Les meg først Läs det här först Önce Beni Oku קרא אותי תחילה
Copyright and License © 2007 Copyright Hewlett-Packard Development Company, L.P. Reproduction, adaptation or translation without prior written permission is prohibited, except as allowed under the copyright laws. The information contained herein is subject to change without notice. The only warranties for HP products and services are set forth in the express warranty statements accompanying such products and services. Nothing herein should be construed as constituting an additional warranty.
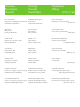
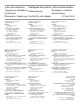
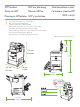
Overview Översikt Oversigt Oversikt Genel Bakış Yleiskatsaus סקירה כללית In-box documentation Medfølgende dokumentation Laitteen dokumentaatio µ µ Dokumentasjon תיעוד שבאריזה Dokumentation i förpackningen Ürünle birlikte verilen belgeler MFP location MFP'ens placering Monitoimilaitteen sijainti MFP Plassere MFP-en Placering av MFP-enheten MFP'yi yerleştirme Un
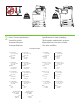
In-box documentation Medfølgende dokumentation Laitteen dokumentaatio µ µ Dokumentasjon תיעוד שבאריזה Dokumentation i förpackningen Ürünle birlikte verilen belgeler CM4730 Customer Documentation: Getting Started Guide Wall Poster • Control Panel information • MFP features Software/Customer information CD • Getting Started Guide Video • User Guide • Install Notes • Hp Jet Direct •Fax Guides • Embedded Web Server • Software Drivers HP
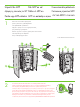
MFP location MFP'ens placering Monitoimilaitteen sijainti MFP Plassere MFP-en MFP-מיקום ה Placering av MFP-enheten MFP'yi yerleştirme 1 Select a well-ventilated, dust-free area to position the MFP. Vælg et velventileret, støvfrit område til MFP'en. Sijoita laite hyvin ilmastoituun, pölyttömään paikkaan. µ µ , , MFP. Velg et støvfritt område med god ventilasjon for plassering av MFP-en.
136 kg. 298 lbs. 124 kg. 273 lbs. 2 Power/Current specifications. Specifikationer til strøm/spænding Virrankulutustiedot /µ Strømspesifikasjoner Strömspecifikationer Güç/Akım özellikleri זרם/מפרטי מתח 110-volt models • 110 to 127 volts • 50/60 Hz Current: • 9.0 Amps • 15 Amps 220-volt models • 220 to 240 volts • 50/60 Hz Current: • 4.
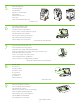
Unpack the MFP Pak MFP'en ud Pura monitoimilaite pakkauksesta MFP Pakke ut MFP-en Packa upp MFP-enheten MFP'nin ambalajını açma מאריזתוMFP-הוצא את ה 1 Remove the outer box and the packing foam. Fjern den yderste kasse og emballageskummet. Poista pakkauslaatikko ja vaahtomuovi. . Fjern ytterkartongen og skumplasten. .
3 Install the ramps, remove cardboard, bag and foam supports. Installer ramperne, fjern pap, pose og skumelementer. Asenna kiskot, poista pakkauslaatikko ja -pussi sekä vaahtomuovit. µ, , µ . Sett skinnene på plass, fjern pappen, plastemballasjen og all skumplastbeskyttelse. , , . Installera ramperna, ta bort kartongen, påsen och skumplaststöden.
5 Remove the shipping tape. Fjern emballeringstapen. Irrota pakkausteipit. . Fjern pakketeipen. . Ta bort tejpen. Taşıma sırasında kullanılan bantları çıkarın. .הסר את סרט השילוח 6 Open scanner lid and remove foam. Åbn scannerlåget og fjern skummet. Avaa skannerin kansi ja poista vaahtomuovi. . Åpne skannerdekslet, og fjern skumplasten. .
CM4730fsk MFP, CM4730fm MFP Install the optional stapler/stacker or multi-bin mailbox. Installer hæfteren/stableren eller postkassen med flere bakker (ekstraudstyr). Asenna valinnainen nitoja/pinolokero tai monilokeroinen postilaatikko. µ / . Monter stifte-/stableenheten (ekstrautstyr) eller postboksen med flere skuffer. / .
D Plug accessory cable into the MFP. Sæt kablet til ekstraudstyret i MFP'en. Kytke lisälaitteen johto monitoimilaitteeseen. µ MFP. Koble tilbehørskabelen til MFP-en. . Sätt i tillbehörskabeln i MFP-enheten. Aksesuar kablosunu MFP'ye takın. .
Set up the MFP Installer MFP'en Asenna monitoimilaite MFP Klargjøre MFP-en Installera MFP-enheten MFP'yi ayarlama MFP-הגדר את ה 1 Change the control panel language overlay (if necessary). Skift sprogoverlay'et på kontrolpanelet (hvis det er nødvendigt). Vaihda ohjauspaneelin näytön kieli (tarvittaessa). ( ). Bytt språkoverlegget for kontrollpanelet (om nødvendig).
2 Connect a Network cable (optional). Liitä verkkokaapeli (valinnainen). Koble til en nettverkskabel (valgfritt). Ansluta en nätverkskabel (valfritt). .)חבר כבל רשת (אופציונלי Tilslut et netværkskabel (ekstraudstyr). (). (). Ağ kablosunu bağlayın (isteğe bağlı). • Connect a network cable to the MFP. • Tilslut et netværkskabel til MFP'en. • Yhdistä verkkokaapeli laitteeseen. • MFP.
3 Connect the fax (optional). Tilslut faxen (ekstraudstyr). Kytke faksi (valinnainen). (). Koble til faksenheten (valgfritt). (). Ansluta faxen (valfritt). Faksı bağlayın (isteğe bağlı). .)חבר את הפקס (אופציונלי CM4730f MFP, CM4730fsk MFP, CM4730fm MFP Connect the phone cord to the MFP (optional). Tilslut telefonledningen til MFP'en (ekstraudstyr). Liitä puhelinjohto monitoimilaitteeseen (valinnainen).
5 Plug in the power cord, turn on the MFP and wait for green ready light. Sæt netledningen i, tænd for MFP'en og vent på den grønne indikator for klar. Liitä virtajohto, käynnistä monitoimilaite ja odota, että vihreä valo syttyy. , MFP µ µ. Koble til strømledningen, slå på MFP-en og vent til den grønne Klar-lampen lyser.
6 Set language, date, time, and fax settings (if necessary). If prompted, select your language, the date, and the time. Follow the instructions on the control panel touch screen. Vælg indstillinger for sprog, dato, klokkeslæt og evt. fax. Vælg dit sprog, dato og klokkeslæt, hvis du bliver bedt om det. Følg instruktionerne på kontrolpanelets berøringsskærm. Aseta kieli, päivämäärä, aika ja faksiasetukset (tarvittaessa). Valitse kieli, päivämäärä ja aika, jos niitä pyydetään.
8 Adjust the paper guide(s). Juster papirstyret(rene). Säädä paperinohjaimet. µ . Juster papirskinnen(e). . Justera pappersledarna. Kağıt kılavuzlarını ayarlayın. .כוונן את מכוונ(י) הנייר NOTE: For tray media auto sensing information, refer to the User Guide. BEMÆRK! Der henvises til Brugervejledningen angående oplysninger om autoregistrering af bakkemedie.
11 Verify functionality by printing a configuration page. From the control panel, A) scroll to and touch Administration. B) Touch Information. C) Touch Configuration Status Pages. D) Touch Configuration Page. E) Touch Print. If you are connected using a network cable, the IP address will be on the Jetdirect page, under “TCP/IP”. Note: You might need to assign an IP address depending on the type of network that is installed. See “Configure an IP address (if necessary)” on the next page, for more information.
12 Configure the IP address (if the IP address shows 192.0.0.192 or 169.254.x.x). A) On the control panel, scroll to and touch Administration. B) Scroll to and touch Initial Setup, and then touch Networking and I/O. C) Touch Embedded Jetdirect, TCP/IP and IPV4 Settings. D) Touch Config Method, set to Manual, and touch Save. E) Touch Manual Settings, and then enter the IP Address, Subnet Mask, and Default Gateway. Konfigurer IP-adressen (hvis IP-adresssen er 192.0.0.192 eller 169.254.x.x).
13 Verify copy. Place configuration page, print side-up, in the ADF (Automatic Document Feeder), and press the Start button. The ADF will automatically feed the paper through the scanner and the copied page will be ejected into the output bin. Kontroller kopien. Anbring konfigurationssiden med printsiden opad i ADF'en (Automatic Document Feeder), og tryk derefter på knappen Start. ADF'en fremfører automatisk papiret gennem scanneren, og den kopierede side sendes ud i udskriftsbakken. Tarkista kopio.
Installer softwaren til Windows µ Windows Windows Windows yazılımını yükleme Install Windows software Windows-ohjelmiston asentaminen Installere Windows-programvare Installera Windows-programvara Windows התקנת תוכנת Note: Do not connect a USB or parallel cable until prompted during the software installation. Bemærk!Tilslut ikke et USB- eller parallelkabel, før der bliver givet besked om det under softwareinstallationen.
1 Install software. A) Insert the Software/Customer CD that came with the printer. B) At the welcome screen, click Install. The Setup Wizard appears.C) If installing a fax driver (send fax from the computer) click on “custom” install. If not installing fax driver, click on “basic” install. D) Follow the on screen instructions. Note: If the welcome screen does not appear, click Start and then click Run. Type X:SETUP, where X corresponds to the CD-ROM drive letter, and then click OK. E) Click Finish.
2 Test the software installation. Print a page from any program to make sure that the software is correctly installed. Note: If the installation failed, reinstall the software or see the troubleshooting section in the User Guide. Test softwareinstallationen. Udskriv en side fra et vilkårligt program for at kontrollere, at softwaren er installeret korrekt. Bemærk! Installer softwaren igen, hvis installationen mislykkedes, eller se fejlfindingsafsnittet i Brugervejledningen. Testaa ohjelmiston asennus.
Install Mac software Installer Mac-softwaren Mac-ohjelmiston asentaminen µ Mac Installere Mac-programvare Mac Installera Mac-programvara Mac yazılımını yükleme Mac התקן תוכנת 1 Connect MFP to a Macintosh computer. Connect a USB cable between the MFP and the computer. Tilslut MFP'en til en Macintosh-computer. Tilslut et USB-kabel mellem MFP'en og computeren. Liitä monitoimilaite Macintosh-tietokoneeseen. Liitä laite tietokoneeseen USB-kaapelilla.
2 Place the CD in the CD-ROM drive and run the installer. Complete an “easy” install. Sæt cd'en i cd-rom-drevet, og kør installationsprogrammet. Foretag en nem installation. Aseta CD-levy CD-asemaan ja käynnistä asennusohjelma. Käy läpi helppo asennus. CD µ CD-ROM µµ . µ "" . Sett CD-en i CD-ROM-stasjonen, og kjør installasjonsprogrammet. Fullfør en "enkel" installering.
5 From the Printer Browser window, select the HP printer from the Printer Name section. For Mac OS X v10.4: If HP software is installed, the printer software should be automatically configured. Make sure that the HP Color LaserJet CM4730 MFP model name is selected in the Print Using pull down list. Note: Mac OS X v10.2 and v10.3 might require you to manually select the printer model from the Printer Model drop-down list. I printerbrowser-vinduet skal du vælge HP-printeren i afsnittet Printernavn.
7 Under Model Name, select your device and click Add. Vælg enheden under Modelnavn, og klik derefter på Tilføj. Valitse Model Name (Mallin nimi) - kohdasta laitteesi ja valitse Add (Lisää). Model Name (µ µ), µ Add (). Velg den aktuelle enheten under Modellnavn, og klikk på Legg til. Model Name ( ) Add ().
CM4730f, CM4730fsk, CM4730fm Install the send fax driver (optional) Installer driveren til faxsending (ekstraudstyr) Asenna faksin lähetysajuri (valinnainen) µµ ().
Install send fax driver. A) Insert the software/customer CD that came with the device. B) On the welcome screen, if the printer driver is already installed click Modify Installation, otherwise click Install Printer. The setup wizard appears. C) Choose the “custom installation” option, and select the Send Fax Driver in the installation options. D) Follow the onscreen instructions. Installer driveren til faxsending. A) Isæt software/kunde-cd'en, der fulgte med enheden.
Set up the embedded digital send features for network connection Installer integreret digital sending-funktionerne angående tilslutning til netværk Määritä sulautetun digitaalisen lähetyksen ominaisuudet verkkoliitäntälaitteelle µ µµ Konfigurere de innebygde funksjonene for digital sending for nettverkstilkobling Konfigurera funktionerna för inbäddad digital sändning f
2 Configure the General Settings. A) Open a web browser. B) Input device IP address or hostname (found on the embedded Jetdirect configuration page) in the the URL window. C) Select the Digital Sending tab. D) Complete the information under General Settings: name, address, and other information. Konfigurer de generelle indstillinger. A) Åbn webbrowseren. B) Inputenhedens IP-adresse eller værtsnavnet (findes på konfigurationssiden) i URLvinduet. D) Vælg fanen Digital Sending.
3 Configure E-mail Settings. A) On the left navigation menu, select E-mail Settings. B) Input the SMTP server address, use the default From and Subject fields. Note: If you are using an ISP (Internet Service Provider) for internet access and e-mail, you may need to contact your ISP to obtain the SMTP server name, and to determine if you need to enter an account name and password for SMTP authentication. Konfigurer e-mail-indstillingerne. A) Vælg E-mail-indstillinger i venstre navigationsmenu.
4 Configure E-mail Address Book. A) On the left navigation menu, select E-mail Address Book, to enter frequently-used e-mail addresses and e-mail distribution lists. Note: The Fax Address Book and Fax Speed Dials is also located in the left navigation area. These two features allow you to manage frequently-used fax numbers and speed dial lists. Konfigurer e-mail-adressekartoteket. A) Vælg E-mail Adressekartotek i navigationsmenuen for at angive ofte benyttede e-mail-adresser og email-distributionslister.
5 Configure Send to Folder. A) To scan a document to your PC or network share folder, use the Send To Folder option (on the left navigation bar) to set up one or more folder destinations. For more information on configuring Send to Folder, consult the Embedded Web Server (EWS) User Guide found on the software/customer information CD. Note: See http://www.hp.com/support for more information about the digital send features. Konfigurer Send til mappe.
http://www.hp.com/support http://www.hp.
© 2007 Hewlett-Packard Development Company, L.P. www.hp.