HP Color LaserJet CM4730 MFP CM4730 MFP CM4730f MFP Getting Started Guide Vodič za početak rada Úvodní píručka Alapvet tudnivalók kézikönyve Podrczna instrukcja obsługi Ghid de iniiere Príručka Začíname Navodila za začetek uporabe دليل بدء االستخدام CM4730fsk MFP CM4730fm MFP Read Me First Pročitaj me najprije Čtte jako první Fontos tudnivalók Przeczytaj przed rozpoczciem A se citi mai întâi Úvodné pokyny Ta preberite najprej ً الرجاء قراءة امللف التمهيدي أوال
Copyright and License © 2007 Copyright Hewlett-Packard Development Company, L.P. Reproduction, adaptation or translation without prior written permission is prohibited, except as allowed under the copyright laws. The information contained herein is subject to change without notice. The only warranties for HP products and services are set forth in the express warranty statements accompanying such products and services. Nothing herein should be construed as constituting an additional warranty.
Overview Áttekintés Prehad Pregled Przegld Pregled Pehled Prezentare general نظرة عامة In-box documentation Dokumentacija iz kutije Pibalená dokumentace A csomagban lév dokumentáció Załczona dokumentacja Documentaia din pachet Dodaná dokumentácia Priložena dokumentacija MFP location Položaj višenamjenskog uređaja Umístní zaízení MFP A készülék elhelyezése Umiejscowienie urzdzenia wielofunkcyjnego Amplasarea dispozitivului MFP Umiestnenie zariadenia MFP Postavitev večnamenske n
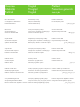
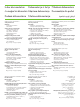
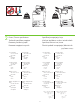
In-box documentation Dokumentacija iz kutije Pibalená dokumentace A csomagban lév dokumentáció Załczona dokumentacja Dodaná dokumentácia Priložena dokumentacija Documentaia din pachet الوثائق املوجودة بالعبوة CM4730 Customer Documentation: Getting Started Guide Wall Poster • Control Panel information • MFP features Software/Customer information CD • Getting Started Guide Video • User Guide • Install Notes • Hp Jet Direct •Fax Guides • Embedded Web Server • Software Drivers HP Digital Sending Softw
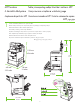
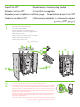
Položaj višenamjenskog uređaja Umístní zaízení MFP MFP location A készülék elhelyezése Umiejscowienie urzdzenia wielofunkcyjnego Amplasarea dispozitivului MFP Umiestnenie zariadenia MFP Postavitev večnamenske naprave MFP موقع جهاز 1 Select a well-ventilated, dust-free area to position the MFP. Izaberite dobro prozračan prostor u kojem nema prašine za postavljanje višenamjenskog uređaja. Zaízení MFP umístte na dobe vtrané bezprašné místo.
136 kg. 298 lbs. 124 kg. 273 lbs. 2 Power/Current specifications Specifikacije napajanja/struje Technické specifikace napájení A hálózati tápellátásra vonatkozó mszaki adatok Parametry zasilania/prdu Specificaii de tensiune/curent Parametre napájania a prúdu Tehnični podatki za napajanje/električni tok التيار/مواصفات الطاقة 110-volt models • 110 to 127 volts • 50/60 Hz Current: • 9.0 Amps • 15 Amps 220-volt models • 220 to 240 volts • 50/60 Hz Current: • 4.
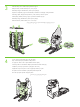
Unpack the MFP Raspakiravanje višenamjenskog uređaja Rozbalení zaízení MFP A készülék kicsomagolása Rozpakowywanie urzdzenia wielofunkcyjnego Despachetarea dispozitivului MFP Vybalenie zariadenia MFP Odstranjevanje embalaže z večnamenske naprave من الصندوقMFP إخراج جهاز 1 Remove the outer box and the packing foam. Uklonite kutiju i zaštitnu ambalažu. Odstrate vnjší krabici a pnový obalový materiál. Vegye le a küls dobozt és a manyag csomagolóelemeket. Zdejmij opakowanie i piank.
3 Install the ramps, remove cardboard, bag and foam supports. Namjestite kosine, uklonite kartonsku ploču, vreću i potpore. Nainstalujte rampy a odstrate kartón, sáček a pnové podpry. Helyezze el a rámpákat, vegye le a kartonborítást, a fóliazsákot és a manyag csomagolóelemeket. Zainstaluj podpórki, zdejmij elementy kartonowe, torb i elementy ochronne z pianki. Instalai rampa, înlturai cartonul, punga şi suporturile din material spongios. Nainštalujte rampy, odstráte kartón, obal a penové podpery.
5 Remove the shipping tape. Uklonite zaštitne trake. Odstrate pepravní pásku. Távolítsa el a rögzítszalagokat. Usu tam zabezpieczajc. Înlturai banda de protecie pentru transport. Odstráte prepravnú pásku. Odstranite zaščitne trakove. .قم بإزالة شريط الشحن 6 Open scanner lid and remove foam. Otvorite poklopac skenera i odstranite zaštitu. Otevete víko skeneru a vyjmte pnu. Nyissa ki a lapolvasó fedelét, és vegye ki a védelemet. Otwórz pokryw skanera i wyjmij piank.
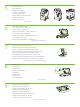
CM4730fsk MFP, CM4730fm MFP Install the optional stapler/stacker or multi-bin mailbox. Namjestite dodatak za spajanje/slaganje ili spremnik sa više ladica. Nainstalujte volitelný stohovač se sešívačkou nebo schránku s více pihrádkami. Szerelje be a választható tartozékot: a tzgépet/leválogatót vagy a többtálcás postaládát. Zainstaluj opcjonaln zszywark/układark lub sortownik wielopojemnikowy. Instalai capsatorul/stivuitorul sau cutia poştal compartimentat opionale.
D Plug accessory cable into the MFP. Priključite kabel dodatka u višenamjenski uređaj. Zapojte kabel píslušenství do zaízení MFP. Csatlakoztassa a tartozék kábelét az MFP-készülékhez. Włó kabel do urzdzenia wielofunkcyjnego. Conectai cablul accesoriului la MFP. Kábel príslušenstva pripojte k zariadeniu MFP. Kabel pripomočka povežite z večnamensko napravo. .
Set up the MFP Postavljanje višenamjenskog uređaja Nastavení zaízení MFP A készülék üzembe helyezése Ustawianie urzdzenia wielofunkcyjnego Instalarea dispozitivului MFP Nastavenie zariadenia MFP Nastavitev večnamenske naprave 1 Change the control panel language overlay (if necessary). Promijenite masku jezika upravljačke ploče (ako je potrebno). Zmte pekryvný segment jazyka na ovládacím panelu (v pípad poteby). Ha szükséges, cserélje ki a kezelpanel ellapját a kívánt nyelvnek megfelelen.
2 Connect a Network cable (optional). Pipojte sít'ový kabel (volitelné). Podłcz kabel sieciowy (opcjonalny). Pripojte siet'ový kábel (volitená možnost'). Spojite mrežni kabel (po izboru). A külön megvásárolható hálózati kábel csatlakoztatása Conectai un cablu de reea (opional). Priključitev omrežnega kabla (po želji). .)قم بتوصيل كبل الشبكة (اختياري • Connect a network cable to the MFP. • Priključite mrežni kabel na višenamjenski uređaj. • Pipojte sít'ový kabel k zaízení MFP.
3 Connect the fax (optional). Spojite faks (po izboru). Pipojte fax (volitelné). A fax csatlakoztatása (választható lehetség) Podłcz faks (opcjonalnie). Conectai faxul (opional). Pripojte fax (volitená možnost'). Priključitev faksa (po želji). .)قم بتوصيل الفاكس (اختياري CM4730f MFP, CM4730fsk MFP, CM4730fm MFP Connect the phone cord to the MFP (optional). Spojite telefonski kabel na višenamjenski uređaj (po izboru). Pipojte telefonní kabel k zaízení MFP (volitelné).
5 Plug in the power cord, turn on the MFP and wait for green ready light. Priključite kabel napajanja, uključite višenamjenski uređaj i pričekajte zelenu žaruljicu pripravnosti. Pipojte napájecí kabel, zapnte zaízení MFP a počkejte, až se rozsvítí zelená kontrolka Pipraveno. Csatlakoztassa a tápkábelt, kapcsolja be a készüléket, és várja meg, hogy kigyulladjon a zöld készenléti fény. Podłcz kabel zasilajcy, włcz urzdzenie wielofunkcyjne i czekaj, a zapali si zielona kontrolka Gotowoć.
6 Set language, date, time, and fax settings (if necessary). If prompted, select your language, the date, and the time. Follow the instructions on the control panel touch screen. Postavite jezik, datum, vrijeme i postavke faksa (ako je potrebno). Po potrebi izaberite jezik, datum i vrijeme. Slijedite upute na dodirnom zaslonu upravljačke ploče. Nastavte jazyk, datum, čas a nastavení faxu (v pípad poteby). Po zobrazení výzvy vyberte píslušný jazyk, datum a čas.
8 Adjust the paper guide(s). Podesite vodilice za papir. Nastavte vodítka papíru. Állítsa be a megfelel helyzetbe a papírterel(ke)t. Wyrównaj prowadnice papieru. Reglai ghidajele pentru hârtie. Upravte lištu (lišty) na papier. Prilagodite vodili za papir. .قم مبحاذاة موجه (موجهات) الورق NOTE: For tray media auto sensing information, refer to the User Guide. NAPOMENA: Za informacije o automatskom prepoznavanju medija u ladici pogledajte Korisnički vodič.
11 Verify functionality by printing a configuration page. From the control panel, A) scroll to and touch Administration. B) Touch Information. C) Touch Configuration Status Pages. D) Touch Configuration Page. E) Touch Print. If you are connected using a network cable, the IP address will be on the Jetdirect page, under “TCP/IP”. Note: You might need to assign an IP address depending on the type of network that is installed. See “Configure an IP address (if necessary)” on the next page, for more information.
12 Configure the IP address (if the IP address shows 192.0.0.192 or 169.254.x.x). A) On the control panel, scroll to and touch Administration. B) Scroll to and touch Initial Setup, and then touch Networking and I/O. C) Touch Embedded Jetdirect, TCP/IP and IPV4 Settings. D) Touch Config Method, set to Manual, and touch Save. E) Touch Manual Settings, and then enter the IP Address, Subnet Mask, and Default Gateway. Konfiguriranje IP adrese (ako IP adresa prikazuje 192.0.0.192 ili 169.254.x.x).
13 Verify copy. Place configuration page, print side-up, in the ADF (Automatic Document Feeder), and press the Start button. The ADF will automatically feed the paper through the scanner and the copied page will be ejected into the output bin. Provjera kopiranja. Položite konfiguracijsku stranicu sa stranom za ispis prema gore u ADF (Automatski ulagač dokumenata) i pritisnite gumb Start. ADF će automatski umetnuti papir kroz skener te će kopirana stranica biti izbačena u ulaznu ladicu. Ovte kopírování.
Install Windows software Instalace softwaru pro systém Windows Instalowanie oprogramowania dla systemu Windows Inštalácia softvéru v systéme Windows Instaliranje softvera za Windows A szoftver telepítése Windows rendszerre Instalarea software-ului pentru Windows Nameščanje programske opreme za OS Windows Windows تثبيت برامج Note: Do not connect a USB or parallel cable until prompted during the software installation.
1 Install software. A) Insert the Software/Customer CD that came with the printer. B) At the welcome screen, click Install. The Setup Wizard appears. C) If installing a fax driver (send fax from the computer) click on “custom” install. If not installing fax driver, click on “basic” install. D) Follow the on screen instructions. Note: If the welcome screen does not appear, click Start and then click Run. Type X:SETUP, where X corresponds to the CD-ROM drive letter, and then click OK. E) Click Finish.
2 Test the software installation. Print a page from any program to make sure that the software is correctly installed. Note: If the installation failed, reinstall the software or see the troubleshooting section in the User Guide. Isprobavanje softverske instalacije. Ispišite stranicu iz bilo kojeg programa kako bi se uvjerili da je softver ispravno instaliran. Napomena: Ako instalacija nije uspjela, ponovno instalirajte softver ili pogledajte odjeljak rješavanja problema Korisničkom vodiču.
Install Mac software Instaliranje softvera za Mac Instalace softwaru pro systém Mas OS A szoftver telepítése Mac rendszerre Instalowanie oprogramowania dla komputerów Macintosh Instalarea software-ului pentru Mac Inštalácia softvéru v systéme Mac Nameščanje programske opreme za OS Mac Mac تثبيت برامج 1 Connect MFP to a Macintosh computer. Connect a USB cable between the MFP and the computer. Spajanje višenamjenskog uređaja na Macintosh računalo.
2 Place the CD in the CD-ROM drive and run the installer. Complete an “easy” install. Umetnite CD u CD-ROM pogon i pokrenite instalaciju. Dovršite "easy (jednostavnu)" instalaciju. Vložte disk CD do jednotky CD-ROM a spust'te instalační program. Dokončete jednoduchou instalaci. Helyezze a CD-t a meghajtóba, és futtassa a telepítprogramot. Hajtson végre „easy” (Egyszer) telepítést. Włó dysk CD do napdu CD-ROM i uruchom instalatora. Wykonaj instalacj prost.
5 From the Printer Browser window, select the HP printer from the Printer Name section. For Mac OS X v10.4: If HP software is installed, the printer software should be automatically configured. Make sure that the HP Color LaserJet CM4730 MFP model name is selected in the Print Using pull down list. Note: Mac OS X v10.2 and v10.3 might require you to manually select the printer model from the Printer Model drop-down list.
7 Under Model Name, select your device and click Add. Pod Model Name (Naziv modela) izaberite vaš uređaj i kliknite Add (Dodaj). V nastavení Název modelu vyberte píslušné zaízení a klepnte na tlačítko Pidat. A Model Name (Modellnév) felirat alatt válassza ki készülékét, majd kattintson az Add (Hozzáadás) parancsra. Z listy Model Name (Nazwa modelu) wybierz urzdzenie i kliknij przycisk Add (Dodaj). La Model Name (Nume model), selectai dispozitivul dvs. şi facei clic pe Add (Adugare).
CM4730f, CM4730fsk, CM4730fm Install the send fax driver (optional) Instalacija upravljačkog programa faksa (po izboru) Instalace ovladače pro odesílání fax (volitelné) A faxillesztprogram telepítése (választható lehetség) Instalowanie sterownika wysyłania faksów (opcjonalnie) Instalarea driverului pentru trimiterea faxurilor (opional) Inštalácia ovládača na odosielanie faxov (volitená možnost') Namestitev gonilnika za pošiljanje faksov (po želji) )تثبيت برنامج تشغيل إرسال الفاكس (اختياري Windows onl
Install send fax driver. A) Insert the software/customer CD that came with the device. B) On the welcome screen, if the printer driver is already installed click Modify Installation, otherwise click Install Printer. The setup wizard appears. C) Choose the “custom installation” option, and select the Send Fax Driver in the installation options. D) Follow the onscreen instructions. Instaliranje upravljačkog programa faksa. A) Umetnite softverski/korisnički CD-ROM priložen uz pisač.
Set up the embedded digital send features for network connection Postavljanje ugrađenih značajki digitalnog slanja za mrežne veze Nastavení funkce integrovaného digitálního odesílání pro sít'ové pipojení A beépített digitális küldési funkció beállítása hálózati kapcsolathoz Konfigurowanie wbudowanej funkcji dystrybucji cyfrowej dla połczenia sieciowego Instalarea caracteristicilor de trimitere digital încorporat pentru conexiunea de reea Nastavenie funkcie zabudovaného digitálneho odosielania pri siet'
2 Configure the General Settings. A) Open a web browser. B) Input device IP address or hostname (found on the embedded Jetdirect configuration page) in the the URL window. C) Select the Digital Sending tab. D) Complete the information under General Settings: name, address, and other information. Konfiguracija Općih postavki. A) Otvorite web preglednik. B) Unesite IP adresu uređaja ili ime glavnog računala (hostname) (pronađen na konfiguracijskoj stranici ugrađenog Jetdirect) u prozoru URL-a.
3 Configure E-mail Settings. A) On the left navigation menu, select E-mail Settings. B) Input the SMTP server address, use the default From and Subject fields. Note: If you are using an ISP (Internet Service Provider) for internet access and e-mail, you may need to contact your ISP to obtain the SMTP server name, and to determine if you need to enter an account name and password for SMTP authentication. Konfiguriranje postavki e-pošte.
4 Configure E-mail Address Book. A) On the left navigation menu, select E-mail Address Book, to enter frequently-used e-mail addresses and e-mail distribution lists. Note: The Fax Address Book and Fax Speed Dials is also located in the left navigation area. These two features allow you to manage frequently-used fax numbers and speed dial lists. Konfiguriranje E-poštnog adresara.
5 Configure Send to Folder. A) To scan a document to your PC or network share folder, use the Send To Folder option (on the left navigation bar) to set up one or more folder destinations. For more information on configuring Send to Folder, consult the Embedded Web Server (EWS) User Guide found on the software/customer information CD. Note: See http://www.hp.com/support for more information about the digital send features. Konfiguriranje Slanja u mapu.
http://www.hp.com/support http://www.hp.
© 2007 Hewlett-Packard Development Company, L.P. www.hp.