HP LaserJet P4010 and P4510 Series Printers Getting Started Guide Opsætningsvejledning Alustusjuhend Aloitusopas Lietošanas pamācība Darbo pradžios vadovas Komme i gang Starthandbok
Copyright and License © 2008 Copyright Hewlett-Packard Development Company, L.P. Reproduction, adaptation or translation without prior written permission is prohibited, except as allowed under the copyright laws. The information contained herein is subject to change without notice. The only warranties for HP products and services are set forth in the express warranty statements accompanying such products and services. Nothing herein should be construed as constituting an additional warranty.
Hardware setup................................................................................................................................. 2 Software setup Windows USB....................................................................................................................... 9 Windows Network................................................................................................................. 14 Macintosh USB.........................................................................
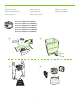
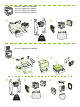
1 Unpack the product. Pak produktet ud. Pakkige toode lahti. Poista laite pakkauksesta. Izpakojiet printeri. Išpakuokite produktą. Pakk ut produktet. Packa upp produkten. HP LaserJet P4014 Printer (CB506A) HP LaserJet P4014n Printer (CB507A) HP LaserJet P4014dn Printer (CB512A) HP LaserJet P4015n Printer (CB509A) HP LaserJet P4015dn Printer (CB526A) HP LaserJet P4515n Printer (CB514A) 1 2 3 4 23.
HP LaserJet P4015tn Printer (CB510A) HP LaserJet P4015x Printer (CB511A) HP LaserJet P4515tn Printer (CB515A) HP LaserJet P4515x Printer (CB516A) 1 2 3 23.5 kg 52 lb HP LaserJet P4515xm Printer (CB517A) 1 2 4 3 5 6 25.
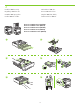
2 Select a sturdy, well-ventilated, dust-free area to position the product. Vælg et solidt, velventileret, støvfrit område til enheden. Valige seadme paigutuseks paindumatu, hea ventilatsiooniga ja tolmuvaba ala. Valitse laitteelle tukeva, ilmastoitu ja pölytön paikka. Novietojiet ierīci stabilā, labi ventilētā vietā, kur nav putekļu. Produktui parinkite tvirtą, gerai vėdinamą vietą be dulkių. Plasser produktet på et stabilt, godt ventilert og støvfritt sted.
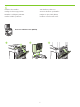
3 Install the 500-sheet tray. Sæt bakken til 500 ark i. Paigaldage 500 lehe salv. Asenna 500 arkin lokero. Uzstādiet 500 lapu padevi. Įstatykite 500 lakštų dėklą. Installer 500-arks skuffen. Installera fack för 500 ark.
4 Remove the packing material. Fjern emballagen. Eemaldage pakkematerjal. Irrota pakkausmateriaali. Noņemiet iepakojuma materiālu. Nuimkite pakuotės medžiagą. Fjern emballasjen. Ta bort förpackningsmaterialet.
5 Load paper. Læg papir i. Laadige paber. Aseta paperia. Ievietojiet papīru. Įdėkite popieriaus. Legg i papir. Fyll på papper.
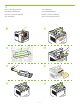
6 Install the 5-bin mailbox. Sæt 5-bakkers postkassen i. Installige 5-sektsiooniga postkast. Asenna 5-alustainen postilaatikko. Uzstādiet 5 nodalījumu pastkastīti. Įstatykite 5 skyrių laiškų dėžutę. Installer 5-skuffers postkassen. Installera sorteraren med 5 fack.
For USB connections, go to page 9. USB-tilslutning, gå til side 9. USB-ühenduste puhul vt lk 9. USB-liitännät: siirry sivulle 9. Lai izveidotu USB savienojumus, pārejiet uz 9. lappusi. Norėdami gauti informacijos apie USB prijungimą, pereikite prie 9 psl. For USB-tilkoblinger gå til side 9. För USB-anslutningar, gå till sidan 9. For network connections, go to page 14. Netværkstilslutning: Gå til side 14. Võrguühenduste puhul vt lk 14. Verkkoliitännät: siirry sivulle 14.
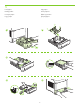
7 USB connection USB-tilslutning USB-ühendus USB-liitäntä USB savienojums USB prijungimas USB-tilkobling USB-anslutning Caution! Do not connect USB now. Wait until the software prompts you. Advarsel! USB-kablet må ikke tilsluttes endnu. Vent, til du bliver bedt om at gøre det. Ettevaatust! Ärge USB-d praegu ühendage. Oodake tarkvara viipa. Muistutus! Älä liitä USB-kaapelia nyt. Odota, kunnes ohjelmisto kehottaa siihen. Uzmanību! Pagaidām nepievienojiet USB kabeli.
8 Connect the power, and turn on the product. If the duplexer is installed (CB511A, CB512A, CB516A, CB517A, and CB526A), pull it out so you can connect the power cord, and then push the duplexer in. Tilslut netledningen, og tænd for produktet. Hvis dupleksenheden er installeret (CB511A, CB512A, CB516A, CB517A og CB526A), skal du trække den ud, så du kan tillslutte strømkablet. Skub den derefter ind igen. Ühendage seade vooluvõrku ja lülitage sisse.
9 On the control panel, if prompted, press Press OK to accept selections. to select a language, the date, and the time for the product. Hvis du bliver bedt om det, skal du på kontrolpanelet trykke på for produktet. Tryk på OK for at godkende dine valg. Nõudmisel vajutage juhtpaneelil for at vælge sprog, dato og klokkeslæt , et valida tootele keel, kuupäev ja kellaaeg. Valikute kinnitamiseks vajutage OK.
10 Quit all programs on the computer. Install the software from the CD. Follow the onscreen instructions. When prompted, select Connected directly to this computer, and then click Next. Do not connect the USB cable until the Looking for new hardware screen appears. At the end of the installation, click Finish. If prompted, restart the computer. Afslut alle programmer på computeren. Installer softwaren fra den medfølgende cd. Følg vejledningen på skærmen.
Windows USB setup is complete. For more information about the following topics, see the electronic User Guide on the CD-ROM or go to: www.hp.com/support/hpljp4010series or www.hp.com/support/hpljp4510series. • Detailed user instructions. • Important safety notices. • Troubleshooting information. • Regulatory information. Windows-USB-opsætning er fuldført. Yderligere oplysninger om følgende emner finder du i den elektroniske brugervejledning på cd-rom'en eller på adressen: www.hp.
7 Network connection. Connect the network cable to the product and to the network. Netværkstilslutning. Slut netværkskablet og printeren til netværket. Võrguühendus. Ühendage võrgukaabel toote ja võrguga. Verkkoliitäntä. Liitä verkkokaapeli laitteeseen ja verkkoon. Tīkla savienojums. Savienojiet tīkla kabeli ar printeri un tīklu. Prisijungimas prie tinklo. Prijunkite tinklo kabelį prie produkto ir prie tinklo. Nettverkstilkobling. Koble nettverkskabelen til produktet og til nettverket. Nätverksanslutning.
8 Connect the power, and turn on the product. If the duplexer is installed (CB511A, CB512A, CB516A, CB517A, and CB526A), pull it out so you can connect the power cord, and then push the duplexer in. Tilslut netledningen, og tænd for produktet. Hvis dupleksenheden er installeret (CB511A, CB512A, CB516A, CB517A og CB526A), skal du trække den ud, så du kan tillslutte strømkablet. Skub den derefter ind igen. Ühendage seade vooluvõrku ja lülitage sisse.
9 On the control panel, if prompted, press to select a language, the date, and the time for the product. Press OK to accept selections. After Ready appears on the display, wait 30 seconds. Hvis du bliver bedt om det, skal du på kontrolpanelet trykke på for at vælge sprog, dato og klokkeslæt for produktet. Tryk på OK for at godkende dine valg. Når Klar vises på displayet, skal du vente i 30 sekunder. Nõudmisel vajutage juhtpaneelil , et valida tootele keel, kuupäev ja kellaaeg.
10 Find the IP address by printing a Configuration page. At the product control panel, press Menu , press to highlight INFORMATION and then press OK. Press to highlight PRINT CONFIGURATION and then press OK. Find IP-adressen ved at udskrive en konfigurationsside. Tryk på Menu på produktets kontrolpanel, tryk på for at fremhæve OPLYSNINGER, og tryk derefter på OK. Tryk på for at fremhæve UDSKRIV KONFIGURATION, og tryk derefter på OK. IP-aadressi tuvastamiseks printige konfiguratsioonileht.
11 If the Configuration page lists the IP address as 169.254.X.X, you must manually assign the address. See the User Guide on the product CD-ROM for advanced network-configuration instructions. They are in the chapter called Connectivity. Hvis IP-adressen vises som 169.254.X.X på konfigurationssiden, skal du manuelt tildele adressen. Se i brugervejledningen på produkt-cd'en for at få en vejledning i avanceret netværkskonfiguration. Den findes i kapitlet Tilslutning.
12 Quit all open programs on the print server or on each computer that will share the product. Install the software from the CD. Follow the onscreen instructions. When prompted, select Connected to the Network, and then click Next. The installer shows the available printers. Select the printer that has the appropriate IP address. Click Finish. If prompted, restart the computer. Afslut alle åbne programmer på printerserveren og på alle de computere, der udskriver på printeren.
Windows network setup is complete. For more information about the following topics, see the electronic User Guide on the CD-ROM or go to: www.hp.com/support/hpljp4010series or www.hp.com/support/hpljp4510series. • Detailed user instructions. • Important safety notices. • Troubleshooting information. • Regulatory information. Windows-netværksopsætning er fuldført. Yderligere oplysninger om følgende emner finder du i den elektroniske brugervejledning på cd-rom'en eller på adressen: www.hp.
7 USB connection Caution! Do not connect USB now. USB-tilslutning Advarsel! USB-kablet må ikke tilsluttes endnu. USB-ühendus Ettevaatust! Ärge USB-d praegu ühendage. USB-liitäntä Muistutus! Älä liitä USB-kaapelia nyt. USB savienojums Uzmanību! Pagaidām nepievienojiet USB kabeli. USB prijungimas Atsargiai! Dabar neprijunkite USB. USB-tilkobling Forsiktig! Ikke koble til USB nå. USB-anslutning Varning! Anslut inte USB ännu.
8 Connect the power, and turn on the product. If the duplexer is installed (CB511A, CB512A, CB516A, CB517A, and CB526A), pull it out so you can connect the power cord, and then push the duplexer in. Tilslut netledningen, og tænd for produktet. Hvis dupleksenheden er installeret (CB511A, CB512A, CB516A, CB517A og CB526A), skal du trække den ud, så du kan tillslutte strømkablet. Skub den derefter ind igen. Ühendage seade vooluvõrku ja lülitage sisse.
9 On the control panel, if prompted, press to select a language, the date, and the time for the product. Press OK to accept selections. After Ready appears on the display, wait 30 seconds. Hvis du bliver bedt om det, skal du på kontrolpanelet trykke på for at vælge sprog, dato og klokkeslæt for produktet. Tryk på OK for at godkende dine valg. Når Klar vises på displayet, skal du vente i 30 sekunder. Nõudmisel vajutage juhtpaneelil , et valida tootele keel, kuupäev ja kellaaeg.
10 Install the software from the CD. Complete the Easy Install. Click Quit when the installation is finished. Installer softwaren fra den medfølgende cd. Fuldfør Almindelig installering. Klik på Afslut, når installationen er gennemført. Installige CD-lt tarkvara. Viige lõpule Easy Install (Lihtne install). Installi lõppemisel klõpsake Quit (Välju). Asenna ohjelmisto CD-levyltä. Suorita Helppo asennus. Kun asennus on valmis, valitse Sulje. Instalējiet programmatūru no kompaktdiska.
OS X V10.2.8 12 On the computer hard drive, open Applications, open Utilities, and then open Print Center. If the product name displays in the printer list, go to step 13. Otherwise, click Add or +, and then select USB from the drop-down list. Select the product name from the printer list. Åbn Programmer på computerens harddisk, åbn Hjælpeprogrammer, og åbn derefter Printercentral. Hvis produktnavnet vises på printerlisten, skal du gå til trin 13.
OS X V10.3, V10.4 At the computer, open the Apple menu and click System Preferences and then click Print & Fax. If the product name appears in the printer list, go to step 13. Otherwise, click Add or +, and then select Default Browser or Default. Select the product name from the printer list. Åbn Apple-menuen på computeren, og klik på Systemindstillinger. Klik derefter på Udskriv & fax. Hvis produktnavnet vises på printerlisten, skal du gå til trin 13.
13 Configure the product software to recognize the installed accessories. Click Add. The Installable Options dialog box appears. Select the product options that you are using. Konfigurer produktsoftwaren, så den genkender det installerede ekstraudstyr. Klik på Tilføj. Dialogboksen Installerbart ekstraudstyr vises. Marker de produktindstillinger, du bruger. Konfigureerige toote tarkvara nii, et see suudaks tuvastada installitud lisatarvikuid. Klõpsake Add (Lisa).
Macintosh USB setup is complete. For more information about the following topics, see the electronic User Guide on the CD-ROM or go to: www.hp.com/support/hpljp4010series or www.hp.com/support/hpljp4510series. • Detailed user instructions. • Important safety notices. • Troubleshooting information. • Regulatory information. Macintosh-USB-opsætning er fuldført. Yderligere oplysninger om følgende emner finder du i den elektroniske brugervejledning på cd-rom'en eller på adressen: www.hp.
7 Network connection. Connect the network cable to the product and to the network. Netværkstilslutning. Slut netværkskablet og printeren til netværket. Võrguühendus. Ühendage võrgukaabel toote ja võrguga. Verkkoliitäntä. Liitä verkkokaapeli laitteeseen ja verkkoon. Tīkla savienojums. Savienojiet tīkla kabeli ar printeri un tīklu. Prisijungimas prie tinklo. Prijunkite tinklo kabelį prie produkto ir prie tinklo. Nettverkstilkobling. Koble nettverkskabelen til produktet og til nettverket. Nätverksanslutning.
8 Connect the power, and turn on the product. If the duplexer is installed (CB511A, CB512A, CB516A, CB517A, and CB526A), pull it out so you can connect the power cord, and then push the duplexer in. Tilslut netledningen, og tænd for produktet. Hvis dupleksenheden er installeret (CB511A, CB512A, CB516A, CB517A og CB526A), skal du trække den ud, så du kan tillslutte strømkablet. Skub den derefter ind igen. Ühendage seade vooluvõrku ja lülitage sisse.
9 On the control panel, if prompted, press to select a language, the date, and the time for the product. Press OK to accept selections. After Ready appears on the display, wait 30 seconds. Hvis du bliver bedt om det, skal du på kontrolpanelet trykke på for at vælge sprog, dato og klokkeslæt for produktet. Tryk på OK for at godkende dine valg. Når Klar vises på displayet, skal du vente i 30 sekunder. Nõudmisel vajutage juhtpaneelil , et valida tootele keel, kuupäev ja kellaaeg.
10 Find the IP address by printing a Configuration page. At the product control panel, press Menu , press to highlight INFORMATION and then press OK. Press to highlight PRINT CONFIGURATION and then press OK. Find IP-adressen ved at udskrive en konfigurationsside. Tryk på Menu på produktets kontrolpanel, tryk på for at fremhæve OPLYSNINGER, og tryk derefter på OK. Tryk på for at fremhæve UDSKRIV KONFIGURATION, og tryk derefter på OK. IP-aadressi tuvastamiseks printige konfiguratsioonileht.
1 1 If the Configuration page lists the IP address as 169.254.X.X, you must manually assign the address. See the User Guide on the product CD-ROM for advanced network-configuration instructions. They are in the chapter called Connectivity. Hvis IP-adressen vises som 169.254.X.X på konfigurationssiden, skal du manuelt tildele adressen. Se i brugervejledningen på produkt-cd'en for at få en vejledning i avanceret netværkskonfiguration. Den findes i kapitlet Tilslutning.
12 Quit all open programs on the print server or on each computer that will share the product. Install the software from the CD. Complete the Easy Install. Click Quit when the installation is finished. Afslut alle åbne programmer på printerserveren og på alle de computere, der udskriver på printeren. Installer softwaren fra den medfølgende cd. Fuldfør Almindelig installering. Klik på Afslut, når installationen er gennemført.
OS X V10.2.8 13 On the computer hard drive, open Applications, open Utilities, and then open Print Center. Click Add. From the drop-down list, select the connection type. Rendezvous: Select the product from the list. Select the printer model if one is not already selected. IP Printing: Enter the IP address for the product. Select the printer model if one is not already selected. Åbn Programmer på computerens harddisk, åbn Hjælpeprogrammer, og åbn derefter Printercentral. Klik på Tilføj.
OS X V10.3, V10.4 At the computer, open the Apple menu and click System Preferences and then click Print & Fax. Click Add or +, and then select the connection type. Default Browser: Select the product from the list. From the Print Using drop-down list, select the printer model if one is not already selected. IP Printer: From the Protocol drop-down list, select HP Jetdirect – Socket. Enter the IP address for the product.
Kompiuteryje atidarykite meniu „Apple“, spustelėkite „System Preferences“ (sistemos parinktys), o tada spustelėkite „Print & Fax“ (spausdinti ir siųsti faksu). Spustelėkite „Add“ (pridėti) arba +, o tada pasirinkite sujungimo tipą. Numatytoji naršyklė: Pasirinkite produktą iš sąrašo. Iš išskleidžiamojo sąrašo „Print Using“ (spausdinti naudojant) pasirinkite spausdintuvo modelį, jei dar nepasirinkote.
14 OS X V10.3, V10.4 Configure the product software to recognize the installed accessories. Click Add. The Installable Options dialog box appears. Select the product options that you are using. Konfigurer produktsoftwaren, så den genkender det installerede ekstraudstyr. Klik på Tilføj. Dialogboksen Installerbart ekstraudstyr vises. Marker de produktindstillinger, du bruger. Konfigureerige toote tarkvara nii, et see suudaks tuvastada installitud lisatarvikuid. Klõpsake Add (Lisa).
Macintosh network setup is complete. For more information about the following topics, see the electronic User Guide on the CD-ROM or go to: www.hp.com/support/hpljp4010series or www.hp.com/support/hpljp4510series. • Detailed user instructions. • Important safety notices. • Troubleshooting information. • Regulatory information. Macintosh-netværksopsætning er fuldført. Yderligere oplysninger om følgende emner finder du i den elektroniske brugervejledning på cd-rom'en eller på adressen: www.hp.
© 2008 Hewlett-Packard Development Company, L.P. www.hp.