HP LaserJet P4010 and P4510 Series Printers Getting Started Guide Vodič za početak rada Příručka Začínáme Bevezetés a termék használatába Podręczna instrukcja obsługi Ghid de iniţiere Priručnik za početak rada Príručka na začiatok práce Priročnik za začetek uporabe
Copyright and License © 2008 Copyright Hewlett-Packard Development Company, L.P. Reproduction, adaptation or translation without prior written permission is prohibited, except as allowed under the copyright laws. The information contained herein is subject to change without notice. The only warranties for HP products and services are set forth in the express warranty statements accompanying such products and services. Nothing herein should be construed as constituting an additional warranty.
Hardware setup................................................................................................................................. 2 Software setup Windows USB....................................................................................................................... 9 Windows Network................................................................................................................. 14 Macintosh USB.........................................................................
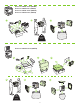
1 Unpack the product. Raspakirajte proizvod. Vybalte zařízení. Csomagolja ki a készüléket. Rozpakuj urządzenie. Despachetaţi produsul. Raspakujte proizvod. Produkt rozbaľte. Napravo vzemite iz embalaže. HP LaserJet P4014 Printer (CB506A) HP LaserJet P4014n Printer (CB507A) HP LaserJet P4014dn Printer (CB512A) HP LaserJet P4015n Printer (CB509A) HP LaserJet P4015dn Printer (CB526A) HP LaserJet P4515n Printer (CB514A) 1 2 3 4 23.
HP LaserJet P4015tn Printer (CB510A) HP LaserJet P4015x Printer (CB511A) HP LaserJet P4515tn Printer (CB515A) HP LaserJet P4515x Printer (CB516A) 1 2 3 23.5 kg 52 lb HP LaserJet P4515xm Printer (CB517A) 1 2 4 3 5 6 25.
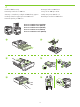
2 Select a sturdy, well-ventilated, dust-free area to position the product. Za postavljanje proizvoda odaberite čvrstu, prozračnu površinu na kojoj nema prašine. Zařízení umístěte na pevnou plochu v dobře odvětrávané a bezprašné oblasti. Válasszon stabil, jól szellőző, pormentes helyet a készülék számára. Urządzenie należy umieścić w pomieszczeniu o dobrej wentylacji i wolnym od kurzu. Alegeţi o suprafaţă solidă aflată într-un loc bine ventilat şi ferit de praf pentru a amplasa produsul.
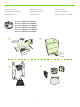
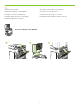
3 Install the 500-sheet tray. Montirajte ladice za 500 listova. Nainstalujte zásobník na 500 listů. Szerelje fel az 500 lapos tálcát. Zamontuj w urządzeniu podajnik na 500 arkuszy papieru. Instalaţi tava pentru 500 de coli. Instalirajte ležišta za papir kapaciteta 500 listova. Nainštalujte zásobník na 500 hárkov. Namestite pladenj za 500 listov.
4 Remove the packing material. Uklonite ambalažu. Odstraňte balicí materiál. Távolítsa el a csomagolóanyagot. Usuń materiały opakowaniowe. Îndepărtaţi ambalajul. Uklonite pakovanje u kome ste dobili proizvod. Odstráňte baliaci materiál. Odstranite embalažo.
5 Load paper. Umetnite papir. Vložte papír. Töltsön be papírt. Włóż papier. Încărcaţi hârtie. Umetnite papir. Vložte papier. Naložite papir.
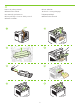
6 Install the 5-bin mailbox. Montirajte izlazni sandučić s 5 pretinaca. Nainstalujte schránku s 5 přihrádkami. Szerelje fel az 5 tálcás szortert. Zainstaluj sortownik 5-pojemnikowy. Instalaţi caseta de mesaje cu 5 sertare. Instalirajte držač za papir sa 5 pregrada. Nainštalujte 5-priehradkovú schránku na poštu. Namestite nabiralnik s 5 predali.
For USB connections, go to page 9. Za USB vezu idite na stranicu 9. Informace o připojení USB najdete na straně 9. USB-kapcsolat esetén lásd a 9. oldalt. W celu uzyskania informacji na temat połączenia USB przejdź do strony 9. Pentru conexiuni USB, deplasaţi-vă la pagina 9. Pri pripojení cez rozhranie USB prejdite na stranu 9. Za USB vezu, idite na stranicu 9. Za povezave USB pojdite na 9. stran. For network connections, go to page 14. Za mrežne veze idite na stranicu 14.
7 USB connection Spajanje putem USB kabela Připojení USB USB-kábeles kapcsolat Połączenie USB Conexiunea USB USB veza Pripojenie cez rozhranie USB Povezava USB Caution! Do not connect USB now. Wait until the software prompts you. Oprez! Nemojte sad priključivati USB kabel. Pričekajte dok se u softveru ne pojavi odzivnik. Pozor! Zatím nepřipojujte kabel USB. Počkejte, až software zobrazí výzvu. Figyelem! Ne most csatlakoztassa az USB-t. Várjon, míg a szoftver kéri.
8 Connect the power, and turn on the product. If the duplexer is installed (CB511A, CB512A, CB516A, CB517A, and CB526A), pull it out so you can connect the power cord, and then push the duplexer in. Priključite proizvod na izvor napajanja te ga uključite. Ako je umetnut dodatak za obostrani ispis (CB511A, CB512A, CB516A, CB517A i CB526A), izvucite ga kako biste mogli priključiti kabel napajanja, a zatim ga ponovo gurnite na mjesto. Připojte napájecí kabel a zapněte zařízení.
9 On the control panel, if prompted, press Press OK to accept selections. to select a language, the date, and the time for the product. Kada to bude zatraženo, na upravljačkoj ploči pritisnite proizvod. Pritisnite OK za prihvaćanje odabira. za odabir jezika, datuma i vremena za Při výzvě vyberte na ovládacím panelu jazyk, datum a čas zařízení stisknutím tlačítka tlačítka OK. .
10 Quit all programs on the computer. Install the software from the CD. Follow the onscreen instructions. When prompted, select Connected directly to this computer, and then click Next. Do not connect the USB cable until the Looking for new hardware screen appears. At the end of the installation, click Finish. If prompted, restart the computer. Zatvorite sve programe na računalu. Instalirajte programe s CD-a. Slijedite upute na zaslonu.
Windows USB setup is complete. For more information about the following topics, see the electronic User Guide on the CD-ROM or go to: www.hp.com/support/hpljp4010series or www.hp.com/support/hpljp4510series. • Detailed user instructions. • Important safety notices. • Troubleshooting information. • Regulatory information. Postavljanje USB veze u sustavu Windows je dovršeno. Više informacija o sljedećim temama potražite u elektroničkom korisničkom priručniku na CD-ROM-u ili idite na: www.hp.
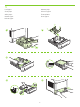
7 Network connection. Connect the network cable to the product and to the network. Mrežna veza. Mrežni kabel priključite na uređaj i na mrežu. Připojení k síti. Síťový kabel připojte k produktu a k síti. Hálózati kapcsolat Csatlakoztassa a hálózati kábelt a készülékhez és a hálózathoz. Połączenie sieciowe. Podłącz kabel sieciowy do produktu i do sieci. Conexiune de reţea. Conectaţi cablul de reţea la produs şi la reţea. Mrežna veza. Priključite mrežni kabl na uređaj i mrežu. Sieťové pripojenie.
8 Connect the power, and turn on the product. If the duplexer is installed (CB511A, CB512A, CB516A, CB517A, and CB526A), pull it out so you can connect the power cord, and then push the duplexer in. Priključite proizvod na izvor napajanja te ga uključite. Ako je umetnut dodatak za obostrani ispis (CB511A, CB512A, CB516A, CB517A i CB526A), izvucite ga kako biste mogli priključiti kabel napajanja, a zatim ga ponovo gurnite na mjesto. Připojte napájecí kabel a zapněte zařízení.
9 On the control panel, if prompted, press to select a language, the date, and the time for the product. Press OK to accept selections. After Ready appears on the display, wait 30 seconds. Kada to bude zatraženo, na upravljačkoj ploči pritisnite za odabir jezika, datuma i vremena za proizvod. Pritisnite OK za prihvaćanje odabira. Nakon što se na zaslonu prikaže Ready (Spreman), pričekajte 30 sekundi. Při výzvě vyberte na ovládacím panelu jazyk, datum a čas zařízení stisknutím tlačítka tlačítka OK.
10 Find the IP address by printing a Configuration page. At the product control panel, press Menu , press to highlight INFORMATION and then press OK. Press to highlight PRINT CONFIGURATION and then press OK. Potražite IP adresu ispisivanjem stranice konfiguracije. Na upravljačkoj ploči proizvoda pritisnite Izbornik , pritisnite kako biste označili INFORMATION (Informacije), a zatim pritisnite OK. Pritisnite kako biste označili PRINT CONFIGURATION (Konfiguracija ispisa), a zatim pritisnite OK.
11 If the Configuration page lists the IP address as 169.254.X.X, you must manually assign the address. See the User Guide on the product CD-ROM for advanced network-configuration instructions. They are in the chapter called Connectivity. Ako se na stranici s konfiguracijom ispišu IP adrese, kao što je 169.254.X.X, morate ručno dodijeliti adresu. Dodatne upute za mrežnu konfiguraciju potražite u korisničkom vodiču na CD-ROM-u isporučenom uz proizvod. Nalaze se u poglavlju naslovljenom Povezivost.
12 Quit all open programs on the print server or on each computer that will share the product. Install the software from the CD. Follow the onscreen instructions. When prompted, select Connected to the Network, and then click Next. The installer shows the available printers. Select the printer that has the appropriate IP address. Click Finish. If prompted, restart the computer. Zatvorite sve otvorene programe na ispisnom poslužitelju ili će svako računalo moći koristiti uređaj.
Windows network setup is complete. For more information about the following topics, see the electronic User Guide on the CD-ROM or go to: www.hp.com/support/hpljp4010series or www.hp.com/support/hpljp4510series. • Detailed user instructions. • Important safety notices. • Troubleshooting information. • Regulatory information. Postavljanje mrežne veze u sustavu Windows je dovršeno. Više informacija o sljedećim temama potražite u elektroničkom korisničkom priručniku na CD-ROM-u ili idite na: www.hp.
7 USB connection Caution! Do not connect USB now. Spajanje putem USB kabela Oprez! Nemojte sad priključivati USB kabel. Přípojka USB Pozor! Zatím nepřipojujte kabel USB. USB-kábeles kapcsolat Figyelem! Ne most csatlakoztassa az USB-t. Połączenie USB Uwaga! W tym momencie nie podłączaj kabla USB. Conexiunea USB Precauţie! Nu conectaţi acum cablul USB. USB veza Oprez! Nemojte odmah povezati USB kabl. Pripojenie cez rozhranie USB Upozornenie! Kábel USB teraz nepripájajte.
8 Connect the power, and turn on the product. If the duplexer is installed (CB511A, CB512A, CB516A, CB517A, and CB526A), pull it out so you can connect the power cord, and then push the duplexer in. Priključite proizvod na izvor napajanja te ga uključite. Ako je umetnut dodatak za obostrani ispis (CB511A, CB512A, CB516A, CB517A i CB526A), izvucite ga kako biste mogli priključiti kabel napajanja, a zatim ga ponovo gurnite na mjesto. Připojte napájecí kabel a zapněte zařízení.
9 On the control panel, if prompted, press to select a language, the date, and the time for the product. Press OK to accept selections. After Ready appears on the display, wait 30 seconds. Kada to bude zatraženo, na upravljačkoj ploči pritisnite za odabir jezika, datuma i vremena za proizvod. Pritisnite OK za prihvaćanje odabira. Nakon što se na zaslonu prikaže Ready (Spreman), pričekajte 30 sekundi. Při výzvě vyberte na ovládacím panelu jazyk, datum a čas zařízení stisknutím tlačítka tlačítka OK.
10 Install the software from the CD. Complete the Easy Install. Click Quit when the installation is finished. Instalirajte programe s CD-a. Izvršite Easy Install (Jednostavnu instalaciju). Pritisnite Quit (Prekid) kada se instalacija završi. Nainstalujte software z disku CD. Proveďte snadnou instalaci. Po dokončení instalace klepněte na tlačítko Quit (Konec). Telepítse a szoftvert a CD-ről. Végezze el az Easy Install (Egyszerű telepítés) folyamatát.
OS X V10.2.8 12 On the computer hard drive, open Applications, open Utilities, and then open Print Center. If the product name displays in the printer list, go to step 13. Otherwise, click Add or +, and then select USB from the drop-down list. Select the product name from the printer list. Na tvrdom disku računala otvorite Applications (Aplikacije), zatim Utilities (Uslužni programi), a zatim otvorite Print Center (Centar za ispis). Ako se naziv proizvoda prikaže na popisu pisača, idite na korak 13.
OS X V10.3, V10.4 At the computer, open the Apple menu and click System Preferences and then click Print & Fax. If the product name appears in the printer list, go to step 13. Otherwise, click Add or +, and then select Default Browser or Default. Select the product name from the printer list. Otvorite izbornik Apple na računalu, pritisnite System Preferences (Preference sustava), a zatim Print & Fax (Ispis i faksiranje). Ako se naziv proizvoda prikaže na popisu pisača, idite na korak 13.
13 Configure the product software to recognize the installed accessories. Click Add. The Installable Options dialog box appears. Select the product options that you are using. Konfigurirajte softver proizvoda tako da prepozna instalirane dodatke. Pritisnite Add (Dodaj). Pojavit će se dijaloški okvir Installable Options (Opcije koje se mogu instalirati). Odaberite opcije uređaja koje koristite. Nakonfigurujte software zařízení, aby rozeznal nainstalované příslušenství. Klepněte na tlačítko Add (Přidat).
Macintosh USB setup is complete. For more information about the following topics, see the electronic User Guide on the CD-ROM or go to: www.hp.com/support/hpljp4010series or www.hp.com/support/hpljp4510series. • Detailed user instructions. • Important safety notices. • Troubleshooting information. • Regulatory information. Postavljanje USB veze na Macintosh računalu. Više informacija o sljedećim temama potražite u elektroničkom korisničkom priručniku na CD-ROM-u ili idite na: www.hp.
7 Network connection. Connect the network cable to the product and to the network. Mrežna veza. Mrežni kabel priključite na uređaj i na mrežu. Připojení k síti. Síťový kabel připojte k produktu a k síti. Hálózati kapcsolat. Csatlakoztassa a hálózati kábelt a készülékhez és a hálózathoz. Połączenie sieciowe. Podłącz kabel sieciowy do produktu i do sieci. Conexiune de reţea. Conectaţi cablul de reţea la produs şi la reţea. Mrežna veza. Priključite mrežni kabl na uređaj i mrežu. Sieťové pripojenie.
8 Connect the power, and turn on the product. If the duplexer is installed (CB511A, CB512A, CB516A, CB517A, and CB526A), pull it out so you can connect the power cord, and then push the duplexer in. Priključite proizvod na izvor napajanja te ga uključite. Ako je umetnut dodatak za obostrani ispis (CB511A, CB512A, CB516A, CB517A i CB526A), izvucite ga kako biste mogli priključiti kabel napajanja, a zatim ga ponovo gurnite na mjesto. Připojte napájecí kabel a zapněte zařízení.
9 On the control panel, if prompted, press to select a language, the date, and the time for the product. Press OK to accept selections. After Ready appears on the display, wait 30 seconds. Kada to bude zatraženo, na upravljačkoj ploči pritisnite za odabir jezika, datuma i vremena za proizvod. Pritisnite OK za prihvaćanje odabira. Nakon što se na zaslonu prikaže Ready (Spreman), pričekajte 30 sekundi. Při výzvě vyberte na ovládacím panelu jazyk, datum a čas zařízení stisknutím tlačítka tlačítka OK.
10 Find the IP address by printing a Configuration page. At the product control panel, press Menu , press to highlight INFORMATION and then press OK. Press to highlight PRINT CONFIGURATION and then press OK. Potražite IP adresu ispisivanjem stranice konfiguracije. Na upravljačkoj ploči proizvoda pritisnite Izbornik , pritisnite kako biste označili INFORMATION (Informacije), a zatim pritisnite OK. Pritisnite kako biste označili PRINT CONFIGURATION (Konfiguracija ispisa), a zatim pritisnite OK.
1 1 If the Configuration page lists the IP address as 169.254.X.X, you must manually assign the address. See the User Guide on the product CD-ROM for advanced network-configuration instructions. They are in the chapter called Connectivity. Ako se na stranici s konfiguracijom ispišu IP adrese, kao što je 169.254.X.X, morate ručno dodijeliti adresu. Dodatne upute za mrežnu konfiguraciju potražite u korisničkom vodiču na CD-ROM-u isporučenom uz proizvod. Nalaze se u poglavlju naslovljenom Povezivost.
12 Quit all open programs on the print server or on each computer that will share the product. Install the software from the CD. Complete the Easy Install. Click Quit when the installation is finished. Zatvorite sve otvorene programe na ispisnom poslužitelju ili će svako računalo moći koristiti uređaj. Instalirajte programe s CD-a. Izvršite Easy Install (Jednostavnu instalaciju). Pritisnite Quit (Prekid) kada se instalacija završi.
OS X V10.2.8 13 On the computer hard drive, open Applications, open Utilities, and then open Print Center. Click Add. From the drop-down list, select the connection type. Rendezvous: Select the product from the list. Select the printer model if one is not already selected. IP Printing: Enter the IP address for the product. Select the printer model if one is not already selected.
OS X V10.3, V10.4 At the computer, open the Apple menu and click System Preferences and then click Print & Fax. Click Add or +, and then select the connection type. Default Browser: Select the product from the list. From the Print Using drop-down list, select the printer model if one is not already selected. IP Printer: From the Protocol drop-down list, select HP Jetdirect – Socket. Enter the IP address for the product.
Pe computer, deschideţi meniul Apple şi faceţi clic pe System Preferences (Preferinţe sistem) şi apoi faceţi clic pe Print & Fax (Imprimare şi fax). Faceţi clic pe Add (Adăugare) sau pe + şi apoi selectaţi tipul conexiunii. Browser implicit: Selectaţi din listă echipamentul. Dacă nu a fost detectat încă niciun model de imprimantă, selectaţi unul din caseta verticală Print Using (Imprimare cu ajutorul). Imprimantă IP: Din lista verticală Protocol, selectaţi HP Jetdirect – Socket.
OS X V10.3, V10.4 14 Configure the product software to recognize the installed accessories. Click Add. The Installable Options dialog box appears. Select the product options that you are using. Konfigurirajte softver proizvoda tako da prepozna instalirane dodatke. Pritisnite Add (Dodaj). Pojavit će se dijaloški okvir Installable Options (Opcije koje se mogu instalirati). Odaberite opcije uređaja koje koristite. Nakonfigurujte software zařízení, aby rozeznal nainstalované příslušenství.
Macintosh network setup is complete. For more information about the following topics, see the electronic User Guide on the CD-ROM or go to: www.hp.com/support/hpljp4010series or www.hp.com/support/hpljp4510series. • Detailed user instructions. • Important safety notices. • Troubleshooting information. • Regulatory information. Postavljanje mrežne veze na Macintosh računalu je dovršeno. Više informacija o sljedećim temama potražite u elektroničkom korisničkom priručniku na CD-ROM-u ili idite na: www.hp.
© 2008 Hewlett-Packard Development Company, L.P. www.hp.