HP LaserJet P4010 and P4510 Series Printers Imprimantes HP LaserJet séries P4010 et P4510 Getting Started Guide Guide de mise en route Ръководство за начално запознаване Οδηγός Εκκίνησης Алғашқы іске қосу жөніндегі нұсқаулық Руководство по началу работы Başlangıç Kılavuzu Короткий посібник
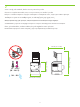
Copyright and License Copyright et licence © 2008 Copyright Hewlett-Packard Development Company, L.P. © 2008 Copyright Hewlett-Packard Development Company, L.P. Reproduction, adaptation or translation without prior written permission is prohibited, except as allowed under the copyright laws. Toute reproduction, adaptation ou traduction sans autorisation expresse par écrit est interdite, sauf dans les cas permis par les lois régissant les droits d'auteur.
Hardware setup................................................................................................................................. 2 Software setup Windows USB....................................................................................................................... 9 Windows Network................................................................................................................. 14 Macintosh USB.........................................................................
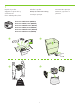
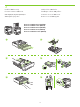
1 Unpack the product. Αφαιρέστε το προϊόν από τη συσκευασία του. Ürünü ambalajından çıkarın. Déballez le produit. Разопаковайте принтера. Өнімді қаптамасынан шығару. Извлеките устройство из упаковки. Розпакуйте пристрій. HP LaserJet P4014 Printer (CB506A) HP LaserJet P4014n Printer (CB507A) HP LaserJet P4014dn Printer (CB512A) HP LaserJet P4015n Printer (CB509A) HP LaserJet P4015dn Printer (CB526A) HP LaserJet P4515n Printer (CB514A) 1 2 3 4 23.
HP LaserJet P4015tn Printer (CB510A) HP LaserJet P4015x Printer (CB511A) HP LaserJet P4515tn Printer (CB515A) HP LaserJet P4515x Printer (CB516A) 1 2 3 23.5 kg 52 lb HP LaserJet P4515xm Printer (CB517A) 1 2 4 3 5 6 25.
2 Select a sturdy, well-ventilated, dust-free area to position the product. Choisissez un emplacement stable, aéré et non poussiéreux pour installer le produit. Изберете стабилна повърхност на добре вентилирано и незапрашено място, където да поставите принтера. Τοποθετήστε το προϊόν σε ένα σταθερό σημείο, σε καλά αεριζόμενο χώρο χωρίς σκόνη. Өнімді орналастыру үшін орнықты, жақсы желдетілетін және шаңсыз жерді таңдаңыз.
3 Install the 500-sheet tray. Installez le bac 500 feuilles. Поставете тавата за 500 листа. Τοποθετήστε το δίσκο 500 φύλλων. 500-парақтық науаны орнатыңыз. Установите лоток на 500 листов. 500 sayfalık tepsiyi takın. Вставте лоток на 500 аркушів.
4 Remove the packing material. Retirez les bandes de protection. Отстранете опаковъчния материал. Αφαιρέστε το υλικό συσκευασίας. Қаптау материалдарын алып тастаңыз. Удалите упаковочный материал. Ambalaj malzemesini çıkarın. Зніміть пакувальні матеріали.
5 Load paper. Chargez du papier. Заредете хартия. Τοποθετήστε χαρτί. Қағазды салыңыз. Загрузите бумагу. Kağıt yerleştirin. Завантажте папір.
6 Install the 5-bin mailbox. Installez la trieuse à 5 bacs. Поставете кутията за писма с 5 контейнера. Τοποθετήστε το εξάρτημα γραμματοκιβωτίου 5 θηκών. 5 қалталы пошта жәшігін орнатыңыз. Установите приемник на 5 почтовых ящиков. 5 bölmeli posta kutusunu takın. Вставте поштову скриньку із 5-ма відсіками.
For USB connections, go to page 9. Pour les connexions USB, reportez-vous à la page 9. За USB връзки отидете на стр. 9. Εάν χρησιμοποιείτε σύνδεση USB, πηγαίνετε στη σελίδα 9. USB портына жалғау үшін 9-бетке өтіңіз. Инструкции по подключению с помощью кабеля USB см. на стр. 9. USB bağlantıları için 9. sayfaya gidin. Вказівки для USB-підключення див. на стор. 9. For network connections, go to page 14. Pour les connexions réseau, reportez-vous à la page 14. За мрежови връзки отидете на стр. 14.
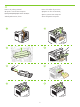
7 USB connection Connexion USB USB връзка Σύνδεση USB USB портына жалғау Подключение с помощью кабеля USB USB bağlantısı Підключення за допомогою USB Caution! Do not connect USB now. Wait until the software prompts you. Attention ! Ne branchez pas le câble USB tout de suite. Attendez les instructions du logiciel. Внимание: Не свързвайте сега USB кабела. Изчакайте, докато софтуерът ви подкани. Προσοχή! Μη συνδέετε ακόμη το USB. Περιμένετε να εμφανιστεί το σχετικό μήνυμα προτροπής.
8 Connect the power, and turn on the product. If the duplexer is installed (CB511A, CB512A, CB516A, CB517A, and CB526A), pull it out so you can connect the power cord, and then push the duplexer in. Branchez le produit sur une prise d'alimentation, puis allumez-le. Si une unité d'impression recto verso est installée (CB511A, CB512A, CB516A, CB517A et CB526A), tirez-la hors du produit afin de pouvoir brancher le cordon d'alimentation, puis replacez l'unité d'impression recto verso.
9 On the control panel, if prompted, press Press OK to accept selections. to select a language, the date, and the time for the product. Sur le panneau de commande, si vous y êtes invité, appuyez sur et l'heure. Appuyez sur OK pour confirmer vos choix. На контролния панел при подкана натиснете за да приемете избора. pour sélectionner une langue, la date , за да изберете език, датата и часа на принтера.
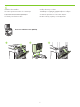
10 Quit all programs on the computer. Install the software from the CD. Follow the onscreen instructions. When prompted, select Connected directly to this computer, and then click Next. Do not connect the USB cable until the Looking for new hardware screen appears. At the end of the installation, click Finish. If prompted, restart the computer. Quittez tous les programmes ouverts sur votre ordinateur. Installez le logiciel à partir du CD. Suivez les instructions à l'écran.
Windows USB setup is complete. For more information about the following topics, see the electronic User Guide on the CD-ROM or go to: www.hp.com/support/hpljp4010series or www.hp.com/support/hpljp4510series. • Detailed user instructions. • Important safety notices. • Troubleshooting information. • Regulatory information. L'installation USB pour Windows est terminée.
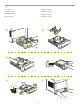
7 Network connection. Connect the network cable to the product and to the network. Connexion réseau Branchez le câble réseau au produit et au réseau. Мрежова връзка. Свържете мрежовия кабел към принтера и към мрежата. Σύνδεση δικτύου. Συνδέστε το καλώδιο δικτύου στο προϊόν και στο δίκτυο. Желіге жалғау. Желі кабелін өнімге және желіге жалғаңыз. Подключение через локальную сеть. Подсоедините устройство к сети при помощи сетевого кабеля. Ağ bağlantısı. Ağ kablosunu ürüne ve ağa bağlayın.
8 Connect the power, and turn on the product. If the duplexer is installed (CB511A, CB512A, CB516A, CB517A, and CB526A), pull it out so you can connect the power cord, and then push the duplexer in. Branchez le produit sur une prise d'alimentation, puis allumez-le. Si une unité d'impression recto verso est installée (CB511A, CB512A, CB516A, CB517A et CB526A), tirez-la hors du produit afin de pouvoir brancher le cordon d'alimentation, puis replacez l'unité d'impression recto verso.
9 On the control panel, if prompted, press to select a language, the date, and the time for the product. Press OK to accept selections. After Ready appears on the display, wait 30 seconds. Sur le panneau de commande, si vous y êtes invité, appuyez sur pour sélectionner une langue, la date et l'heure. Appuyez sur OK pour confirmer vos choix. Lorsque Prêt apparaît sur l'écran, attendez 30 secondes. На контролния панел при подкана натиснете , за да изберете език, датата и часа на принтера.
10 Find the IP address by printing a Configuration page. At the product control panel, press Menu , press to highlight INFORMATION and then press OK. Press to highlight PRINT CONFIGURATION and then press OK. Recherchez l'adresse IP en imprimant une page de configuration. Sur le panneau de commande du produit, appuyez sur Menu , puis sur pour mettre INFORMATIONS en surbrillance et appuyez sur OK. Appuyez sur pour mettre IMPRIMER CONFIGURATION en surbrillance, puis appuyez sur OK.
11 If the Configuration page lists the IP address as 169.254.X.X, you must manually assign the address. See the User Guide on the product CD-ROM for advanced network-configuration instructions. They are in the chapter called Connectivity. Si la page de configuration présente 169.254.X.X comme adresse IP, vous devez attribuer l'adresse IP manuellement. Reportez-vous au Guide de l'utilisateur sur le CD-ROM du produit pour obtenir des instructions plus détaillées sur la configuration des réseaux.
12 Quit all open programs on the print server or on each computer that will share the product. Install the software from the CD. Follow the onscreen instructions. When prompted, select Connected to the Network, and then click Next. The installer shows the available printers. Select the printer that has the appropriate IP address. Click Finish. If prompted, restart the computer. Fermez tous les programmes ouverts sur le serveur d'impression ou sur chaque ordinateur partageant le produit.
Windows network setup is complete. For more information about the following topics, see the electronic User Guide on the CD-ROM or go to: www.hp.com/support/hpljp4010series or www.hp.com/support/hpljp4510series. • Detailed user instructions. • Important safety notices. • Troubleshooting information. • Regulatory information. L'installation réseau pour Windows est terminée.
7 USB connection Caution! Do not connect USB now. Connexion USB Attention ! Ne branchez pas le câble USB tout de suite. USB връзка Внимание: Не свързвайте сега USB кабела. Σύνδεση USB Προσοχή! Μη συνδέετε ακόμη το USB. USB портына жалғау Абайлаңыз! Қазір USB портына жалғамаңыз. Подключение с помощью кабеля USB Внимание! Не подключайте кабель USB на этом этапе. USB bağlantısı Dikkat! USB'yi şimdi bağlamayın. Підключення за допомогою USB Обережно! Не під'єднуйте кабель USB зараз.
8 Connect the power, and turn on the product. If the duplexer is installed (CB511A, CB512A, CB516A, CB517A, and CB526A), pull it out so you can connect the power cord, and then push the duplexer in. Branchez le produit sur une prise d'alimentation, puis allumez-le. Si une unité d'impression recto verso est installée (CB511A, CB512A, CB516A, CB517A et CB526A), tirez-la hors du produit afin de pouvoir brancher le cordon d'alimentation, puis replacez l'unité d'impression recto verso.
9 On the control panel, if prompted, press to select a language, the date, and the time for the product. Press OK to accept selections. After Ready appears on the display, wait 30 seconds. Sur le panneau de commande, si vous y êtes invité, appuyez sur pour sélectionner une langue, la date et l'heure. Appuyez sur OK pour confirmer vos choix. Lorsque Prêt apparaît sur l'écran, attendez 30 secondes. На контролния панел при подкана натиснете , за да изберете език, датата и часа на принтера.
10 Install the software from the CD. Complete the Easy Install. Click Quit when the installation is finished. Installez le logiciel à partir du CD. Effectuez l'Installation simple. Cliquez sur Fermer lorsque l'installation est terminée. Инсталирайте софтуера от компактдиска. Изпълнете Easy Install (Лесно инсталиране). Щракнете върху Quit (Изход) при завършване на инсталирането. Εγκαταστήστε το λογισμικό από το CD. Ολοκληρώστε την εγκατάσταση Easy Install (Εύκολη εγκατάσταση).
OS X V10.2.8 12 On the computer hard drive, open Applications, open Utilities, and then open Print Center. If the product name displays in the printer list, go to step 13. Otherwise, click Add or +, and then select USB from the drop-down list. Select the product name from the printer list. Sur le disque dur de l'ordinateur, ouvrez Applications, Utilitaires, puis Centre d'impression. Si le nom du produit apparaît dans la liste des imprimantes, rendez-vous à l'étape 13.
OS X V10.3, V10.4 At the computer, open the Apple menu and click System Preferences and then click Print & Fax. If the product name appears in the printer list, go to step 13. Otherwise, click Add or +, and then select Default Browser or Default. Select the product name from the printer list. Sur votre ordinateur, ouvrez le menu Apple et cliquez sur Préférences système, puis sur Imprimantes et télécopieurs. Si le nom du produit apparaît dans la liste des imprimantes, rendez-vous à l'étape 13.
13 Configure the product software to recognize the installed accessories. Click Add. The Installable Options dialog box appears. Select the product options that you are using. Configurez le logiciel du produit afin de reconnaître les accessoires installés. Cliquez sur Ajouter. La boîte de dialogue Options installables apparaît. Sélectionnez les options du produit que vous utilisez. Конфигурирайте софтуера на принтера, така че да разпознава инсталираните принадлежности. Щракнете върху Add (Добави).
Macintosh USB setup is complete. For more information about the following topics, see the electronic User Guide on the CD-ROM or go to: www.hp.com/support/hpljp4010series or www.hp.com/support/hpljp4510series. • Detailed user instructions. • Important safety notices. • Troubleshooting information. • Regulatory information. L'installation USB pour Macintosh est terminée.
7 Network connection. Connect the network cable to the product and to the network. Connexion réseau Branchez le câble réseau au produit et au réseau. Мрежова връзка. Свържете мрежовия кабел към принтера и към мрежата. Σύνδεση δικτύου. Συνδέστε το καλώδιο δικτύου στο προϊόν και στο δίκτυο. Желіге жалғау. Желі кабелін өнімге және желіге жалғаңыз. Подключение через локальную сеть. Подсоедините устройство к сети при помощи сетевого кабеля. Ağ bağlantısı. Ağ kablosunu ürüne ve ağa bağlayın.
8 Connect the power, and turn on the product. If the duplexer is installed (CB511A, CB512A, CB516A, CB517A, and CB526A), pull it out so you can connect the power cord, and then push the duplexer in. Branchez le produit sur une prise d'alimentation, puis allumez-le. Si une unité d'impression recto verso est installée (CB511A, CB512A, CB516A, CB517A et CB526A), tirez-la hors du produit afin de pouvoir brancher le cordon d'alimentation, puis replacez l'unité d'impression recto verso.
9 On the control panel, if prompted, press to select a language, the date, and the time for the product. Press OK to accept selections. After Ready appears on the display, wait 30 seconds. Sur le panneau de commande, si vous y êtes invité, appuyez sur pour sélectionner une langue, la date et l'heure. Appuyez sur OK pour confirmer vos choix. Lorsque Prêt apparaît sur l'écran, attendez 30 secondes. На контролния панел при подкана натиснете , за да изберете език, датата и часа на принтера.
10 Find the IP address by printing a Configuration page. At the product control panel, press Menu , press to highlight INFORMATION and then press OK. Press to highlight PRINT CONFIGURATION and then press OK. Recherchez l'adresse IP en imprimant une page de configuration. Sur le panneau de commande du produit, appuyez sur Menu , puis sur pour mettre INFORMATIONS en surbrillance et appuyez sur OK. Appuyez sur pour mettre IMPRIMER CONFIGURATION en surbrillance, puis appuyez sur OK.
1 1 If the Configuration page lists the IP address as 169.254.X.X, you must manually assign the address. See the User Guide on the product CD-ROM for advanced network-configuration instructions. They are in the chapter called Connectivity. Si la page de configuration présente 169.254.X.X comme adresse IP, vous devez attribuer l'adresse IP manuellement. Reportez-vous au Guide de l'utilisateur sur le CD-ROM du produit pour obtenir des instructions plus détaillées sur la configuration des réseaux.
12 Quit all open programs on the print server or on each computer that will share the product. Install the software from the CD. Complete the Easy Install. Click Quit when the installation is finished. Fermez tous les programmes ouverts sur le serveur d'impression ou sur chaque ordinateur partageant le produit. Installez le logiciel à partir du CD. Effectuez l'Installation simple. Cliquez sur Fermer lorsque l'installation est terminée.
OS X V10.2.8 13 On the computer hard drive, open Applications, open Utilities, and then open Print Center. Click Add. From the drop-down list, select the connection type. Rendezvous: Select the product from the list. Select the printer model if one is not already selected. IP Printing: Enter the IP address for the product. Select the printer model if one is not already selected. Sur le disque dur de l'ordinateur, ouvrez Applications, Utilitaires, puis Centre d'impression. Cliquez sur Ajouter.
OS X V10.3, V10.4 At the computer, open the Apple menu and click System Preferences and then click Print & Fax. Click Add or +, and then select the connection type. Default Browser: Select the product from the list. From the Print Using drop-down list, select the printer model if one is not already selected. IP Printer: From the Protocol drop-down list, select HP Jetdirect – Socket. Enter the IP address for the product.
На компьютере откройте меню Apple и щелкните System Preferences (Настройки системы), затем щелкните Print & Fax (Печать и факс). Нажмите Add (Добавить) или + и выберите тип подключения. Default Browser (Браузер по умолчанию): Выберите устройство из списка. В раскрывающемся списке Print Using (Печатать с помощью) выберите модель принтера, если она еще не выбрана. IP Printer (IP-принтер): В раскрывающемся списке протоколов выберите HP Jetdirect – Socket. Введите IP-адрес устройства.
OS X V10.3, V10.4 14 Configure the product software to recognize the installed accessories. Click Add. The Installable Options dialog box appears. Select the product options that you are using. Configurez le logiciel du produit afin de reconnaître les accessoires installés. Cliquez sur Ajouter. La boîte de dialogue Options installables apparaît. Sélectionnez les options du produit que vous utilisez. Конфигурирайте софтуера на принтера, така че да разпознава инсталираните принадлежности.
Macintosh network setup is complete. For more information about the following topics, see the electronic User Guide on the CD-ROM or go to: www.hp.com/support/hpljp4010series or www.hp.com/support/hpljp4510series. • Detailed user instructions. • Important safety notices. • Troubleshooting information. • Regulatory information. L'installation réseau pour Macintosh est terminée.
40
OS X V10.2.8 OS X V10.3, V10.
IPv4 IPv6 42
CB526A, CB517A, CB516A, CB512A, CB511A 43
OS X V10.2.8 OS X V10.3, V10.
HP La se rJe t XX XX XP rin ter HP 45 Laser Jet M1 31 9 Se ries
CB526A, CB517A, CB516A, CB512A, CB511A 46
HP La se rJe t XX XX XP rin ter HP Las erJ et M1 31 47 9 Ser ies
IPv4 IPv6 48
CB526A, CB517A, CB516A, CB512A, CB511A 49
HP La se rJe t XX XX XP rin ter HP Las erJ et M1 31 50 9 Ser ies
CB526A, CB517A, CB516A, CB512A, CB511A 51
52
HP LaserJet P4515xm Printer (CB517A) 53
54
55
HP LaserJet P4015tn Printer (CB510A) HP LaserJet P4015x Printer (CB511A) HP LaserJet P4515tn Printer (CB515A) HP LaserJet P4515x Printer (CB516A) HP LaserJet P4515xm Printer (CB517A) 56
533 mm (21.0 inches) 394 mm (15.5 inches) 955 mm (37.6 inches) 425 mm (16.75 inches) 57 10˚ - 32.5˚C (50˚ - 90.
HP LaserJet P4015tn Printer (CB510A) HP LaserJet P4015x Printer (CB511A) HP LaserJet P4515tn Printer (CB515A) HP LaserJet P4515x Printer (CB516A) 23.5 kg 52 lb HP LaserJet P4515xm Printer (CB517A) 25.
HP LaserJet P4014 Printer (CB506A) HP LaserJet P4014n Printer (CB507A) HP LaserJet P4014dn Printer (CB512A) HP LaserJet P4015n Printer (CB509A) HP LaserJet P4015dn Printer (CB526A) HP LaserJet P4515n Printer (CB514A) 23.
60
© 2008 Hewlett-Packard Development Company, L.P. www.hp.