
HP LaserJet P4010 and P4510 Series - Software Technical Reference

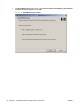
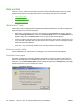

5. The Ready to Remove window opens. Click Remove.
Figure 3-48 Ready to Remove window
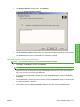
6. The Un-installation Status window opens. A progress bar indicates the progression of the install.
The Finish dialog box opens. Click Finish. The uninstall is complete.
Uninstall a printer-driver only installation
NOTE: To uninstall the software, you must have administrator privileges.
1. Click Start, click Settings, and then click Printers.
NOTE: For Windows XP and Windows Vista, click Start, and then click Printers and Faxes.
2. Right-click the icon for the product and then click Delete. This removes the icon for the product
only, but it does not remove the associated files.
3. To remove the associated files, click File from inside the Printers folder, and then click Server
Properties.
4. Click the Driver tab, click the name of the product, and then click Remove. When you are prompted
to confirm the deletion, click Yes.
5. Click Close to close the Server Properties dialog box, and then close the Printers folder.
ENWW User uninstall software 113
Install Windows printing-
system components