HP LaserJet M1120 MFP Series HP LaserJet série M1120 MFP Getting Started Guide Read Me First Guide de mise en route Lisez-moi d'abord Introduktionsvejledning Læs dette først Aloitusopas Lue tämä ensin Komme i gang Les meg først Starthandbok Läs det här först HP LaserJet Information Engineering
Copyright and License Copyright et Licence © 2008 Copyright Hewlett-Packard Development Company, L.P. © 2008 Copyright Hewlett-Packard Development Company, L.P. Reproduction, adaptation or translation without prior written permission is prohibited, except as allowed under the copyright laws. Il est interdit de reproduire, adapter ou traduire ce manuel sans autorisation expresse par écrit, sauf dans les cas permis par les lois régissant les droits d'auteur.
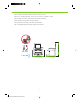
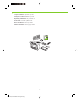
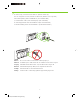
Select a sturdy, well-ventilated, dust-free area to position the product. Choisissez un emplacement stable, aéré et non poussiéreux pour installer le produit. Vælg et stabilt, velventileret, støvfrit område til placering af produktet. Valitse laitteelle tukeva, ilmastoitu ja pölytön paikka. Plasser produktet på et stabilt, godt ventilert og støvfritt sted. Välj en stadig dammfri plats med god ventilation för produkten. 8.2 kg 18.
There are two sections in this guide: • Set up the hardware • Install the software Ce guide est divisé en deux sections : • Configuration du matériel • Installation du logiciel Denne vejledning indeholder to sektioner: • Opsætning af hardwaren • Installation af softwaren Tässä oppaassa on kaksi osaa: • Laitteiston asentaminen • Ohjelmiston asentaminen Denne veiledningen har to deler: • Monter maskinvaren • Installer programvaren Handboken innehåller två avsnitt: • Ställa in maskinvaran • Installera programv
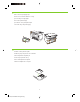
1 Set up the hardware. Unpack the product. Configurez le matériel. Déballez le produit. Opsætning af hardwaren. Pak produktet ud. Asenna laite. Poista laite pakkauksesta. Monter maskinvaren. Pakk ut produktet. Ställa in maskinvaran. Packa upp produkten.
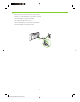
2 Remove all orange shipping tape. Retirez toutes les bandes adhésives orange. Fjern al orange forseglingstape. Irrota oranssi pakkausteippi. Fjern all den oransje beskyttelsestapen. Ta bort all orange förpackningstejp. 3 Install the control panel faceplate. Installez la plaque du panneau de commande. Sæt kontrolpanelets frontplade på. Asenna ohjauspaneelin etulevy. Monter kontrollpanelets frontpanel. Sätt fast kontrollpanelens överstycke.
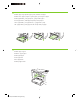
4 Install the paper tray, adjust the paper guides, and then load paper. Installez le bac à papier, réglez les guides papier, puis chargez du papier. Installer papirbakken, juster papirstyrene, og læg derefter papir i. Asenna paperilokero, säädä paperinohjaimet ja lisää paperia. Sett inn papirskuffen, juster papirskinnene, og legg deretter i papir. Sätt i pappersfacket, justera pappersstöden och fyll sedan på papper. 1 2 5 Install the paper support. Installez le support papier. Installer papirsupport.
6 Install the print cartridge. Installez la cartouche d'impression. Sæt printerpatronen i. Asenna tulostuskasetti. Sett inn skriverkassetten. Sätt i tonerkassetten.
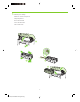
7 For network setup, connect the network cable now. (Network models only.) Pour une configuration sur réseau, branchez le câble réseau. (Modèles réseau uniquement.) Ved netværksopsætning: Tilslut netværkskablet nu. (Kun netværksmodeller). Jos asennat laitteen verkkoon, liitä verkkokaapeli nyt. (Vain verkkomallit.) For nettverksoppsett kobler du til nettverkskabelen nå. (Bare nettverksmodeller.) För nätverksinställning ansluter du nätverkskabeln nu. (Endast nätverksmodeller.
8 Connect the power cord, and then turn on the product. Branchez le cordon téléphonique, puis allumez le produit. Tilslut netledningen, og tænd for produktet. Liitä virtajohto ja kytke laitteeseen virta. Koble til strømledningen, og slå deretter på produktet. Anslut strömsladden och slå på produkten.
9 Control panel features. Press Setup to view menus. Use the arrows to select the menu options. Press OK to accept the selection. Press Cancel to return to the ready screen. Fonctions du panneau de commande. Appuyez sur Configurer pour afficher les menus. Utilisez les flèches pour sélectionner les options de menu. Appuyez sur OK pour accepter la sélection. Appuyez sur Annuler pour revenir à l'écran Prêt. Kontrolpanelfunktioner. Tryk på Opsætning for at få vist menuer. Brug pilene til at vælge menupunkter.
11Install the software. Installez le logiciel. Installation af softwaren. Asenna ohjelmisto. Installer programvaren. Installera programvaran. Go to step 12. Passez à l'étape 12. Gå til trin 12. Siirry vaiheeseen 12. Gå til trinn 12. Gå till steg 12. Go to step 14. Passez à l'étape 14. Gå til trin 14. Siirry vaiheeseen 14. Gå til trinn 14. Gå till steg 14.
12Insert the CD and follow the instructions onscreen to install the software. • If the installation program does not start, click Start, click Run, click Browse, select the Setup.exe file on the CD, and then click OK. Insérez le CD et suivez les instructions à l'écran pour installer le logiciel. • Si le programme d'installation ne démarre pas, cliquez sur Démarrer, Exécuter, cliquez sur Parcourir, sélectionnez le fichier Setup.exe sur le CD, puis cliquez sur OK.
13For USB, connect the USB cable when prompted. Si vous utilisez une connexion USB, connectez le câble USB lorsque vous y êtes invité. Ved USB: Sæt USB-kablet i, når du bliver bedt om det. Jos käytät USB-liitäntää, liitä USB-kaapeli kehotettaessa. For USB kobler du til USB-kabelen når du blir bedt om det. För USB ansluter du USB-kabeln när du uppmanas att göra det. When finished with this step, go to step 15. Une fois cette étape terminée, passez à l'étape 15.
14For Macintosh, connect the USB cable or the network cable. Insert the CD and double-click the installer icon. Follow the instructions onscreen to install the software. Sous Macintosh, branchez le câble USB ou le câble réseau. Insérez le CD et double-cliquez sur l'icône d'installation. Suivez les instructions à l'écran pour installer le logiciel. Macintosh: Sæt USB-kablet eller netværkskablet i. Sæt cd'en i, og dobbeltklik på installationsikonet. Følg vejledningen på skærmen for at installere softwaren.
15Test the product. From the control panel, press Setup, use the arrow buttons to select Reports, select Config report, and then press OK. Testez le produit. Depuis le panneau de commande, appuyez sur Configurer, utilisez les flèches pour sélectionner Rapports, puis Rapport config. et appuyez sur OK. Test produktet. Tryk på Opsætning på kontrolpanelet, brug pileknapperne til at vælge Rapporter, vælg Konfig. rapport, og tryk derefter på OK. Testaa laite.
16 Test copy. Load the configuration report on the flatbed, and then press Start Copy. Testez le photocopieur. Placez le rapport de configuration sur la vitre, puis appuyez sur Lancer copie. Test kopieringen. Læg konfigurationsrapporten på glaspladen, og tryk derefter på Start kopiering. Testaa kopiotoiminto. Aseta määritysraportti skannaustasolle ja paina Kopioi-painiketta. Test kopieringsfunksjonen. Legg konfigurasjonsrapporten på planskanneren, og trykk på Start kopi. Testa kopieringen.
Product Documentation. The electronic User Guide is on the CD-ROM that came with the product or is in the HP program folder on your computer. It contains the following: • Problem Solve • Important safety notices and regulatory information • Detailed user instructions This information is also available at www.hp.com/support/ljm1120. Documentation produit. Le Guide de l'utilisateur électronique se trouve sur le CD-ROM livré avec le produit ou dans le dossier de programmes HP sur votre ordinateur.
17 HP LaserJet Information Engineering
18 HP LaserJet Information Engineering
19 HP LaserJet Information Engineering
20 HP LaserJet Information Engineering
21 HP LaserJet Information Engineering
22 HP LaserJet Information Engineering
23 HP LaserJet Information Engineering
24 HP LaserJet Information Engineering
25 HP LaserJet Information Engineering
26 HP LaserJet Information Engineering
27 HP LaserJet Information Engineering
28 HP LaserJet Information Engineering
8.2 kg 18.
© 2008 Hewlett-Packard Development Company, L.P. www.hp.