HP Photosmart D7400 series Basics Guide
Hewlett-Packard Company notices The information contained in this document is subject to change without notice. All rights reserved. Reproduction, adaptation, or translation of this material is prohibited without prior written permission of Hewlett-Packard, except as allowed under copyright laws. The only warranties for HP products and services are set forth in the express warranty statements accompanying such products and services. Nothing herein should be construed as constituting an additional warranty.
HP Photosmart D7400 series English Basics Guide
Contents English 1 HP Photosmart overview The HP Photosmart at a glance.................................................................................................5 Control panel features................................................................................................................6 Find more information.................................................................................................................7 2 Network setup Wired network setup..............................
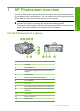
1 HP Photosmart overview Use the HP Photosmart to quickly and easily accomplish tasks such as printing photos from a memory card or storage device. You can access many HP Photosmart functions directly from the control panel, without turning on your computer. NOTE: This guide introduces basic operations and troubleshooting, as well as provides information for contacting HP support and ordering supplies.
Chapter 1 (continued) * Label Description 13 Rear USB port 14 Rear door Use only with the power adapter supplied by HP. Control panel features English The following diagram and related table provide a quick reference to the HP Photosmart control panel features. Label Name and Description 1 Display: View menus, photos, and messages. The touch screen display can be adjusted to different positions.
Find more information • • • Setup Guide The Setup Guide provides instructions for setting up the HP Photosmart and installing software. Make sure you follow the steps in the Setup Guide in order. If you have problems during setup, see Troubleshooting in the last section of the Setup Guide, or see “Troubleshooting and support” on page 29 in this guide.
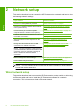
2 Network setup This section describes how to connect the HP Photosmart to a network and how to view and manage network settings. English If you want to: See this section: Connect to a wired (Ethernet) network. “Wired network setup” on page 8 Connect to a wireless network with a wireless router (infrastructure). “Integrated wireless WLAN 802.11 network setup” on page 11 Connect directly to a wireless-capable computer without a wireless router (ad hoc).
English To set up the HP Photosmart on a wired network, you need to do the following: See this section: First, collect all of the required materials. “What you need for a wired network” on page 9 Next, connect to a wired network. “Connect the HP Photosmart to the network” on page 10 Finally, install the software.
Chapter 2 connector) is wider and thicker and always has 8 contacts on the end. A phone connector has between 2 and 6 contacts. ❑ A desktop computer or laptop with an Ethernet connection. NOTE: The HP Photosmart supports both 10 Mbps and 100 Mbps Ethernet networks. If you are purchasing, or have purchased, a network interface card (NIC), make sure it can operate at either speed.
Integrated wireless WLAN 802.11 network setup English For optimal performance and security in your wireless network, HP recommends you use a wireless router or access point (802.11) to connect the HP Photosmart and the other network elements. When network elements are connected through a wireless router or access point, this is called an infrastructure network.
Chapter 2 ❑ If you connect the HP Photosmart on a wireless network that has Internet access, HP recommends that you use a wireless router (access point or base station) that uses Dynamic Host Configuration Protocol (DHCP). ❑ Network name (SSID). ❑ WEP key or WPA Passphrase (if needed). Connect to an integrated wireless WLAN 802.11 network English The Wireless Setup Wizard provides an easy way to connect the HP Photosmart to your network.
5. Touch the name of the network you wrote down in step 1. If you do not see your network name in the list a. Touch Enter a New Network Name (SSID). The visual keyboard appears. b. Enter the network name (SSID). Touch the appropriate letters or numbers on the visual keyboard. c. When you have finished entering the new network name, touch Done, and then touch OK.
Chapter 2 5. Follow the onscreen prompts on the display to complete the connection. 6. When the HP Photosmart connects successfully to the network, go to your computer to install the software on each computer that will use the network. NOTE: If the connection fails, the wireless router or access point might have timed out after you activated SecureEasySetup.
What you need for an ad hoc network To connect the HP Photosmart to a wireless network, you will need a Windows computer with a wireless network adapter. Create a network profile for a Windows XP computer Prepare your computer for an ad hoc connection by creating a network profile. NOTE: The HP Photosmart comes configured with a network profile with hpsetup as the network name (SSID). However, for security and privacy HP recommends you create a new network profile on your computer as described here. 1.
Chapter 2 g. Write down the WEP key exactly as you typed it, including uppercase and lowercase letters. NOTE: You must remember the exact uppercase (capital) and lowercase (small) letters. If you enter your WEP key incorrectly on the HP Photosmart, the wireless connection will fail. English h. Select the check box for This is a computer-to-computer (ad hoc) network; wireless access points are not used. i. Click OK to close the Wireless network properties window, and then click OK again. j.
5. Touch the network name. If you found your network name and selected it, go on to step 6. If you do not see your network name in the list a. Touch Enter a New Network Name (SSID). The visual keyboard appears. b. Enter the SSID. Touch the appropriate letters or numbers on the visual keyboard. c. When you have finished entering the new SSID, touch Done on the visual keyboard, and then touch OK.
Chapter 2 English To install the Windows HP Photosmart software 1. Quit all applications running on your computer, including any virus detection software. 2. Insert the Windows CD that came with the HP Photosmart into the CD-ROM drive on your computer and follow the onscreen instructions. 3. If a dialog box about firewalls appears, follow the instructions. If you see firewall popup messages, you must always accept or allow the pop-up messages. 4.
3. Touch Network. or 4. Touch Wireless Setup Wizard. This runs the Wireless Setup Wizard. 5. Install the software for a network connection, choose Add a Device, and then choose Through the network. 6. When the installation is complete, open Printers and Faxes (or Printers) in the Control Panel and delete the printers for the USB installation. To change a USB connection to a wired (Ethernet) connection 1. Unplug the USB connection from the back of the HP Photosmart. 2.
Chapter 2 View and print network settings You can display a summary of the network settings on the HP Photosmart control panel, or you can print a more detailed configuration page. The network configuration page lists all of the important network settings such as the IP address, link speed, DNS, and mDNS. 1. Touch Setup on the display. 2. Touch Network. NOTE: If the menu option you want is not visible on the screen, touch to scroll through all the menu options. or English 3. Touch View Network Settings.
Print the wireless network test The wireless network test performs a series of diagnostic tests to determine whether network setup is successful. The wireless network test prints automatically when the Wireless Setup Wizard is run. You also can print the wireless network test at any time. 1. Touch Setup on the display. 2. Touch Network. NOTE: If the menu option you want is not visible on the screen, touch to scroll through all the menu options. or English 3. Touch Wireless Network Test.
3 Use the HP Photosmart features This chapter includes information about how to use the HP Photosmart for basic operations. In addition, it provides instructions about how to load paper, view, select, and print photos, and replace the ink cartridges. Load paper English This section describes the procedure for loading different types and sizes of paper into the HP Photosmart for your printouts. TIP: To help prevent rips, wrinkles, and curled or bent edges, store all paper flat in a resealable bag.
CAUTION: Make sure that the HP Photosmart is idle and silent when you load paper into the main input tray. If the HP Photosmart is servicing the ink cartridges or otherwise engaged in a task, the paper stop inside the device might not be in place. You could push the paper too far forward, causing the HP Photosmart to eject blank pages. 4. Slide the paper-width and paper-length guides inward until they stop at the edges of the paper.
Chapter 3 English 2. Insert the stack of photo paper into the photo tray with the short edge forward and the print side down. Slide the stack of photo paper forward until it stops. If the photo paper you are using has perforated tabs, load the photo paper so that the tabs are closest to you. 3. Slide the paper-length and paper-width guides inward against the stack of photo paper until the guides stop.
English 2. 3. 4. 5. 6. 7. 8. 9.
Chapter 3 Check the estimated ink levels You can easily check the ink supply level to determine how soon you might need to replace an ink cartridge. The ink supply level shows an estimate of the amount of ink remaining in the ink cartridges. NOTE: The HP Photosmart can only detect the ink levels for genuine HP ink. The ink levels in ink cartridges that are refilled or have been used in other devices might not register accurately.
1 Ink cartridge latch for the black ink cartridge 2 Ink cartridge latches for the color ink cartridges 4. Pull the ink cartridge toward you out of its slot to remove it. Replace the ink cartridges 27 English 3. Squeeze the bottom of the latch below the ink cartridge you want to replace, and then lift the latch. If you are replacing the black ink cartridge, lift the latch on the far left.
Chapter 3 5. Remove the new ink cartridge from its packaging, and then, holding it by the handle, push the ink cartridge into the empty slot. Match the color and pattern of the ink cartridge to the color and pattern on the print carriage. English 6. Close the latch and make sure it is secure. 7. Repeat steps 3 through 6 for each ink cartridge you are replacing. 8. Close the ink cartridge door.
Troubleshooting and support This chapter contains troubleshooting information for the HP Photosmart. Specific information is provided for installation and configuration issues, and some operational topics. For more troubleshooting information, see the onscreen Help that came with your software. Many issues are caused when the HP Photosmart is connected to the computer using a USB cable before the HP Photosmart software is installed on the computer.
Chapter 4 Solution • Make sure the power cord is firmly connected to both the HP Photosmart and the power adapter. Plug the power cord into a power outlet, surge protector, or power strip. English • • • 1 Power connection 2 Power cord and adapter 3 Power outlet If you are using a power strip, make sure the power strip is on. Or, try plugging the HP Photosmart directly into a power outlet. Test the power outlet to make sure it is working.
English For more information on installing the software and connecting the USB cable, see the Setup Guide that came with the HP Photosmart. The HP Photosmart does not print Cause: The HP Photosmart and computer are not communicating with each other. Solution: Check the connection between the HP Photosmart and computer. Cause: There might be a problem with one or more of the ink cartridges. Solution: Check that the ink cartridges are installed properly and have ink.
Chapter 4 Solution: Make sure that your LAN card is set up properly. To check your LAN card (Windows 2000 and XP) 1. Right-click My Computer. 2. In the System Properties dialog box, click the Hardware tab. 3. Click Device Manager. 4. Make sure your card shows up under Network Adapters. 5. Refer to the documentation that came with your card. English To check your LAN card (Windows Vista) 1. On the Windows taskbar, click Start, Computer, and then click Properties. 2. Click Device Manager. 3.
Solution: Make sure you have an active network connection. English To make sure your network connection is active 1. If the connections are secure, turn off the power on the HP Photosmart, and then turn it on again. Press the On button on the control panel to turn the HP Photosmart off, and press it again to turn the device on. Also, turn off the power on your router or hub, and then turn it on again. 2.
Chapter 4 Solution: Access the router's Embedded Web Server and turn on the Broadcast SSID option. See the user guide that came with your wireless router for information on how to access the Embedded Web Server and check the Broadcast SSID setting. For more information, see: “Connect to an integrated wireless WLAN 802.11 network” on page 12 English Cause: The wireless router (infrastructure) or computer (ad hoc) is too far from the HP Photosmart or there is interference.
Solution: Run the wireless setup process again and enter your network name (SSID) carefully. Remember that the SSID is case-sensitive. For more information, see: “Connect to an integrated wireless WLAN 802.11 network” on page 12 Invalid WEP key during wireless setup Cause: If you are using WEP security, you might have entered the WEP key incorrectly during the wireless setup process. Solution: During the wireless setup process, you might have entered the WEP key incorrectly.
Chapter 4 Clear paper jams If the HP Photosmart has a paper jam, first check the rear door. If the jammed paper is not in the rear rollers, check the top door. To clear a paper jam from the rear door 1. Turn off the HP Photosmart. 2. Press in the tab on the rear door to release the door. Remove the door by pulling it away from the HP Photosmart. CAUTION: Trying to clear a paper jam from the front of the HP Photosmart can damage the print mechanism. Always access and clear paper jams through the rear door.
Gently pull the paper out of the rollers. CAUTION: If the paper tears when you are removing it from the rollers, check the rollers and wheels for torn pieces of paper that might be remaining inside the device. If you do not remove all the pieces of paper from the HP Photosmart, more paper jams are likely to occur. 5. 6. Close the top door. Close the ink cartridge door. 7. Turn on the HP Photosmart, and then touch OK to continue the current job.
Chapter 4 Support process English If you have a problem, follow these steps: 1. Check the documentation that came with the HP Photosmart. 2. Visit the HP online support Web site at www.hp.com/support. HP online support is available to all HP customers.
5 Technical information The technical specifications and international regulatory information for the HP Photosmart are provided in this section. System requirements Software system requirements are located in the Readme file. English Product specifications For product specifications, go to the HP Web site at www.hp.com/support. Paper specifications • Main input tray capacity: Plain paper sheets: Up to 100 (20 lb./75 gsm. paper) • Output tray capacity: Plain paper sheets: Up to 50 (20 lb./75 gsm.
Chapter 5 ENERGY STAR is a U.S. registered service mark of the U.S. EPA. As an ENERGY STAR partner, HP has determined that this product meets ENERGY STAR guidelines for energy efficiency. For more information on ENERGY STAR guidelines, go to the following Web site: www.energystar.
HP product Duration of limited warranty Software Media 90 days Printer 1 year Print or Ink cartridges Until the HP ink is depleted or the “end of warranty” date printed on the cartridge has been reached, whichever occurs first. This warranty does not cover HP ink products that have been refilled, remanufactured, refurbished, misused, or tampered with. Accessories 1 year unless otherwise stated A. Extent of limited warranty 1.
HP Photosmart D7400 series دﻟﻴﻞ اﻷﺳﺎﺳﻴﺎت ﻋﺮﺑﻲ
اﻟﻤﺤﺘﻮﻳﺎت ٢ إﻋﺪاد اﻟﺸﺒﻜﺔ إﻋﺪاد ﺷﺒﻜﺔ ﺳﻠﻜﻴﺔ٦................................................................................................................................ إﻋﺪاد اﻟﺸﺒﻜﺔ اﻟﻼﺳﻠﻜﻴﺔ اﻟﻤﻀﻤﻨﺔ ٨.........................................................................................WLAN 802.11 إﻋﺪاد ﺷﺒﻜﺔ ad hocﻻﺳﻠﻜﻴﺔ١١................................................................................................................ ﺕﺜﺒﻴﺖ اﻟﺒﺮﻥﺎﻡﺞ ﻡﻦ أﺟﻞ اﻟﺘﻮﺹﻴﻞ ﺏﺎﻟﺸﺒﻜﺔ١٤.....
١ ﻓﻜﺮة ﻋﺎﻡﺔ ﻋﻦ HP Photosmart اﺳﺘﺨﺪم ﺟﻬﺎز HP Photosmartﻟﺘﻨﻔﻴﺬ ﻡﻬﺎم ﺏﻄﺮیﻘﺔ ﺳﺮیﻌﺔ وﺳﻬﻠﺔ ﻡﺜﻞ ﻃﺒﺎﻋﺔ ﺹﻮر ﻡﻦ ﺏﻄﺎﻗﺔ ذاآﺮة أو ﺟﻬﺎز ﺕﺨﺰیﻦ. یﻤﻜﻦ اﻟﻮﺹﻮل إﻟﻰ اﻟﻜﺜﻴﺮ ﻡﻦ وﻇﺎﺋﻒ HP Photosmartﻡﺒﺎﺷﺮ ًة ﻡﻦ ﻟﻮﺡﺔ اﻟﺘﺤﻜﻢ ,دون ﺕﺸﻐﻴﻞ اﻟﻜﻤﺒﻴﻮﺕﺮ. ﻡﻼﺡﻈﺔ یﻘﻮم هﺬا اﻟﺪﻟﻴﻞ ﺏﺘﻘﺪیﻢ ﻋﻤﻠﻴﺎت أﺳﺎﺳﻴﺔ وﻡﻌﻠﻮﻡﺎت ﺡﻮل ﺡﻞ اﻟﻤﺸﻜﻼت ,آﻤﺎ یﻮﻓﺮ ﻡﻌﻠﻮﻡﺎت ﺡﻮل اﻻﺕﺼﺎل ﺏﺪﻋﻢ HPوﻃﻠﺐ اﻟﻤﺴﺘﻠﺰﻡﺎت. ﺕﺼﻒ اﻟﺘﻌﻠﻴﻤﺎت اﻟﻈﺎهﺮة ﻋﻠﻰ اﻟﺸﺎﺷﺔ ﺏﺘﻔﺼﻴﻞ اﻟﻨﻄﺎق اﻟﻜﺎﻡﻞ ﻟﻠﻤﻴﺰات واﻟﻮﻇﺎﺋﻒ ,ﺏﻤﺎ ﻓﻲ ذﻟﻚ اﺳﺘﺨﺪام ﺏﺮﻥﺎﻡﺞ HP Photosmartاﻟﻤﺰود ﻡﻊ ﺟﻬﺎز .
)ﺕﺎﺏﻊ( اﻟﺒﻄﺎﻗﺔ اﻟﻼﺻﻘﺔ اﻟﻮﺻﻒ 14 ﺏﺎب ﺥﻠﻔﻲ * اﺳﺘﺨﺪم ﻓﻘﻂ ﻡﻊ ﻡﺤﻮل اﻟﻄﺎﻗﺔ اﻟﻤﺰود ﻡﻦ ﻗﺒﻞ .HP ﻡﻴﺰات ﻟﻮﺡﺔ اﻟﺘﺤﻜﻢ یﻮﻓﺮ اﻟﺮﺳﻢ اﻟﺘﺎﻟﻲ واﻟﺠﺪول اﻟﻤﺘﻌﻠﻖ ﺏﻪ ﻡﺮاﺟﻌﺔ ﺳﺮیﻌﺔ ﻟﻤﻴﺰات ﻟﻮﺡﺔ اﻟﺘﺤﻜﻢ ﻟﺠﻬﺎز .HP Photosmart ﻋﺮﺑﻲ اﻟﺒﻄﺎﻗﺔ اﻟﻼﺻﻘﺔ اﻻﺳﻢ واﻟﻮﺻﻒ 1 اﻟﻌﺮض :ﻟﻌﺮض اﻟﻘﻮاﺋﻢ ,اﻟﺼﻮر واﻟﺮﺳﺎﺋﻞ .یﻤﻜﻦ ﺽﺒﻂ ﺷﺎﺷﺔ اﻟﻠﻤﺲ ﻋﻠﻰ أوﺽﺎع ﻡﺨﺘﻠﻔﺔ .ﻡﻤﺎ یﻤﻜّﻦ اﻟﻤﺴﺘﺨﺪم ﻡﻦ ﺕﻐﻴﻴﺮ زاویﺔ اﻟﻌﺮض ﻟﻜﻲ ﺕﻼﺋﻢ اﺳﺘﺒﺪاﻻت اﻟﺠﻬﺎز اﻟﻤﺘﻨﻮﻋﺔ وﻇﺮوف اﻹﺽﺎءة.
اﻟﻔﺼﻞ ١ • • ﻋﺮﺑﻲ • دﻟﻴﻞ اﻹﻋﺪاد یﻮﻓﺮ دﻟﻴﻞ اﻹﻋﺪاد إرﺷﺎدات ﺡﻮل إﻋﺪاد ﺟﻬﺎز HP Photosmartوﺕﺜﺒﻴﺖ اﻟﺒﺮﻥﺎﻡﺞ .ﺕﺄآﺪ ﻡﻦ اﺕﺒﺎع اﻟﺨﻄﻮات اﻟﻤﻮﺟﻮدة ﻓﻲ دﻟﻴﻞ اﻹﻋﺪاد ﺡﺴﺐ اﻟﺘﺮﺕﻴﺐ. ﻋﻨﺪ اﻟﺘﻌﺮض إﻟﻰ ﻡﺸﺎآﻞ أﺙﻨﺎء ﻋﻤﻠﻴﺔ اﻹﻋﺪاد ,ﻓﻘﻢ ﺏﻤﺮاﺟﻌﺔ ﺡﻞ اﻟﻤﺸﻜﻼت ﻓﻲ ﺁﺥﺮ ﻗﺴﻢ ﻡﻦ دﻟﻴﻞ اﻹﻋﺪاد ,أو راﺟﻊ ”ﺡﻞ اﻟﻤﺸﻜﻼت واﻟﺪﻋﻢ“ ﻓﻲ ﺹﻔﺤﺔ ٢٥ﻓﻲ هﺬا اﻟﺪﻟﻴﻞ.
٢ إﻋﺪاد اﻟﺸﺒﻜﺔ یﺼﻒ هﺬا اﻟﻘﺴﻢ آﻴﻔﻴﺔ ﺕﻮﺹﻴﻞ HP Photosmartﺏﺎﻟﺸﺒﻜﺔ وآﻴﻔﻴﺔ ﻋﺮض إﻋﺪادات اﻟﺸﺒﻜﺔ وإدارﺕﻬﺎ. ﻋﺮﺑﻲ إذا رﻏﺒﺖ ﻓﻲ: راﺟﻊ هﺬا اﻟﻘﺴﻢ: ﺕﻮﺹﻴﻞ ﺏﺸﺒﻜﺔ )إیﺜﺮﻥﺖ( ﺳﻠﻜﻴﺔ. ”إﻋﺪاد ﺷﺒﻜﺔ ﺳﻠﻜﻴﺔ“ ﻓﻲ ﺹﻔﺤﺔ ٦ ﺕﻮﺹﻴﻞ ﺏﺸﺒﻜﺔ ﻻﺳﻠﻜﻴﺔ ﺏﺎﺳﺘﺨﺪام ﻡﻮﺟﻪ ﻻﺳﻠﻜﻲ )ﺏﻨﻴﺔ ﺕﺤﺘﻴﺔ(. ”إﻋﺪاد اﻟﺸﺒﻜﺔ اﻟﻼﺳﻠﻜﻴﺔ اﻟﻤﻀﻤﻨﺔ “WLAN 802.11 ﻓﻲ ﺹﻔﺤﺔ ٨ اﻟﺘﻮﺹﻴﻞ ﻡﺒﺎﺷﺮ ًة ﺏﺠﻬﺎز آﻮﻡﺒﻴﻮﺕﺮ ذي إﻡﻜﺎﻥﻴﺔ ﺳﻠﻜﻴﺔ ﺏﺪون ﻡﻮﺟﻪ ﻻﺳﻠﻜﻲ ).
اﻟﻔﺼﻞ ٢ ﻹﻋﺪاد ﺟﻬﺎز HP Photosmartﻋﻠﻰ ﺵﺒﻜﺔ ﺳﻠﻜﻴﺔ ,ﻳﺠﺐ اﻟﻘﻴﺎم ﺑﻤﺎ ﻳﻠﻲ: راﺟﻊ هﺬا اﻟﻘﺴﻢ: ﻻ ,ﻗﻢ ﺏﺘﺠﻤﻴﻊ آﺎﻓﺔ اﻟﻤﻮاد اﻟﻤﻄﻠﻮﺏﺔ. أو ً ”ﻡﺎ ﺕﺤﺘﺎج إﻟﻴﻪ ﻡﻦ أﺟﻞ ﺷﺒﻜﺔ ﺳﻠﻜﻴﺔ“ ﻓﻲ ﺹﻔﺤﺔ ٧ ﺙﺎﻥﻴًﺎ ﻗﻢ ﺏﺎﻟﺘﻮﺹﻴﻞ ﺏﺸﺒﻜﺔ ﺳﻠﻜﻴﺔ. ”ﺕﻮﺹﻴﻞ ﺟﻬﺎز HP Photosmartﺏﺎﻟﺸﺒﻜﺔ“ ﻓﻲ ﺹﻔﺤﺔ ٧ أﺥﻴﺮا ،ﻗﻢ ﺏﺘﺜﺒﻴﺖ اﻟﺒﺮﻥﺎﻡﺞ. ً ”ﺕﺜﺒﻴﺖ اﻟﺒﺮﻥﺎﻡﺞ ﻡﻦ أﺟﻞ اﻟﺘﻮﺹﻴﻞ ﺏﺎﻟﺸﺒﻜﺔ“ ﻓﻲ ﺹﻔﺤﺔ ١٤ ﻡﺎ ﺕﺤﺘﺎج إﻟﻴﻪ ﻡﻦ أﺟﻞ ﺵﺒﻜﺔ ﺳﻠﻜﻴﺔ ﻗﺒﻞ ﺕﻮﺹﻴﻞ ﺟﻬﺎز HP Photosmartﺏﺎﻟﺸﺒﻜﺔ ،ﺕﺄآﺪ أﻥﻪ یﻀﻢ آﺎﻓﺔ اﻟﻤﻮاد اﻟﻤﻄﻠﻮﺏﺔ.
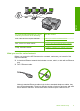
.٣ﻗﻢ ﺏﺘﻮﺹﻴﻞ اﻟﻄﺮف اﻵﺥﺮ ﻡﻦ آﺎﺏﻞ اﻹیﺜﺮﻥﺖ ﺏﺎﻟﻤﻨﻔﺬ اﻟﻤﺘﻮﻓﺮ ﻓﻲ ﻡﻮﺟﻪ إیﺜﺮﻥﺖ ،وﺡﺪة ﺕﻘﺴﻴﻢ ،أو ﻡﻮﺟﻪ ﻻﺳﻠﻜﻲ. ﻋﺮﺑﻲ .٤ﺏﻤﺠﺮد ﺕﻮﺹﻴﻞ ﺟﻬﺎز HP Photosmartﺏﺎﻟﺸﺒﻜﺔ ,ﻗﻢ ﺏﺘﺜﺒﻴﺖ اﻟﺒﺮﻥﺎﻡﺞ آﻤﺎ هﻮ ﻡﻮﺽﺢ ﻓﻲ ”ﺕﺜﺒﻴﺖ اﻟﺒﺮﻥﺎﻡﺞ ﻡﻦ أﺟﻞ اﻟﺘﻮﺹﻴﻞ ﺏﺎﻟﺸﺒﻜﺔ“ ﻓﻲ ﺹﻔﺤﺔ .١٤ إﻋﺪاد اﻟﺸﺒﻜﺔ اﻟﻼﺳﻠﻜﻴﺔ اﻟﻤﻀﻤﻨﺔ WLAN 802.11 ﻟﻠﺤﺼﻮل ﻋﻠﻰ اﻷداء واﻷﻡﺎن اﻷﻓﻀﻠﻴﻦ ﻓﻲ اﻟﺸﺒﻜﺔ اﻟﻼﺳﻠﻜﻴﺔ اﻟﺨﺎﺹﺔ ﺏﻚ ،ﺕﻮﺹﻲ HPﺏﺎﺳﺘﺨﺪام ﻡﻮﺟﻪ ﻻﺳﻠﻜﻲ أو ﻥﻘﻄﺔ وﺹﻮل ) (802.11ﻟﺘﻮﺹﻴﻞ ﺟﻬﺎز HP Photosmartوﻋﻨﺎﺹﺮ اﻟﺸﺒﻜﺔ اﻷﺥﺮى .
اﻟﻔﺼﻞ ٢ ﻹﻋﺪاد ﺟﻬﺎز HP Photosmartﻋﻠﻰ ﺵﺒﻜﺔ ﻻﺳﻠﻜﻴﺔ ﻡﺪﻡﺠﺔ ،WLAN 802.11ﻳﺠﺐ ﻋﻠﻴﻚ اﻟﻘﻴﺎم ﺑﻤﺎ ﻳﻠﻲ: راﺟﻊ هﺬا اﻟﻘﺴﻢ: ﻻ ,ﻗﻢ ﺏﺘﺠﻤﻴﻊ آﺎﻓﺔ اﻟﻤﻮاد اﻟﻤﻄﻠﻮﺏﺔ. أو ً ”ﻡﺎ ﺕﺤﺘﺎج إﻟﻴﻪ ﻡﻦ أﺟﻞ ﺷﺒﻜﺔ ﻻﺳﻠﻜﻴﺔ ﻡﻀﻤﻨﺔ WLAN “802.11ﻓﻲ ﺹﻔﺤﺔ ٩ ﺙﺎﻥﻴًﺎ ,ﻗﻢ ﺏﺘﻮﺹﻴﻞ ﺟﻬﺎز HP Photosmartﺏﺎﻟﻤﻮﺟﻪ اﻟﻼﺳﻠﻜﻲ، وﻗﻢ ﺏﺘﺸﻐﻴﻞ ) Wireless Setup Wizardﻡﻌﺎﻟﺞ اﻹﻋﺪاد اﻟﻼﺳﻠﻜﻲ(. ”اﻟﺘﻮﺹﻴﻞ ﺏﺸﺒﻜﺔ ﻻﺳﻠﻜﻴﺔ ﻡﻀﻤﻨﺔ “WLAN 802.11 ﻓﻲ ﺹﻔﺤﺔ ٩ أﺥﻴﺮا ،ﻗﻢ ﺏﺘﺜﺒﻴﺖ اﻟﺒﺮﻥﺎﻡﺞ.
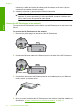
.٣اﻟﻤﺲ ) Networkﺵﺒﻜﺔ(. ﻡﻼﺡﻈﺔ إذا ﻟﻢ یﻈﻬﺮ ﺥﻴﺎر اﻟﻘﺎﺋﻤﺔ اﻟﺬي ﺕﺮﻏﺐ ﻓﻴﻪ ﻋﻠﻰ اﻟﺸﺎﺷﺔ ،ﻓﻘﻢ ﺏﻠﻤﺲ ﺥﻴﺎرات اﻟﻘﺎﺋﻤﺔ. أو ﻟﻠﺘﻤﺮیﺮ ﻋﺒﺮ آﺎﻓﺔ .٤اﻟﻤﺲ ) Wireless Setup Wizardﻡﻌﺎﻟﺞ اﻹﻋﺪاد اﻟﻼﺳﻠﻜﻲ(. یﺆدي ذﻟﻚ إﻟﻰ ﺕﺸﻐﻴﻞ ) Wireless Setup Wizardﻡﻌﺎﻟﺞ اﻹﻋﺪاد اﻟﻼﺳﻠﻜﻲ(. .٥اﻟﻤﺲ اﺳﻢ اﻟﺸﺒﻜﺔ اﻟﺬي آﺘﺒﺘﻪ ﻓﻲ اﻟﺨﻄﻮة .1 إذا ﻟﻢ ﺕﺮ اﺳﻢ اﻟﺸﺒﻜﺔ ﻓﻲ اﻟﻘﺎﺋﻤﺔ أ .اﻟﻤﺲ )) Enter a New Network Name (SSIDإدﺥﺎل اﺳﻢ ﺵﺒﻜﺔ ﺟﺪﻳﺪ ).((SSID ﺕﻈﻬﺮ ﻟﻮﺡﺔ اﻟﻤﻔﺎﺕﻴﺢ اﻟﻤﺮﺋﻴّﺔ. ب .أدﺥﻞ اﺳﻢ اﻟﺸﺒﻜﺔ ) .
اﻟﻔﺼﻞ ٢ .٥اﺕﺒﻊ اﻟﻤﻄﺎﻟﺒﺎت اﻟﻈﺎهﺮة ﻋﻠﻰ ﺷﺎﺷﺔ اﻟﻌﺮض ﻻﺳﺘﻜﻤﺎل اﻻﺕﺼﺎل. .٦ﻋﻨﺪ اﺕﺼﺎل ﺟﻬﺎز HP Photosmartﺏﻨﺠﺎح ﺏﺎﻟﺸﺒﻜﺔ ،اﻥﺘﻘﻞ إﻟﻰ ﺟﻬﺎز اﻟﻜﻤﺒﻴﻮﺕﺮ ﻟﺘﺜﺒﻴﺖ اﻟﺒﺮﻥﺎﻡﺞ ﻋﻠﻰ آﻞ ﻡﻦ أﺟﻬﺰة اﻟﻜﻤﺒﻴﻮﺕﺮ اﻟﺘﻲ ﺕﻘﻮم ﺏﺎﺳﺘﺨﺪام اﻟﺸﺒﻜﺔ. ﻡﻼﺡﻈﺔ إذا ﻓﺸﻞ اﻟﺘﻮﺹﻴﻞ ،ﻗﺪ ﺕﻜﻮن ﻗﺪ اﻥﺘﻬﺖ ﻡﻬﻠﺔ اﻟﻤﻮﺟﻪ اﻟﻼﺳﻠﻜﻲ أو ﻥﻘﻄﺔ اﻟﻮﺹﻮل ﺏﻌﺪ ﺕﻨﺸﻴﻂ .SecureEasySetupآﺮر اﻟﻤﻬﻤﺔ اﻟﻤﻮﺟﻮدة أﻋﻼﻩ ،ﻟﻠﺘﺄآﺪ ﻡﻦ إﻥﻬﺎء اﻟﺨﻄﻮات اﻟﻤﻮﺟﻮدة ﻋﻠﻰ ﻟﻮﺡﺔ اﻟﻤﻔﺎﺕﻴﺢ اﻟﺨﺎﺹﺔ ﺏـ HP Photosmartﻋﻠﻰ اﻟﻔﻮر ﺏﻌﺪ اﻟﻀﻐﻂ ﻋﻠﻰ زر اﻟﻤﻮﺟﻪ اﻟﻼﺳﻠﻜﻲ أو ﻥﻘﻄﺔ اﻟﻮﺹﻮل.
ﻹﻥﺸﺎء وﺽﻊ اﻟﺸﺒﻜﺔ ﻡﻼﺡﻈﺔ یﺄﺕﻲ ﺟﻬﺎز HP Photosmartﻡﻜﻮﻥًﺎ ﻡﻊ وﺽﻊ ﺷﺒﻜﺔ ذي hpsetupآـﺎﺳﻢ ﻟﻠﺸﺒﻜﺔ ) .(SSIDورﻏﻢ هﺬا ،ﺕﻮﺹﻲ ،HPﻡﻦ أﺟﻞ اﻷﻡﺎن واﻟﺨﺼﻮﺹﻴﺔ ،ﺏﺄن ﺕﻘﻮم ﺏﺈﻥﺸﺎء وﺽﻊ ﺟﺪیﺪ ﻟﻠﺸﺒﻜﺔ ﻋﻠﻰ اﻟﻜﻤﺒﻴﻮﺕﺮ آﻤﺎ هﻮ ﻡﻮﺽﺢ هﻨﺎ. .١ .٢ .٣ ﻋﺮﺑﻲ .٤ .٥ .٦ ﻡﺰدوﺟﺎ ﻓﻮق ) Network Connectionsاﺕﺼﺎﻻت اﻟﺸﺒﻜﺔ(.
اﻟﻔﺼﻞ ٢ إﻥﺸﺎء وﺽﻊ اﻟﺸﺒﻜﺔ ﻷﻥﻈﻤﺔ اﻟﺘﺸﻐﻴﻞ اﻷﺥﺮى إذا آﺎن ﻟﺪیﻚ ﻥﻈﺎم ﺕﺸﻐﻴﻞ ﻋﺪا Windows XPأو ،Mac OS Xﺕﻮﺹﻲ HPﺏﺎﺳﺘﺨﺪام ﺏﺮﻥﺎﻡﺞ اﻟﺘﻜﻮیﻦ اﻟﻤﺰودة ﻡﻊ ﺏﻄﺎﻗﺔ LANاﻟﻼﺳﻠﻜﻲ .ﻟﻠﻌﺜﻮر ﻋﻠﻰ ﺏﺮﻥﺎﻡﺞ اﻟﺘﻜﻮیﻦ اﻟﺨﺎص ﺏﺒﻄﺎﻗﺔ LANاﻟﻼﺳﻠﻜﻲ ،ﻗﻢ ﺏﺎﻟﻮﺹﻮل إﻟﻰ ﻗﺎﺋﻤﺔ اﻟﻜﻤﺒﻴﻮﺕﺮ اﻟﺨﺎﺹﺔ ﺏﺎﻟﺒﺮاﻡﺞ.
.٦ﻗﻢ ﺏﺈدﺥﺎل ﻡﻔﺘﺎح WEPإذا ُﻃﻠﺐ ﻡﻨﻚ ذﻟﻚ .ﺥﻼﻓًﺎ ﻟﺬﻟﻚ اﻥﺘﻘﻞ إﻟﻰ اﻟﺨﻄﻮة .7 أ .اﻟﻤﺲ ﻡﻔﺎﺕﻴﺢ اﻷرﻗﺎم أو اﻟﺤﺮوف اﻟﻤﻨﺎﺳﺒﺔ ﻋﻠﻰ ﻟﻮﺡﺔ اﻟﻤﻔﺎﺕﻴﺢ اﻟﻤﺮﺋﻴّﺔ. ﻡﻼﺡﻈﺔ یﺠﺐ ﻋﻠﻴﻚ إدﺥﺎل اﻟﺤﺮوف اﻟﻜﺒﻴﺮة )اﻟﺤﺮوف اﻹﺳﺘﻬﻼﻟﻴﺔ( واﻟﺤﺮوف اﻟﺼﻐﻴﺮة ﺑﺎﻟﺘﺤﺪﻳﺪ .ﺏﺨﻼف ذﻟﻚ ،ﺳﻴﻔﺸﻞ اﻻﺕﺼﺎل اﻟﻼﺳﻠﻜﻲ. ب .ﻋﻨﺪ اﻻﻥﺘﻬﺎء ﻡﻦ إدﺥﺎل ﻡﻔﺘﺎح ،WEPاﻟﻤﺲ ) Doneﺕﻢ( ﻋﻠﻰ ﻟﻮﺡﺔ اﻟﻤﻔﺎﺕﻴﺢ اﻟﻤﺮﺋﻴﺔ. .٧اﻟﻤﺲ ) OKﻡﻮاﻓﻖ( ﻡﺮة أﺥﺮى ﻟﻠﺘﺄآﻴﺪ. ﺳﻴﺤﺎول HP Photosmartاﻻﺕﺼﺎل ﺏـ .
اﻟﻔﺼﻞ ٢ ﻡﻼﺡﻈﺔ یﻤﻜﻦ ﺕﻮﺹﻴﻞ ﺟﻬﺎز HP Photosmartإﻡﺎ ﺏﺸﺒﻜﺔ ﻻﺳﻠﻜﻴﺔ أو ﺏﺸﺒﻜﺔ ﺳﻠﻜﻴﺔ ,وﻟﻜﻦ ﻻ یﻤﻜﻦ اﻻﺕﺼﺎل ﺏﻜﻠﺘﺎ اﻟﺸﺒﻜﺘﻴﻦ ﻓﻲ ﻥﻔﺲ اﻟﻮﻗﺖ. ﺕﻐﻴﻴﺮ ﺟﻬﺎز HP Photosmartﻡﻦ ﺕﻮﺻﻴﻞ USBإﻟﻰ ﺕﻮﺻﻴﻞ اﻟﺸﺒﻜﺔ ﻻ ﻡﻊ ﺕﻮﺹﻴﻞ ,USBیﻤﻜﻨﻚ اﻟﺘﺤﻮیﻞ إﻟﻰ إﻡﺎ ﺕﻮﺹﻴﻞ ﻻﺳﻠﻜﻲ أو ﺕﻮﺹﻴﻞ إیﺜﺮﻥﺖ ﻋﻨﺪ ﺕﺜﺒﻴﺖ ﺟﻬﺎز HP Photosmartأو ً ﻓﻲ وﻗﺖ ﻻﺡﻖ .إذا ﻋﺮﻓﺖ آﻴﻔﻴﺔ اﻟﺘﻮﺹﻴﻞ ﺏﺎﻟﺸﺒﻜﺔ ﻡﺴﺒﻘًﺎ ,ﻓﻴﻤﻜﻨﻚ اﺳﺘﺨﺪام اﻟﺘﻮﺟﻴﻬﺎت اﻟﻌﺎﻡﺔ اﻟﻤﻮﺟﻮدة أدﻥﺎﻩ.
) Wireless Setup Wizardاﺳﺘﺨﺪام ﻡﻌﺎﻟﺞ اﻹﻋﺪاد اﻟﻼﺳﻠﻜﻲ( یﻮﻓﺮ ﻡﻌﺎﻟﺞ اﻹﻋﺪاد اﻟﻼﺳﻠﻜﻲ ﻃﺮیﻘﺔ ﺳﻬﻠﺔ ﻹﻋﺪاد ﺕﻮﺹﻴﻞ ﻻﺳﻠﻜﻲ ﻋﻠﻰ ﺟﻬﺎز HP Photosmartوإدارﺕﻪ. .١اﻟﻤﺲ ) Setupإﻋﺪاد( ﻋﻠﻰ ﺷﺎﺷﺔ اﻟﻌﺮض. .٢اﻟﻤﺲ ) Networkﺵﺒﻜﺔ(. ﻡﻼﺡﻈﺔ إذا ﻟﻢ یﻈﻬﺮ ﺥﻴﺎر اﻟﻘﺎﺋﻤﺔ اﻟﺬي ﺕﺮﻏﺐ ﻓﻴﻪ ﻋﻠﻰ اﻟﺸﺎﺷﺔ ،ﻓﻘﻢ ﺏﻠﻤﺲ ﺥﻴﺎرات اﻟﻘﺎﺋﻤﺔ. أو ﻟﻠﺘﻤﺮیﺮ ﻋﺒﺮ آﺎﻓﺔ .٣اﻟﻤﺲ ) Wireless Setup Wizardﻡﻌﺎﻟﺞ اﻹﻋﺪاد اﻟﻼﺳﻠﻜﻲ(. یﺆدي ذﻟﻚ إﻟﻰ ﺕﺸﻐﻴﻞ ) Wireless Setup Wizardﻡﻌﺎﻟﺞ اﻹﻋﺪاد اﻟﻼﺳﻠﻜﻲ(.
اﻟﻔﺼﻞ ٢ .١اﻟﻤﺲ ) Setupإﻋﺪاد( ﻋﻠﻰ ﺷﺎﺷﺔ اﻟﻌﺮض. .٢اﻟﻤﺲ ) Networkﺵﺒﻜﺔ(. ﻡﻼﺡﻈﺔ إذا ﻟﻢ یﻈﻬﺮ ﺥﻴﺎر اﻟﻘﺎﺋﻤﺔ اﻟﺬي ﺕﺮﻏﺐ ﻓﻴﻪ ﻋﻠﻰ اﻟﺸﺎﺷﺔ ،ﻓﻘﻢ ﺏﻠﻤﺲ ﺥﻴﺎرات اﻟﻘﺎﺋﻤﺔ. أو ﻟﻠﺘﻤﺮیﺮ ﻋﺒﺮ آﺎﻓﺔ .٣اﻟﻤﺲ ) Wireless Radioإرﺳﺎل ﻻﺳﻠﻜﻲ(. .٤اﻟﻤﺲ ) Onﺕﺸﻐﻴﻞ( أو ) Offإﻳﻘﺎف اﻟﺘﺸﻐﻴﻞ(. ﻃﺒﺎﻋﺔ اﺥﺘﺒﺎر اﻟﺸﺒﻜﺔ اﻟﻼﺳﻠﻜﻴﺔ ﻥﺎﺟﺤﺎ .
٣ اﺳﺘﺨﺪام ﻡﻴﺰات HP Photosmart یﺤﺘﻮي هﺬا اﻟﻔﺼﻞ ﻋﻠﻲ ﻡﻌﻠﻮﻡﺎت ﻋﻦ آﻴﻔﻴﺔ اﺳﺘﺨﺪام HP Photosmartﻟﻠﻌﻤﻠﻴﺎت اﻷﺳﺎﺳﻴﺔ ﺏﺎﻻﺽﺎﻓﺔ إﻟﻲ ذﻟﻚ ،ﻓﺈﻥﻪ یﻮﻓﺮ ﺕﻌﻠﻴﻤﺎت ﺡﻮل آﻴﻔﻴﺔ ﺕﺤﻤﻴﻞ اﻟﻮرق وﻋﺮض اﻟﺼﻮر وﺕﺤﺪیﺪهﺎ وﻃﺒﺎﻋﺘﻬﺎ واﺳﺘﺒﺪال ﺥﺮﻃﻮﺷﺎت اﻟﺤﺒﺮ. ﺕﺤﻤﻴﻞ اﻟﻮرق یﺼﻒ هﺬا اﻟﻘﺴﻢ ﻃﺮیﻘﺔ ﺕﺤﻤﻴﻞ أﻥﻮاع وأﺡﺠﺎم ﻡﺨﺘﻠﻔﺔ ﻡﻦ اﻟﻮرق ﻓﻲ ﺟﻬﺎز HP Photosmartﻟﻠﻤﻄﺒﻮﻋﺎت اﻟﺨﺎﺹﺔ ﺏﻚ. ﻋﺮﺑﻲ ﻡﺴﺘﻮ ٍ ﺕﻠﻤﻴﺢ ﻟﻤﻨﻊ ﺡﺪوث اﻟﺘﺸﻘﻘﺎت أو اﻟﺘﺠﻌﺪات أو اﻻﻟﺘﻔﺎﻓﺎت أو اﻟﺤﺎﻓﺎت اﻟﻤﻨﺤﻨﻴﺔ ،ﻗﻢ ﺏﺘﺨﺰیﻦ ﺟﻤﻴﻊ اﻟﻮرق ﻓﻲ وﺽﻊ ﻓﻲ آﻴﺲ یﻤﻜﻦ إﻋﺎدة إﺡﻜﺎم ﻏﻠﻘﻪ .
اﻟﻔﺼﻞ ٣ ﺕﻨﺒﻴﻪ ﺕﺄآﺪ ﻡﻦ وﺟﻮد ﺟﻬﺎز HP Photosmartﻗﻴﺪ اﻟﺨﻤﻮل وﺹﺎﻡﺘًﺎ ﻋﻨﺪ ﺕﺤﻤﻴﻞ اﻟﻮرق ﻓﻲ ﺡﺎویﺔ اﻹدﺥﺎل اﻟﺮﺋﻴﺴﻴﺔ .ﻓﻲ ﺡﺎﻟﺔ ﻗﻴﺎم ﺟﻬﺎز HP Photosmartﺏﺼﻴﺎﻥﺔ ﺥﺮﻃﻮﺷﺎت اﻟﺤﺒﺮ أو ﺕﻨﻔﻴﺬ أي ﻡﻬﻤﺔ ,ﻓﻘﺪ ﻻ یﻜﻮن ﺡﺎﺟﺰ اﻟﻮرق ﻓﻲ ﻡﻮﺽﻌﻪ ﺏﺪاﺥﻞ اﻟﺠﻬﺎز .إﻥﻚ ﻗﺪ ﺕﺪﻓﻊ اﻟﻮرق إﻟﻰ ﺁﺥﺮ ﻡﺪى ﻟﻪ ,ﻡﻤﺎ یﺆدي إﻟﻰ ﺥﺮوج ﺹﻔﺤﺎت ﻓﺎرﻏﺔ ﻡﻦ ﺟﻬﺎز .HP Photosmart ﻻ ﻡﻊ ﺕﻮﺟﻴﻪ اﻟﻮﺟﻪ ﺕﻠﻤﻴﺢ إذا آﻨﺖ ﺕﺴﺘﺨﺪم ورق ﻋﻠﻴﻪ ﻋﻨﻮان اﻟﺸﺮآﺔ ,ﻓﺄدﺥﻞ اﻟﺠﺰء اﻟﻌﻠﻮي ﻡﻦ اﻟﺼﻔﺤﺔ أو ً اﻟﻤﺨﺼﺺ ﻟﻠﻄﺒﺎﻋﺔ إﻟﻰ اﻷﺳﻔﻞ .
ﻋﺮﺑﻲ .٢ﻗﻢ ﺏﺈدﺥﺎل رزﻡﺔ اﻟﻮرق إﻟﻰ ﺡﺎویﺔ اﻟﺼﻮر ﻡﻊ ﺕﻮﺟﻴﻪ اﻟﺤﺎﻓﺔ اﻟﻘﺼﻴﺮة ﻟﻸﻡﺎم واﻟﻮﺟﻪ اﻟﻤﺨﺼﺺ ﻟﻠﻄﺒﺎﻋﺔ إﻟﻰ اﻷﺳﻔﻞ .ﻗﻢ ﺏﺈﻡﺎﻟﺔ رزﻡﺔ ورق اﻟﺼﻮر ﻟﻸﻡﺎم ﺡﺘﻰ ﺕﺘﻮﻗﻒ. إذا آﺎن ورق اﻟﺼﻮر اﻟﺬي ﺕﺴﺘﺨﺪﻡﻪ ﺏﻪ ﺙﻘﻮب ﻗﻢ ﺏﺘﺤﻤﻴﻞ ورق اﻟﺼﻮر ﺏﺤﻴﺚ ﺕﻜﻮن اﻟﺜﻘﻮب ﻓﻲ اﻟﺠﻬﺔ اﻟﻘﺮیﺒﺔ ﻡﻨﻚ. .٣ﻗﻢ ﺏﺈﻡﺎﻟﺔ دﻟﻴﻠﻲ ﻃﻮل وﻋﺮض اﻟﻮرق ﻟﻠﺪاﺥﻞ ﻋﻠﻰ رزﻡﺔ ورق اﻟﺼﻮر ﺡﺘﻰ ﺕﺘﻮﻗﻒ اﻟﺪﻻﺋﻞ. ﻻ ﺕﻘﻢ ﺏﺰیﺎدة ﺕﺤﻤﻴﻞ ﺡﺎویﺔ اﻟﺼﻮر ,ﻋﻠﻴﻚ اﻟﺘﺄآﺪ ﻡﻦ أن رزﻡﺔ ورق اﻟﺼﻮر یﻤﻜﻦ ﺕﺜﺒﻴﺘﻬﺎ داﺥﻞ ﺡﺎویﺔ اﻟﺼﻮر وأن ارﺕﻔﺎﻋﻬﺎ ﻻ یﺰیﺪ ﻋﻠﻰ أﻋﻠﻰ ارﺕﻔﺎع ﻟﺪﻟﻴﻞ ﻋﺮض اﻟﻮرق. .
ﻋﺮﺑﻲ اﻟﻔﺼﻞ ٣ .٢ .٣ .٤ .٥ .٦ .٧ .٨ .٩ ١ xD-Picture Card ٢ (CompactFlash (CFاﻟﻨﻮع IوII ٣ ﺏﻄﺎﻗﺔ اﻟﺬاآﺮة Memory Stick Proأو Memory Stick Selectأو Memory Stick Magic Gateأو Memory Stick Duoأو ) Duo Proﻡﺤﻮل اﺥﺘﻴﺎري( ،أو ) Memory Stick Microﻡﺤﻮل إﻟﺰاﻡﻲ(.
ﻡﻼﺡﻈﺔ یﺘﻤﻜﻦ ﺟﻬﺎز HP Photosmartﻡﻦ اﻟﻜﺸﻒ ﻋﻠﻰ ﻡﺴﺘﻮیﺎت اﻟﺤﺒﺮ إذا آﺎن ﺡﺒﺮ HPأﺹﻠﻲ .ﻗﺪ ﻻ یﻤﻜﻦ ﺕﺴﺠﻴﻞ ﻡﺴﺘﻮیﺎت اﻟﺤﺒﺮ ﻓﻲ ﺥﺮﻃﻮﺷﺎت اﻟﺤﺒﺮ اﻟﺘﻲ ﺕﻢ ﺕﻌﺒﺌﺘﻬﺎ أو اﺳﺘﺨﺪاﻡﻬﺎ ﻓﻲ أﺟﻬﺰة أﺥﺮى ﺏﺪﻗﺔ. ﻡﻼﺡﻈﺔ یﺘﻢ اﺳﺘﺨﺪام ﺡﺒﺮ ﻡﻦ ﺥﺮﻃﻮﺷﺎت اﻟﻄﺒﺎﻋﺔ ﻓﻲ إﺟﺮاء اﻟﻄﺒﺎﻋﺔ ﺏﺎﻟﻌﺪیﺪ ﻡﻦ اﻟﻄﺮق اﻟﻤﺨﺘﻠﻔﺔ ,ﺏﻤﺎ ﻓﻲ ذﻟﻚ ﻓﻲ إﺟﺮاء اﻟﺘﻬﻴﺌﺔ ,اﻟﺬي یﻘﻮم ﺏﺘﺠﻬﻴﺰ اﻟﺠﻬﺎز واﻟﺨﺮﻃﻮﺷﺎت ﻟﻠﻄﺒﺎﻋﺔ وﻓﻲ ﺹﻴﺎﻥﺔ رؤوس اﻟﻄﺒﺎﻋﺔ ,اﻟﺘﻲ ﺕﻘﻮم ﺏﺎﻟﺤﻔﺎظ ﻋﻠﻰ ﻓﺘﺤﺎت اﻟﻄﺒﺎﻋﺔ ﻥﻈﻴﻔﺔ واﻥﺴﻴﺎب اﻟﺤﺒﺮ ﻋﻠﻰ ﻡﺎ یﺮام .
اﻟﻔﺼﻞ ٣ ﻋﺮﺑﻲ ﻓﻲ ﺡﺎﻟﺔ اﺳﺘﺒﺪال ﺥﺮﻃﻮﺷﺔ واﺡﺪة ﻡﻦ ﺏﻴﻦ ﺥﺮﻃﻮﺷﺎت اﻟﺤﺒﺮ اﻟﻤﻠﻮن اﻟﺨﺎﻡﺴﺔ ,ﻡﺜﻞ اﻟﻠﻮن اﻷﺹﻔﺮ ,ﺳﻤﺎوي ﻓﺎﺕﺢ )أزرق(, ﺳﻤﺎوي ,أرﺟﻮاﻥﻲ ﻓﺎﺕﺢ )وردي( ,أو أرﺟﻮاﻥﻲ ,ارﻓﻊ اﻟﻤﺰﻻج اﻟﻤﻨﺎﺳﺐ ﻓﻲ اﻟﻤﻨﻄﻘﺔ اﻟﻤﺮآﺰیﺔ. ١ ﻡﺰﻻج ﺥﺮﻃﻮﺷﺔ اﻟﺤﺒﺮ ﻟﺨﺮﻃﻮﺷﺔ اﻟﺤﺒﺮ اﻷﺳﻮد ٢ ﻡﺰاﻟﻴﺞ ﺥﺮﻃﻮﺷﺔ اﻟﺤﺒﺮ ﻟﺨﺮﻃﻮﺷﺎت اﻟﺤﺒﺮ اﻟﻤﻠﻮن .٤اﺳﺤﺐ ﺥﺮﻃﻮﺷﺔ اﻟﺤﺒﺮ ﻥﺤﻮك ﻹﺥﺮاﺟﻬﺎ ﻡﻦ ﻓﺘﺤﺘﻬﺎ وإزاﻟﺘﻬﺎ. .٥ﻗﻢ ﺏﺈزاﻟﺔ ﺥﺮﻃﻮﺷﺔ اﻟﺤﺒﺮ اﻟﺠﺪیﺪة ﻡﻦ ﻋﺒﻮﺕﻬﺎ ,ﺙﻢ اﺡﻤﻠﻬﺎ ﻡﻦ ﻡﻘﺒﻀﻬﺎ ,وادﻓﻊ ﺥﺮﻃﻮﺷﺔ اﻟﺤﺒﺮ إﻟﻰ اﻟﻔﺘﺤﺔ اﻟﻔﺎرﻏﺔ.
.٦ﻗﻢ ﺏﺈﻏﻼق اﻟﻤﺰﻻج وﺕﺄآﺪ ﻡﻦ إﻏﻼﻗﻪ ﺏﺈﺡﻜﺎم. ﻋﺮﺑﻲ .٧آﺮر ﺥﻄﻮات 3إﻟﻰ 6ﻟﻜﻞ ﻡﻦ ﺥﺮﻃﻮﺷﺎت اﻟﺤﺒﺮ اﻟﺘﻲ ﺕﻘﻮم ﺏﺎﺳﺘﺒﺪاﻟﻬﺎ. .٨أﻏﻠﻖ ﺏﺎب ﺥﺮﻃﻮﺷﺔ اﻟﺤﺒﺮ.
٤ ﺡﻞ اﻟﻤﺸﻜﻼت واﻟﺪﻋﻢ یﺤﺘﻮي هﺬا اﻟﻔﺼﻞ ﻋﻠﻰ ﻡﻌﻠﻮﻡﺎت ﺡﻞ اﻟﻤﺸﻜﻼت ﺏﺎﻟﻨﺴﺒﺔ ﻟﺠﻬﺎز .HP Photosmartﺕﺘﻮﻓﺮ ﻡﻌﻠﻮﻡﺎت ﻡﺤﺪدة ﺡﻮل ﻗﻀﺎیﺎ اﻟﺘﺜﺒﻴﺖ واﻟﺘﻜﻮیﻦ وﺏﻌﺾ ﻡﻮاﺽﻴﻊ اﻟﺘﺸﻐﻴﻞ .ﻟﻠﻤﺰیﺪ ﻡﻦ اﻟﻤﻌﻠﻮﻡﺎت ﺡﻮل ﺡﻞ اﻟﻤﺸﻜﻼت ،راﺟﻊ اﻟﺘﻌﻠﻴﻤﺎت اﻟﻈﺎهﺮة ﻋﻠﻰ اﻟﺸﺎﺷﺔ اﻟﻤﺰودة ﻡﻊ اﻟﺒﺮﻥﺎﻡﺞ اﻟﺨﺎص ﺏﻚ. ﺕﺤﺪث اﻟﻌﺪیﺪ ﻡﻦ اﻟﻤﺸﻜﻼت ﻋﻨﺪ ﺕﻮﺹﻴﻞ ﺟﻬﺎز HP Photosmartﺏﺎﻟﻜﻤﺒﻴﻮﺕﺮ ﺏﺎﺳﺘﺨﺪام آﺎﺏﻞ USBﻗﺒﻞ ﺕﺜﺒﻴﺖ ﺏﺮﻥﺎﻡﺞ HP Photosmartﻓﻲ اﻟﻜﻤﺒﻴﻮﺕﺮ .
ﻋﺮﺑﻲ • • • ١ ﺕﻮﺹﻴﻞ اﻟﻄﺎﻗﺔ ٢ ﺳﻠﻚ اﻟﻄﺎﻗﺔ واﻟﻤﺤﻮل ٣ ﻡﺄﺥﺬ اﻟﻄﺎﻗﺔ إذا آﻨﺖ ﺕﺴﺘﺨﺪم ﻗﻄﺎع آﻬﺮﺏﺎء ،ﻓﺘﺄآﺪ ﻡﻦ أﻥﻪ ﻗﻴﺪ اﻟﺘﺸﻐﻴﻞ .أو ,ﺡﺎول ﺕﻮﺹﻴﻞ HP Photosmartﻡﺒﺎﺷﺮ ًة ﺏﻤﺄﺥﺬ اﻟﻄﺎﻗﺔ. ﻼ ﺏﺎﻟﻄﺎﻗﺔ أم ﻻ .إذا اﺥﺘﺒﺮ ﻡﺄﺥﺬ اﻟﻄﺎﻗﺔ ﺡﺘﻰ ﺕﺘﺄآﺪ أﻥﻪ یﻌﻤﻞ .ﻗﻢ ﺏﺘﻮﺹﻴﻞ ﺟﻬﺎز ﺕﻌﺮف أﻥﻪ یﻌﻤﻞ ،وﺕﺤﻘﻖ ﻡﻤﺎ إذا آﺎن اﻟﺠﻬﺎز ﻡﺘﺼ ً ﻼ ﺏﺎﻟﻄﺎﻗﺔ ،ﻓﺮﺏﻤﺎ ﺕﻜﻮن هﻨﺎك ﻡﺸﻜﻠﺔ ﻡﺘﻌﻠﻘﺔ ﺏﻤﺄﺥﺬ اﻟﻄﺎﻗﺔ. ﻟﻢ یﻜﻦ ﻡﺘﺼ ً إذا ﻗﻤﺖ ﺏﺘﻮﺹﻴﻞ HP Photosmartﺏﻤﺄﺥﺬ ﻡﺒﺪّل ،ﻓﺘﺄآﺪ ﻡﻦ ﺕﺸﻐﻴﻞ اﻟﻤﻔﺘﺎح .
ﻋﺮﺑﻲ اﻟﻔﺼﻞ ٤ ﻟﻠﻤﺰیﺪ ﻡﻦ اﻟﻤﻌﻠﻮﻡﺎت ﺡﻮل ﺕﺜﺒﻴﺖ اﻟﺒﺮﻥﺎﻡﺞ وﺕﻮﺹﻴﻞ آﺎﺏﻞ ,USBراﺟﻊ دﻟﻴﻞ اﻹﻋﺪاد اﻟﻤﺰود ﻡﻊ ﺟﻬﺎز .HP Photosmart ﺟﻬﺎز HP Photosmartﻻ ﻳﻘﻮم ﺑﻌﻤﻠﻴﺔ اﻟﻄﺒﺎﻋﺔ اﻟﺴﺒﺐ :ﻻ یﺘﺼﻞ آﻞ ﻡﻦ HP Photosmartواﻟﻜﻤﺒﻴﻮﺕﺮ ﺏﺒﻌﻀﻬﻤﺎ اﻟﺒﻌﺾ. اﻟﺤﻞ :اﻓﺤﺺ اﻻﺕﺼﺎل ﺏﻴﻦ HP Photosmartواﻟﻜﻤﺒﻴﻮﺕﺮ. اﻟﺴﺒﺐ :ﻗﺪ یﻜﻮن هﻨﺎك ﻡﺸﻜﻠﺔ ﻓﻲ واﺡﺪة أو أآﺜﺮ ﻡﻦ ﺥﺮﻃﻮﺷﺎت اﻟﺤﺒﺮ. اﻟﺤﻞ :ﺕﺄآﺪ ﻡﻦ ﺕﺜﺒﻴﺖ ﺥﺮﻃﻮﺷﺎت اﻟﺤﺒﺮ ﺏﺸﻜﻞ ﺹﺤﻴﺢ ووﺟﻮد اﻟﺤﺒﺮ ﺏﻬﺎ. اﻟﺴﺒﺐ :ﻗﺪ ﻻ یﻜﻮن HP Photosmartﻓﻲ وﺽﻊ اﻟﺘﺸﻐﻴﻞ.
.٣ .٤ .٥ اﻥﻘﺮ ﻓﻮق ) Device Managerإدارة اﻷﺟﻬﺰة(. ﺕﺄآﺪ ﻡﻦ ﻇﻬﻮر اﻟﺒﻄﺎﻗﺔ ﺕﺤﺖ ) Network Adaptersﻡﺤﻮﻻت اﻟﺸﺒﻜﺔ(. راﺟﻊ اﻟﻮﺙﺎﺋﻖ اﻟﻤﺰودة ﻡﻊ اﻟﺒﻄﺎﻗﺔ. ﻟﻔﺤﺺ ﺑﻄﺎﻗﺔ (Windows Vista) LAN .١ﻓﻲ ﺷﺮیﻂ اﻟﻤﻬﺎم ﻟـ ,Windowsاﻥﻘﺮ ﻓﻮق ) Startاﺑﺪأ() Computer ,اﻟﻜﻤﺒﻴﻮﺕﺮ( ,ﺙﻢ اﻥﻘﺮ ﻓﻮق Properties )ﺥﺼﺎﺋﺺ(. .٢اﻥﻘﺮ ﻓﻮق ) Device Managerإدارة اﻷﺟﻬﺰة(. .٣ﺕﺄآﺪ ﻡﻦ ﻇﻬﻮر اﻟﺒﻄﺎﻗﺔ ﺕﺤﺖ ) Network Adaptersﻡﺤﻮﻻت اﻟﺸﺒﻜﺔ(. .٤راﺟﻊ اﻟﻮﺙﺎﺋﻖ اﻟﻤﺰودة ﻡﻊ اﻟﺒﻄﺎﻗﺔ.
اﻟﻔﺼﻞ ٤ اﻟﺴﺒﺐ :یﻤﻨﻊ ﺕﻄﺒﻴﻖ ﺟﺪار اﻟﺤﻤﺎیﺔ ,ﺏﺮﻥﺎﻡﺞ ﻡﻜﺎﻓﺤﺔ اﻟﻔﻴﺮوﺳﺎت أو ﺏﺮﻥﺎﻡﺞ ﻡﻜﺎﻓﺤﺔ اﻟﺘﺠﺴﺲ ﺟﻬﺎز HP Photosmartﻡﻦ اﻟﻮﺹﻮل إﻟﻰ اﻟﻜﻤﺒﻴﻮﺕﺮ اﻟﺨﺎص ﺏﻚ. اﻟﺤﻞ :ﻗﻢ ﺏﺈﻟﻐﺎء ﺕﺜﺒﻴﺖ اﻟﺒﺮﻥﺎﻡﺞ اﻟﺨﺎص ﺏﺠﻬﺎز ،HP Photosmartﺙﻢ أﻋﺪ ﺕﻤﻬﻴﺪ ﺟﻬﺎز اﻟﻜﻤﺒﻴﻮﺕﺮ اﻟﺨﺎص ﺏﻚ .ﺏﻌﺪ ذﻟﻚ ،ﻗﻢ ﺏﺘﻌﻄﻴﻞ ﺕﻄﺒﻴﻘﺎت ﻡﻜﺎﻓﺤﺔ اﻟﻔﻴﺮوﺳﺎت أو ﻡﻜﺎﻓﺤﺔ اﻟﺘﺠﺴﺲ ﺏﺸﻜﻞ ﻡﺆﻗﺖ ،ﺙﻢ أﻋﺪ ﺕﺜﺒﻴﺖ اﻟﺒﺮﻥﺎﻡﺞ اﻟﺨﺎص ﺏﺠﻬﺎز .HP Photosmart یﻤﻜﻨﻚ إﻋﺎدة ﺕﻤﻜﻴﻦ ﺕﻄﺒﻴﻘﺎت ﻡﻜﺎﻓﺤﺔ اﻟﻔﻴﺮوﺳﺎت أو ﻡﻜﺎﻓﺤﺔ اﻟﺘﺠﺴﺲ ﺏﻌﺪ اﻻﻥﺘﻬﺎء ﻡﻦ اﻟﺘﺜﺒﻴﺖ .
ﻟﻼﻥﺘﻘﺎل إﻟﻰ أﺳﻔﻞ اﻟﻘﺎﺋﻤﺔ .یﺘﻢ إدراج إدﺥﺎﻻت اﻟﺒﻨﻴﺔ اﻟﺘﺤﺘﻴﺔ ﻓﻲ اﻟﺠﺰء اﻟﻌﻠﻮي ﻡﻦ اﻟﻘﺎﺋﻤﺔ ﺏﻴﻨﻤﺎ یﺘﻢ إدراج إدﺥﺎﻻت ad اﻟﺤﻞ :اﻟﻤﺲ " hocآﻤﺒﻴﻮﺕﺮ ﻟﻜﻤﺒﻴﻮﺕﺮ" ﻓﻲ اﻟﺠﺰء اﻟﺴﻔﻠﻲ ﻡﻨﻬﺎ. اﻹﺵﺎرة ﺽﻌﻴﻔﺔ ﻋﺮﺑﻲ اﻟﺴﺒﺐ :ﺟﻬﺎز HP Photosmartﺏﻌﻴﺪ ﺟﺪًا ﻋﻦ ﺟﻬﺎز اﻟﺘﻮﺟﻴﻪ اﻟﻼﺳﻠﻜﻲ أو یﻮﺟﺪ ﺕﺸﻮیﺶ. ﻼ .
اﻟﻔﺼﻞ ٤ اﻟﺤﻞ: ﻗﻢ ﺏﺘﺸﻐﻴﻞ ﻋﻤﻠﻴﺔ اﻹﻋﺪاد اﻟﻼﺳﻠﻜﻲ ﻡﺮة أﺥﺮى ﺙﻢ أدﺥﻞ ﻋﺒﺎرة اﻟﻤﺮور اﻟﺼﺤﻴﺤﺔ .ﻋﺒﺎرة اﻟﻤﺮور ﺡﺴﺎﺳﺔ ﻟﺤﺎﻟﺔ اﻷﺡﺮف. ﺕﻈﻬﺮ ﺵﺎﺵﺔ ) The Printer Not Foundﺕﻌﺬر اﻟﻌﺜﻮر ﻋﻠﻰ اﻟﻄﺎﺑﻌﺔ( أﺙﻨﺎء اﻟﺘﺜﺒﻴﺖ ﻋﺮﺑﻲ اﻟﺴﺒﺐ :یﻤﻨﻊ ﺕﻄﺒﻴﻖ ﺟﺪار اﻟﺤﻤﺎیﺔ ,ﺏﺮﻥﺎﻡﺞ ﻡﻜﺎﻓﺤﺔ اﻟﻔﻴﺮوﺳﺎت أو ﺏﺮﻥﺎﻡﺞ ﻡﻜﺎﻓﺤﺔ اﻟﺘﺠﺴﺲ ﺟﻬﺎز HP Photosmartﻡﻦ اﻟﻮﺹﻮل إﻟﻰ اﻟﻜﻤﺒﻴﻮﺕﺮ اﻟﺨﺎص ﺏﻚ. اﻟﺤﻞ :ﻗﻢ ﺏﺈﻟﻐﺎء ﺕﺜﺒﻴﺖ اﻟﺒﺮﻥﺎﻡﺞ اﻟﺨﺎص ﺏﺠﻬﺎز ،HP Photosmartﺙﻢ أﻋﺪ ﺕﻤﻬﻴﺪ ﺟﻬﺎز اﻟﻜﻤﺒﻴﻮﺕﺮ اﻟﺨﺎص ﺏﻚ .
ﻟﺘﺤﺮﻳﺮ اﻥﺤﺸﺎر اﻟﻮرق ﻡﻦ اﻟﺒﺎب اﻟﻌﻠﻮي .١ﻗﻢ ﺏﺈیﻘﺎف ﺕﺸﻐﻴﻞ .HP Photosmart .٢اﻓﺘﺢ ﺏﺎب ﺥﺮﻃﻮﺷﺔ اﻟﺤﺒﺮ. ﻋﺮﺑﻲ .٣ ارﻓﻊ اﻟﺒﺎب اﻟﻌﻠﻮي اﻟﻤﻮﺟﻮد ﺥﻠﻒ ﺥﺮﻃﻮﺷﺎت اﻟﺤﺒﺮ ووﺡﺪة رأس اﻟﻄﺒﺎﻋﺔ. .٤ ﻗﻢ ﺏﺴﺤﺐ اﻟﻮرق ﻡﻦ اﻻﺳﻄﻮاﻥﺎت ﺏﻠﻄﻒ. ﺕﻨﺒﻴﻪ إذا ﺕﻤﺰق اﻟﻮرق ﻋﻨﺪ إزاﻟﺘﻪ ﻡﻦ اﻻﺳﻄﻮاﻥﺎت ،ﻓﻘﻢ ﺏﺒﺤﺚ اﻻﺳﻄﻮاﻥﺎت واﻟﻌﺠﻼت ﻋﻦ ﻗﻄﻊ اﻟﻮرق اﻟﺘﻲ ﻗﺪ ﺕﻜﻮن ﻗﺪ ﺏﻘﻴﺖ داﺥﻞ اﻟﺠﻬﺎز .إذا ﻟﻢ ﺕﻘﻢ ﺏﺈزاﻟﺔ ﺟﻤﻴﻊ ﻗﻄﻊ اﻟﻮرق ﻡﻦ ،HP Photosmartﺳﻴﺤﺪث ،ﻋﻠﻰ اﻷرﺟﺢ ،اﻟﻤﺰیﺪ ﻡﻦ اﻥﺤﺸﺎرات اﻟﻮرق. .٥ .٦ أﻏﻠﻖ اﻟﺒﺎب اﻟﻌﻠﻮي.
اﻟﻔﺼﻞ ٤ • • • • • ﻋﺮﺑﻲ • • • ﻗﻢ ﺏﺘﺜﺒﻴﺖ ﺥﺮﻃﻮﺷﺔ اﻟﺤﺒﺮ ﻓﻲ ﺕﺎریﺦ "ﺕﻢ اﻟﺘﺜﺒﻴﺖ ﻡﻦ ﺥﻼل" ,أو ﻗﺒﻠﻪ ,اﻟﻤﻄﺒﻮع ﻋﻠﻰ ﺕﻐﻠﻴﻒ اﻟﺨﺮﻃﻮﺷﺔ. اﺡﺘﻔﻆ ﺏﻜﻞ ﺥﺮﻃﻮﺷﺎت اﻟﺤﺒﺮ ﻡﻐﻠﻔﺔ ﻓﻲ ﺕﻐﻠﻴﻔﻬﺎ إﻟﻰ أن ﺕﺤﺘﺎج إﻟﻴﻬﺎ. ﻗﻢ ﺏﺈیﻘﺎف ﺕﺸﻐﻴﻞ ﺟﻬﺎز HP Photosmartﺏﻀﻐﻂ اﻟﺰر ) Onﺕﺸﻐﻴﻞ( اﻟﻤﻮﺟﻮد ﻋﻠﻰ ﺟﻬﺎز اﻟﻜﻤﺒﻴﻮﺕﺮ .ﻻ ﺕﻘﻢ ﺏﺈیﻘﺎف ﺕﺸﻐﻴﻞ اﻟﺠﻬﺎز ﻋﻦ ﻃﺮیﻖ إیﻘﺎف ﺕﺸﻐﻴﻞ اﻟﻤﺸﺘﺮك اﻟﻜﻬﺮﺏﺎﺋﻲ أو ﻋﻦ ﻃﺮیﻖ ﻗﻄﻊ ﺕﻮﺹﻴﻞ أﺳﻼك اﻟﺘﻴﺎر ﻡﻦ .
٥ اﻟﻤﻌﻠﻮﻡﺎت اﻟﻔﻨﻴﺔ یﺘﻨﺎول هﺬا اﻟﻘﺴﻢ اﻟﻤﻮاﺹﻔﺎت اﻟﻔﻨﻴﺔ واﻟﻤﻌﻠﻮﻡﺎت اﻟﺘﻨﻈﻴﻤﻴﺔ اﻟﺪوﻟﻴﺔ ﻟﺠﻬﺎز .HP Photosmart ﻡﺘﻄﻠﺒﺎت اﻟﻨﻈﺎم ﻡﺘﻄﻠﺒﺎت ﺏﺮﻥﺎﻡﺞ اﻟﻨﻈﺎم ﻡﻮﺟﻮدة ﻓﻲ ﻡﻠﻒ .Readme ﻡﻮاﺻﻔﺎت اﻟﻤﻨﺘﺞ ﻟﻠﺤﺼﻮل ﻋﻠﻰ ﻡﻮاﺹﻔﺎت اﻟﻤﻨﺘﺞ ,زر ﻡﻮﻗﻊ اﻟﻮیﺐ ﻟـ HPﻋﻠﻰ .www.hp.
اﻟﻔﺼﻞ ٥ ENERGY STARهﻲ ﻋﻼﻡﺔ ﺥﺪﻡﺔ ﻡﺴﺠﻠﺔ ﻓﻲ اﻟﻮﻻیﺎت اﻟﻤﺘﺤﺪة اﻷﻡﺮیﻜﻴﺔ ﺏﺎﺳﻢ وآﺎﻟﺔ اﻟﻤﺤﺎﻓﻈﺔ ﻋﻠﻰ اﻟﺒﻴﺌﺔ .EPAآﺸﺮیﻚ ﻓﻲ ﺏﺮﻥﺎﻡﺞ ،ENERGY STARﻓﺈن HPﺕﻀﻤﻦ أن هﺬا اﻟﻤﻨﺘﺞ یﺘﻄﺎﺏﻖ ﻡﻊ اﻟﻤﺒﺎدئ اﻷﺳﺎﺳﻴﺔ اﻟﺘﻲ یﻮﺹﻲ ﺏﻬﺎ ﺏﺮﻥﺎﻡﺞ ENERGY SATRﻡﻦ أﺟﻞ ﺏﻴﺌﺔ ﻥﻈﻴﻔﺔ. ﻟﻠﻤﺰیﺪ ﻡﻦ اﻟﻤﻌﻠﻮﻡﺎت ﺡﻮل ﺕﻮﺟﻴﻬﺎت ENERGY STARزر ﻡﻮﻗﻊ اﻟﻮیﺐ اﻟﺘﺎﻟﻲ: www.energystar.
اﻟﻀﻤﺎن ﻣﺪﺓ ﺍﻟﻀﻤﺎﻥ ﻣﺤﺪﻭﺩ ﻣﻨﺘﺞ HP ًﺎ ﺝﻡﺍﺭﺏﻝﺍ ﻁﺉﺍﺱﻭ ً. ُ ﺍﻟﻤﻠﺤﻘﺎﺕ ﻋﺎﻡ ﻭﺍﺣﺪ ﺃ -ﺣﺪﻭﺩ ﺍﻟﻀﻤﺎﻥ ﺍﻟﻤﺤﺪﻭﺩ ُ -١ﺗﻀﻤﻦ ﺷﺮﻛﺔ Hewlett-Packard HP ً HP ﻋﺮﺑﻲ HP ً ﻓﻲ ﺍﻟﺨﺎﻣﺔ ﺃﻭ ﻓﻲ HP ًﺎ ﻣﻦ ﺍﻷﺧﻄﺎء. HP HP؛ ﺃﻭ -٤ﺑﺎﻟﻨﺴﺒﺔ ﻟﻤﻨﺘﺠﺎﺕ HP HP ﺍ HP HP HPﺑﺘﺤ -٥ﺇﺫﺍ ﺗﻠﻘﺖ ﺷﺮﻛﺔ HP ً HP -٦ﺇﺫﺍ ﺗﻌﺬﺭ ﻋﻠﻰ ﺷﺮﻛﺔ HP HP .