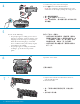
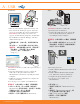
Start Here ㈭㷳壤栚ⱚ 1 2 USB 802.11 Ethernet USB cable users: Do not connect the USB cable until Section A. Wireless or wired network users: you must follow the instructions in this Setup Guide to be successful adding the HP Photosmart to your network. USB 儫偩∎䞷劔 ᤜ⦷拁嫛Ⓙ A 捷⒕ ⃚ⓜ 嵚ₜ尐抲㘴 USB 儫偩ᇭ 䎰偩㒥㦘偩偁恾∎䞷劔 ᤜ㌷㉔檗∬䏶㦻ᇵ⸘ 孬㖖◦ᇶ₼䤓㖖䯉拁嫛㝜⇫᧨㓜厌㒟┮⦿⺖ HP Photosmart 㠿⬭咂偁恾ᇭ a a. Remove all tape, tabs, and protective film from the lid and from the front and back of the device. b.
4 a. Connect the power cord and adapter. b. Press to turn on the HP Photosmart. NOTE: Pay attention to the helpful messages and animations on the display during the setup process. a. 㘴ₙ榊䄟偩咖懘㘴⣷ᇭ b. 㖘ₚ ☂♾栚⟮ HP Photosmartᇭ 㽷㎞ᤜ ⸘孬拝䲚₼᧨嵚㽷㎞櫾䯉⣷ₙ⒉䚍䤓㦘䞷岙 ㋾✛╤䟺ᇭ 5 Do one of the following: • If a prompt appears asking you to select a language, touch the arrows to display your language in the list of up to 25 languages. Touch the desired language, and touch Yes to confirm.
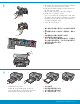
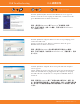
8 a. Match the color and pattern of the ink cartridge to the color and pattern above the latches. b. Push the black ink cartridge in to the first slot on the left. Close the latch. c. Repeat with each of the color ink cartridges. d. Make sure each latch is secure. Note: Use only the ink cartridges that came with the printer. The ink in these cartridges is specially formulated to mix with the ink in the print head assembly at first-time setup. e. Close the access door. a b a.
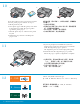
10 a b If you have photo paper, load it now. If you do not have photo paper, continue to step 11. a. Lift the photo tray lid. b. Load photo paper with the glossy side down in the photo tray. Slide the paper guides against the photo paper. c. Push the photo tray in, and lower the photo tray lid. d. Pull out the tray extender and lift up the paper catch. 11 d Ⱁ㨫㦘䦇侨᧨嵚䵚☂孬⏴ᇭⰑ㨫㼡㦘䦇侨᧨嵚儋儛⪆ 嫛㷴泮 ᇭ a. 㔻怆䦇䓖▲坚㨎ᇭ b. ⺖䦇侨ⅴ ⏘槱㦬ₚ 䤓㡈㆞孬⏴䦇䓖▲ᇭ䅠╤侨㇄⺝ 㨎᧨䦃Ⓙ偙彋䦇侨挙偲ᇭ c. 㘷⏴䦇䓖▲᧨䏅㈛㟍ₚ䦇䓖▲坚㨎ᇭ d. 㕘⒉侨▲ㆅ⇇㩅᧨₵㔻怆㘴侨⣷ᇭ a.
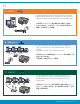
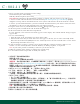
13 A - USB Use the instructions in Section A if you want to connect the HP Photosmart directly to one computer. (Do not connect the USB cable until Section A). Equipment needed: USB cable. Ⱁ㨫尐⺖ HP Photosmart 䦃㘴抲㘴咂㩟♿榊叵᧨嵚♒劒 捷⒕ ₼䤓㖖䯉ᇭ ⦷拁嫛Ⓙ A 捷⒕⃚ⓜ嵚ₜ尐抲㘴 USB A 儫偩 ᇭ㓏榏岼⌨ᤜUSB 儫偩ᇭ B - Ethernet Use the instructions in Section B if you want an Ethernet cable connection between the HP Photosmart and your network. Equipment needed: router and Ethernet cable.
A - USB Windows: Mac: a. Turn on your computer, login if necessary, and then wait for the desktop to appear. Insert the green CD and follow the onscreen instructions. IMPORTANT: If the startup screen does not appear, double-click My Computer, double-click the CD-ROM icon with the HP logo, and then double-click setup.exe. IMPORTANT: Purchase a USB cable separately if it is not included. a. Connect the USB cable to the port on the back of the HP Photosmart, and then to any USB port on the computer.
USB Troubleshooting USB 䠠楲㘡屲 www.hp.com/support Problem: (Windows) The Microsoft Add Hardware screen appears. Action: Cancel all screens. Unplug the USB cable, and then insert the green HP Photosmart CD. Refer to Section A. ⟞櫛᧶ ⍔拸䞷㡋 Windows 櫾䯉 Microsoftᇷ㠿⬭䫻浣ᇸ䟺槱ᇭ ╤⇫᧶ ♥䀗㓏㦘䟺槱ᇭ㕣㘘 USB 儫偩᧨␜㙡⏴倯唁 HP Photosmart CDᇭ嵚♒劒 $ 捷⒕ ᇭ Problem: (Windows only) You did not see the screen prompting you to connect the USB cable. Action: Cancel all screens. Remove, and then re-insert the green HP Photosmart CD.
B - Ethernet a. Locate your Ethernet cable. b. Remove the yellow plug from the back of the device. c. Connect one end of the Ethernet cable to the Ethernet port on the back of the device. d. Connect the other end of the Ethernet cable to the router (not in the Internet port). e. Go to Section D of this Setup Guide to install your software. Important: Your computer and the HP Photosmart must be on the same active, working network.
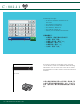
C - 802.11 a. Locate and write down your wireless router settings Network Name (also called SSID):______________________________________________________ WEP key/WPA Passphrase (if needed):__________________________________________________ IMPORTANT:You must have this information available to continue with your wireless setup. HP provides a web-based tool called the Wireless Network Assistant [URL: www.hp.com/go/networksetup (English only)] that can help retrieve this information for some systems.
C - 802.11 A B C D E F G H I J K L M N O P Q R S T U V W X Y Z abc 123 .@! Clear Done HP Photosmart D7400 series Visual Keyboard tips: • To Select: touch the desired letter or character • For mistakes: Touch Clear • For lowercase: Touch abc • For numbers: Touch 123 • For symbols: Touch .
/ D1 - Ethernet/ 802.11 Windows: a. Turn on your computer, login if necessary, and then wait for the desktop to appear. b. Insert the green CD and follow the onscreen instructions to install the software. IMPORTANT: If the startup screen does not appear, double-click My Computer, double-click the CD-ROM icon with the HP logo, and then double-click setup.exe. c. On the Connection Type screen, make sure to select through the network. d.
D2 - Ethernet/ 802.11 / If you have additional computers on your network, install the HP Photosmart software on each computer. Follow the onscreen instructions. Make sure that you choose the connection types between the network and your HP Photosmart (not between your computer and the network).
www.hp.com/support Problem: After you run the Wireless Setup Wizard from the HP Photosmart control panel, the HP Photosmart cannot connect to the network. Action: • You can print a diagnostic report that may help identify the problem. Run the Wireless Network Test from the HP All-in One control panel Network Menu. • If you entered your network name (SSID) manually using the Wireless setup Wizard, you may have not typed the name correctly.
www.hp.com/support Problem: You see the error message Invalid WEP key or Invalid WPA passphrase when you run the Wireless Setup Wizard. Action: • You may have typed the WEP key or WPA passphrase incorrectly. These security keys are case sensitive and must be typed exactly. Make sure you have not accidently inserted blank spaces at the beginning or end.
c. Print a 4 x 6 inch photo ⒦◿ 10 x 15 ⏻摟䦇䓖 a. If you have not already done so, load photo paper in the photo tray. b. Insert the memory card from your camera into the appropriate memory card slot. a. Ⱁ㨫㌷⺩㦹⪆嫛㷳㝜⇫᧨嵚⦷䦇䓖▲₼孬⏴䦇 侨ᇭ b. ⺖䦇㳮₼䤓岧㑅◰㙡⏴䦇㑘䤓岧㑅◰㙡㲌₼ᇭ d. Photosmart Express View Photos 1/999 e. View Photos 1/999 View Print Create Share f.
Explore more features 䊞屌㦃⮩┮厌 Printable School Papers: Did you know you can print school papers from your HP Photosmart? Print notebook paper, graph paper, task checklists, or even music paper from the control panel. Using the (Setup) touch screen of your HP Photosmart, touch to access Printable School Papers.