HP Photosmart Premium Fax C309 series Basics Guide
Hewlett-Packard Company notices The information contained in this document is subject to change without notice. All rights reserved. Reproduction, adaptation, or translation of this material is prohibited without prior written permission of Hewlett-Packard, except as allowed under copyright laws. The only warranties for HP products and services are set forth in the express warranty statements accompanying such products and services. Nothing herein should be construed as constituting an additional warranty.
1 Network setup Add the HP Photosmart to a network.........................................................................................2 Install the software for a network connection.............................................................................9 Connect to additional computers on a network..........................................................................9 Change the HP Photosmart from a USB connection to a network connection.........................
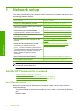
1 Network setup This section describes how to connect the HP Photosmart to a network and how to view and manage network settings. Network setup If you want to: See this section: Connect to a wired (Ethernet) network. “Wired (Ethernet) network” on page 2 Connect to a wireless network with a wireless router (infrastructure). “Wireless with a router (infrastructure network)” on page 4 Connect directly to a wireless-capable computer without a wireless router (ad hoc).
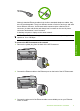
Although standard Ethernet cables look similar to standard telephone cables, they are not interchangeable. There is a different number of wires in each one, and each has a different connector. An Ethernet cable connector (also called an RJ-45 connector) is wider and thicker and always has 8 contacts on the end. A phone connector has between 2 and 6 contacts. A desktop computer or laptop on the same network. NOTE: The HP Photosmart supports networks with automatic speed negotiation capable of 10 or 100 Mbps.
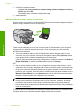
Chapter 1 4. Once you have connected the HP Photosmart to the network, install the software. Wireless with a router (infrastructure network) To connect the HP Photosmart to an integrated wireless WLAN 802.11 network, you will need the following: Network setup A wireless 802.11 network that includes a wireless router or access point. A desktop computer or laptop with either wireless networking support, or a network interface card (NIC).
5. Press the down arrow button to highlight the name of the network you wrote down in step 1, and then press OK. If you do not see your network name in the list a. Select Enter a New Network Name (SSID). If necessary, use the down arrow button to highlight it, and then press OK. The visual keyboard appears. b. Enter the SSID. Use the arrow buttons on the control panel to highlight a letter or number on the visual keyboard, and then press OK to select it. c.
Chapter 1 3. Connect to wireless network. Highlight Yes, set up printer on network using wireless settings on memory device and press OK. Press OK to print a network configuration page. 4. Install software. Wireless without a router (ad hoc connection) Use this section if you want to connect the HP Photosmart to a wireless-capable computer without using a wireless router or access point.
To create a network profile for a Windows XP computer NOTE: The product comes configured with a network profile with hpsetup as the network name (SSID). However, for security and privacy HP recommends you create a new network profile on your computer as described here. 1. In the Control Panel, double-click Network Connections. 2. On the Network Connections window, right-click the Wireless Network Connection. If you see Enable on the pop-up menu, select it.
Chapter 1 configuration program for your wireless LAN card, access your computer's list of programs. Using the LAN card configuration program, create a network profile that has the following values: To create a network profile for other operating sysytems • Network name (SSID): Mynetwork (example only) NOTE: You should create a network name that is unique and easy for you to remember. Just remember that the network name is case-sensitive.
Install the software for a network connection Use this section to install the HP Photosmart software on a computer connected to a network. Before you install the software, make sure you have connected the HP Photosmart to a network. NOTE: If your computer is configured to connect to a series of network drives, make sure that your computer is currently connected to these drives before installing the software.
Chapter 1 Change the HP Photosmart from a USB connection to a network connection If you first install the HP Photosmart with a USB connection, you can later change to either a wireless or Ethernet network connection. If you already understand how to connect to a network, you can use the general directions below. NOTE: For optimal performance and security in your wireless network, use an access point (such as a wireless router) to connect the HP Photosmart.
1. In the firewall configuration utility, look for an option to trust computers on the local subnet (sometimes called the “scope” or “zone”). By trusting all computers on the local subnet, computers and devices in your home can communicate with each other while still being protected from the internet. This is the easiest approach to use. 2. If you do not have the option to trust computers on the local subnet, add incoming UDP port 427 to your firewall's list of allowed ports.
Chapter 1 Manage your network settings The HP Photosmart control panel enables you to perform a variety of network management tasks. This includes printing the network settings, restoring the network defaults, turning the wireless radio on and off, and printing a wireless network test. Print network settings You can display a summary of the network settings on the HP Photosmart control panel, or you can print a more detailed configuration page.
Print the wireless network test The wireless network test performs a series of diagnostic tests to determine whether network setup is successful. If an issue is detected, a recommendation on how to correct the issue will be included on the printed report. You can print the wireless network test at any time. Network setup 1. Press Setup. 2. Press the down arrow button until Network is highlighted, and then press OK. 3.
2 Fax setup After completing all the steps in the Setup Guide, use the instructions in this section to complete your fax setup. Please keep your Setup Guide for later use. In this section, you will learn how to set up the HP Photosmart so that faxing works successfully with equipment and services you might already have on the same phone line as the HP Photosmart.
Countries/regions with a parallel-type phone system (continued) Korea Latin America Malaysia Mexico Philippines Poland Portugal Russia Saudi Arabia Singapore Spain Taiwan Thailand USA Venezuela Vietnam If you are unsure which kind of telephone system you have (serial or parallel), check with your telephone company.
Chapter 2 4. 5. 6. 7. and another phone number with double rings to your fax calls. This allows you to tell the difference between voice and fax calls when the phone rings. Do you receive voice calls at the same phone number you will use for fax calls on the HP Photosmart? Yes, I receive voice calls. No. Please continue answering questions. Do you have a computer dial-up modem on the same phone line as the HP Photosmart? Yes, I have a computer dial-up modem. No.
Other equipment/services sharing your fax line Recommended fax setup for parallel-type phone systems Recommended fax setup for serial-type phone systems None “Case A: Separate fax line (no voice calls received)” on page 18 “Case A: Separate fax line (no voice calls received)” on page 18 “Case B: Set up the HP Photosmart with DSL” on page 19 “Case B: Set up the HP Photosmart with DSL” on page 19 “Case C: Set up the HP Photosmart with a PBX phone system or an ISDN line” on page 20 “Case C: Set up the
Chapter 2 Austria www.hp.com/at/faxconfig Germany www.hp.com/de/faxconfig Switzerland (French) www.hp.com/ch/fr/faxconfig Switzerland (German) www.hp.com/ch/de/faxconfig United Kingdom www.hp.com/uk/faxconfig Spain www.hp.es/faxconfig The Netherlands www.hp.nl/faxconfig Belgium (French) www.hp.be/fr/faxconfig Belgium (Dutch) www.hp.be/nl/faxconfig Portugal www.hp.pt/faxconfig Sweden www.hp.se/faxconfig Finland www.hp.fi/faxconfig Denmark www.hp.dk/faxconfig Norway www.hp.
To set up the product with a separate fax line 1. Using the phone cord supplied in the box with the product, connect one end to your telephone wall jack, then connect the other end to the port labeled 1-LINE on the back of the product. NOTE: If you do not use the supplied cord to connect from the telephone wall jack to the product, you might not be able to fax successfully. This special phone cord is different from the phone cords you might already have in your home or office. 2.
Chapter 2 To set up the product with DSL 1. Obtain a DSL filter from your DSL provider. 2. Connect the DSL filter cord to the telephone wall jack. NOTE: If you do not use the supplied cord to connect from the telephone wall jack to the product, you might not be able to fax successfully. This special phone cord is different from the phone cords you might already have in your home or office. 3.
Case D: Fax with a distinctive ring service on the same line If you subscribe to a distinctive ring service (through your telephone company) that allows you to have multiple phone numbers on one phone line, each with a different ring pattern, set up the HP Photosmart as described in this section.
Chapter 2 Case E: Shared voice/fax line If you receive both voice calls and fax calls at the same phone number, and you have no other office equipment (or voice mail) on this phone line, set up the HP Photosmart as described in this section. Figure 2-4 Back view of the HP Photosmart 1 Telephone wall jack 2 Use the phone cord supplied in the box with the HP Photosmart to connect to the "1-LINE" port 3 Telephone (optional) To set up the product with a shared voice/fax line 1.
3. Do one of the following, depending on your phone system: • If you have a parallel-type phone system, remove the white plug from the port labeled 2-EXT on the back of the product, and then connect a phone to this port. • If you have a serial-type phone system, you might plug your phone directly on top of the product cable which has a wall plug attached to it. 4. Run a fax test.
Chapter 2 To set up the product with voice mail 1. Using the phone cord supplied in the box with the product, connect one end to your telephone wall jack, then connect the other end to the port labeled 1-LINE on the back of the product. NOTE: If you do not use the supplied cord to connect from the telephone wall jack to the product, you might not be able to fax successfully. This special phone cord is different from the phone cords you might already have in your home or office. 2.
To set up the product with a computer dial-up modem 1. Remove the white plug from the port labeled 2-EXT on the back of the product. 2. Find the phone cord that connects from the back of your computer (your computer dial-up modem) to a telephone wall jack. Disconnect the cord from the telephone wall jack and plug it into the port labeled 2-EXT on the back of the product. 3.
Chapter 2 • • If your computer has only one phone port, you will need to purchase a parallel splitter (also called a coupler). Refer to the Electronic Help for specific setup instructions. If your computer has two phone ports, set up the HP Photosmart as described below.
5. If your modem software is set to receive faxes to your computer automatically, turn off that setting. NOTE: If you do not turn off the automatic fax reception setting in your modem software, the product will not be able to receive faxes. 6. Now you need to decide how you want the product to answer calls, automatically or manually: • If you set up the product to answer calls automatically, it answers all incoming calls and receives faxes.
Chapter 2 Case I: Shared voice/fax line with answering machine If you receive both voice calls and fax calls at the same phone number, and you also have an answering machine that answers voice calls at this phone number, set up the HP Photosmart as described in this section.
4. (Optional) If your answering machine does not have a built-in phone, for convenience you might want to connect a phone to the back of your answering machine at the "OUT" port. NOTE: If your answering machine does not let you connect an external phone, you can purchase and use a parallel splitter (also known as a coupler) to connect both the answering machine and telephone to the HP Photosmart. You can use standard phone cords for these connections. 5.
Chapter 2 • • If your computer has only one phone port, you will need to purchase a parallel splitter (also called a coupler). Refer to the Electronic Help for specific setup instructions. If your computer has two phone ports, set up the HP Photosmart as described below.
4. Using the phone cord supplied in the box with the product, connect one end to your telephone wall jack, then connect the other end to the port labeled 1-LINE on the back of the product. NOTE: If you do not use the supplied cord to connect from the telephone wall jack to the product, you might not be able to fax successfully. This special phone cord is different from the phone cords you might already have in your home or office. 5.
Chapter 2 There are two different ways to set up the HP Photosmart with your computer based on the number of phone ports on your computer. Before you begin, check your computer to see if it has one or two phone ports. • • If your computer has only one phone port, you will need to purchase a parallel splitter (also called a coupler). Refer to the Electronic Help for specific setup instructions. If your computer has two phone ports, set up the HP Photosmart as described below.
5. If your modem software is set to receive faxes to your computer automatically, turn off that setting. NOTE: If you do not turn off the automatic fax reception setting in your modem software, the product will not be able to receive faxes. 6. Turn off the Auto Answer setting. 7. Run a fax test. You must be available to respond in person to incoming fax calls, or the HP Photosmart cannot receive faxes.
Chapter 2 3. Press the down arrow button to highlight Advanced Fax Setup, and then press OK. 4. Press the down arrow button to highlight Distinctive Ring, and then press OK. 5. Press the down arrow button to highlight the appropriate option, and then press OK. When the phone rings with the ring pattern assigned to your fax line, the product answers the call and receives the fax. Set the fax header The fax header prints your name and fax number on the top of every fax you send.
Fax setup 3. Press the down arrow button to highlight Tools, and then press OK. 4. Press the down arrow button to highlight Run Fax Test, and then press OK. The HP Photosmart displays the status of the test on the display and prints a report. 5. Review the report. • If the test passes and you are still having problems faxing, check the fax settings listed in the report to verify the settings are correct. A blank or incorrect fax setting can cause problems faxing.
3 HP Photosmart overview Use the HP Photosmart to quickly and easily accomplish tasks such as making a copy, scanning documents, or printing photos from a memory card or USB storage device. You can access many HP Photosmart functions directly from the control panel, without turning on your computer. NOTE: This guide introduces basic operations and troubleshooting, as well as provides information for contacting HP support and ordering supplies.
(continued) Label Description 12 Photo light 13 Memory card slot for CompactFlash cards 14 Front USB/PictBridge port for your camera or other storage device 15 Lid backing 16 Lid 17 Glass 18 Cartridge door access handle 19 Paper-width guide for the main input tray 20 Main input tray (also referred to as the input tray) Label Description 21 Printhead assembly 22 Cartridge access area 23 Model number location 24 Rear USB port 25 Ethernet port 26 Power connection* 27 1-LINE (
Chapter 3 1 OK 2 abc 3 def 4 ghi 5 jkl 6 mno 7 pqrs 8 tuv 9 wxyz * 0 # CD/DVD HP Photosmart overview Label Name and Description 1 Color graphics display (also referred to as the display): Displays menus, photos, and messages. The display can be pulled up and angled for better viewing. 2 Back: Returns to the previous screen. 3 Menu: Presents a set of options related to the current display. 4 Attention light: Indicates a problem occurred. See the display for more information.
(continued) Label Name and Description 20 Start Fax: Sends or receives a black-and-white or color fax. 21 CD/DVD access door handle: Lowers the CD/DVD tray. 22 Start Copy: Starts a black-and-white or color copy. 23 Start Scan: Opens the Scan Menu where you can select a destination for your scan. 24 Print Photos: Prints the photos selected on your memory card. If no photos are currently selected, the product prints the photo currently showing on the display.
Chapter 3 HP Web site If you have Internet access, you can get help and support from the HP Web site at www.hp.com/support. This Web site offers technical support, drivers, supplies, and ordering information. Load paper You can load different types and sizes of paper in the HP Photosmart, including letter or A4 paper, photo paper, transparencies, and envelopes. For more information, see the Electronic Help. To load full-size paper 1. Raise the output tray.
CAUTION: Make sure that the product is idle and silent when you load paper into the main input tray. If the product is servicing the ink cartridges or otherwise engaged in a task, the paper stop inside the product might not be in place. You could push the paper too far forward, causing the product to eject blank pages. TIP: If you are using letterhead, insert the top of the page first with the print side down. 4. Slide the paper-width guide inward until it stops at the edge of the paper.
Chapter 3 2. Slide the paper-width guide to its outermost position. 3. Insert the stack of photo paper into the photo tray with the short edge forward and the print side down. Slide the stack of photo paper forward until it stops. If the photo paper you are using has perforated tabs, load the photo paper so that the tabs are closest to you. 4. Slide the paper-width guide inward until it stops at the edge of the paper.
Avoid paper jams To help avoid paper jams, follow these guidelines. • • • • • • • • Remove printed papers from the output tray frequently. Prevent curled or wrinkled photo paper by storing all unused photo paper flat in a resealable bag. Ensure that paper loaded in the input tray lays flat and the edges are not bent or torn. If you are printing labels, ensure that the label sheets are no more than two years old.
Chapter 3 1 Memory Stick, Memory Stick Pro, Memory Stick Select, Memory Stick Magic Gate, Memory Stick Duo or Duo Pro (adapter optional), or Memory Stick Micro (adapter required) 2 MultiMedia Card (MMC), MMC Plus, Secure MultiMedia Card, MMC Mobile (RS-MMC; adapter required), Secure Digital (SD), Secure Digital Mini (adapter required), Secure Digital High Capacity (SDHC), TransFlash MicroSD Card (adapter required), or xD-Picture card 3 CompactFlash (CF) types I and II 4 Front USB port/Pictbridge: Fo
Scan an image You can start a scan from your computer or from the control panel of the HP Photosmart. This section explains how to scan from the control panel of the HP Photosmart only. NOTE: You can also use the software you installed with the HP Photosmart to scan images. Using this software, you can edit a scanned image and create special projects using a scanned image. To scan to a computer 1.
Chapter 3 TIP: You can also send a fax manually by dialing from a phone or by using the monitor dialing feature from the control panel. These features allow you to control the pace of your dialing. They are also useful when you want to use a calling card to charge the call and you need to respond to tone prompts while dialing. For more information about fax reports, sending faxes manually, and other fax features, see the Electronic Help. To send a basic fax from the control panel 1.
The print carriage moves to the center of the product. NOTE: Wait until the print carriage stops moving before proceeding. 4. Press the tab on the front of the cartridge to release it, and then remove it from the slot. CAUTION: Do not lift the latch handle on the print carriage to remove the cartridges. 5. Remove the new cartridge from its packaging by pulling the orange pull-tab straight back to remove the plastic wrap from the cartridge.
Chapter 3 6. Twist the orange cap to snap it off. 7. Using the colored shaped icons for help, slide the cartridge into the empty slot until it clicks into place and is seated firmly in the slot. CAUTION: Do not lift the latch handle on the print carriage to install the cartridges. Doing so can result in incorrectly seated cartridges and printing problems. The latch must remain down in order to correctly install the cartridges.
Troubleshooting and support This chapter contains troubleshooting information for the HP Photosmart. Specific information is provided for installation and configuration issues, and some operational topics. For more troubleshooting information, see the Electronic Help that came with your software. Many issues are caused when the HP Photosmart is connected to the computer using a USB cable before the HP Photosmart software is installed on the computer.
Chapter 4 Troubleshooting and support To verify that the software is properly installed, double-click the HP Solution Center icon on the desktop. If the HP Solution Center shows the essential icons (Scan Picture and Scan Document), the software has been properly installed. Setup troubleshooting Use this section to solve any problems you might encounter while setting up the HP Photosmart hardware.
Solution: If you have completed all of the steps provided in the previous solutions and are still having a problem, contact HP support for service. Go to: www.hp.com/support. If prompted, choose your country/region, and then click Contact HP for technical support. Cause: You might need assistance to enable the product or software to function properly.
Chapter 4 If this did not solve the issue, try the next solution. Troubleshooting and support Solution 4: Check the connection between the product and computer Solution: Check the connection between the product and computer. Cause: The product and computer were not communicating with each other. If this did not solve the issue, try the next solution. Solution 5: Check that the ink cartridges are installed properly and have ink Solution: Check that the ink cartridges are installed properly and have ink.
To check a wired (Ethernet) connection ▲ Where the Ethernet cable from the router connects to your computer, check to see if the indicator lights are on. Usually there are two indicator lights, one that is on and another that blinks. If you do not see any lights, try reconnecting the Ethernet cable to the computer and the router. If you still do not see lights, there might be a problem with the router or your computer. To check a wireless connection 1.
Chapter 4 c. Troubleshooting and support Press the down arrow button until View Network Settings is highlighted, and then press OK. d. Press the down arrow button until Print Network Configuration Page is highlighted, and then press OK. This prints the Network Configuration Page. Network Status • • URL If the Network Status is Ready, the product is actively connected to a network. If the Network Status is Offline, the product is not connected to a network.
Step 5: Make sure the HP Network Devices Support service is running To restart the HP Network Device Support service 1. Delete any print jobs currently in the print queue. 2. Do one of the following, depending on your operating system: • Windows XP: Click Start, right-click My Computer, and click Manage. Double-click Services and Applications, and then select Services. • Windows Vista: Click Start, right-click Computer, and click Manage. Double-click Services and Applications, and then select Services. 3.
Chapter 4 Troubleshooting and support • • • • • • • • Solution 8: Make sure extension phones or other equipment on the phone line are not in use Solution 9: Make sure the product is connected to an analog phone line Solution 10: If you use a DSL service, make sure you have a DSL filter installed Solution 11: If you use a DSL service, make sure the DSL modem is properly grounded Solution 12: If you use a PBX or ISDN converter, make sure you are using a port designated for fax and phone use Solution 13: Ch
Solution 3: Make sure you are using the correct type of phone cord NOTE: This possible solution applies only in the countries/regions that receive a 2-wire phone cord in the box with the product, including: Argentina, Australia, Brazil, Canada, Chile, China, Colombia, Greece, India, Indonesia, Ireland, Japan, Korea, Latin America, Malaysia, Mexico, Philippines, Poland, Portugal, Russia, Saudi Arabia, Singapore, Spain, Taiwan, Thailand, USA, Venezuela, and Vietnam.
Chapter 4 Troubleshooting and support Cause: The wrong phone cord was used to connect the product or the phone cord was plugged into the wrong port. If this did not solve the issue, try the next solution.
Solution: Try connecting a working telephone and phone cord to the telephone wall jack you are using for the product and check for a dial tone. If you do not hear a dial tone, call your local telephone company for service. Cause: The telephone wall jack was not working properly. If this did not solve the issue, try the next solution.
Chapter 4 If this did not solve the issue, try the next solution. Troubleshooting and support Solution 10: If you use a DSL service, make sure you have a DSL filter installed Solution: If you use a DSL service, make sure that you have a DSL filter connected or you will not be able to fax successfully. The DSL service sends out a digital signal on the phone line that can interfere with the product, preventing the product from sending and receiving faxes.
Solution 13: Check for and resolve any error messages Solution: Check the display or your computer for an error message providing information about the problem and how to solve it. If there is an error, the product will not send or receive a fax until the error condition is resolved. You can also check the status of the product by clicking Status in the HP Solution Center. Cause: Another process caused an error in the product. If this did not solve the issue, try the next solution.
Chapter 4 Troubleshooting and support • • • Solution 2: Check the fax number Solution 3: Dial the fax number more slowly Solution 4: Check the receiving fax machine for problems Solution 1: Make sure the product is set up for faxing correctly Solution: Make sure you set up the product properly for faxing, based on the equipment and services you have on the same phone line as the product. For more information, see “Set up the HP Photosmart for faxing” on page 14.
Solution 4: Check the receiving fax machine for problems Solution: Try calling the fax number from a telephone and listen for fax tones. If you cannot hear fax tones, the receiving fax might not be turned on or connected, or a voice mail service could be interfering with the recipient's phone line. You can also ask the recipient to check the receiving fax machine for any problems. Cause: The receiving fax machine was having problems.
Chapter 4 Troubleshooting and support 1 Telephone wall jack 2 Use the phone cord supplied in the box with the product 3 Telephone For more information on setting up the product with your telephone, see the printed documentation that came with the product. Cause: The telephone used to initiate the fax call was not connected directly to the product or was not connected properly. If this did not solve the issue, try the next solution.
Fax speed Fast (33600) v.34 (33600 baud) Medium (14400) v.17 (14400 baud) Slow (9600) v.29 (9600 baud) Cause: The Fax Speed setting might have been set too fast. Fax tones are recorded on my answering machine Try the following solutions to resolve the issue. Solutions are listed in order, with the most likely solution first. If the first solution does not solve the problem, continue trying the remaining solutions until the issue is resolved.
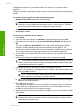
Chapter 4 Troubleshooting and support 1 Telephone wall jack 2 Connect to the IN port on the answering machine 3 Connect to the OUT port on the answering machine 4 Telephone (optional) 5 Answering machine 6 Use the phone cord supplied in the box with the product Make sure the product is set to receive faxes automatically and that the number of rings to wait setting is correct.
Try the following solutions to resolve the issue. Solutions are listed in order, with the most likely solution first. If the first solution does not solve the problem, continue trying the remaining solutions until the issue is resolved.
Chapter 4 Solution 2: Check the Auto Answer setting Troubleshooting and support Solution: Depending on your office setup, you might be able to set the product to answer incoming calls automatically. To find out what the recommended answer mode is for your office setup, see the printed documentation that came with the product. If you must have Auto Answer off, you will need to press Start Fax to receive a fax. Cause: Auto Answer was turned off, which means that the product would not answer incoming calls.
Solution NOTE: This possible solution applies only in the countries/regions that receive a 2-wire phone cord in the box with the product, including: Argentina, Australia, Brazil, Canada, Chile, China, Colombia, Greece, India, Indonesia, Ireland, Japan, Korea, Latin America, Malaysia, Mexico, Philippines, Poland, Portugal, Russia, Saudi Arabia, Singapore, Spain, Taiwan, Thailand, USA, Venezuela, and Vietnam.
Chapter 4 If this did not solve the issue, try the next solution. Troubleshooting and support Solution 7: If you use a distintive ring service, make sure the Distinctive Ring setting matches the ring pattern for your fax number Solution: If you have a special ring pattern for your fax phone number (using a distinctive ring service through your telephone company), make sure that the Distinctive Ring setting on the product is set to match.
• The print carriage is not stalled or blocked. Turn off the product, remove any objects that are blocking the print cartridge carriage (including any packing materials), and then turn on the product again. Resolve any problems found. The product automatically begins printing all the unprinted faxes from memory. To clear the memory, you can also delete the faxes stored in memory by turning off the product. Cause: The memory of the product was full. If this did not solve the issue, try the next solution.
Chapter 4 Troubleshooting and support NOTE: If the product has an alignment message, you might be able to press the button next to OK to clear the message and resume faxing. After you resolve any problems found, the product can begin answering incoming fax calls. Cause: An error condition was preventing the product from receiving faxes and Backup Fax Reception was set to Off.
Solution • Turn off the product by pressing the On button located on the control panel and then unplug the power cord from the back of the product. After a few seconds, plug the power cord back in and turn the power on. Run the test again. If the test fails again, continue reviewing the troubleshooting information in this section. NOTE: Depending how long the product is unplugged, the date and time might be erased. You might need to reset the date and time later, when you plug the power cord back in.
Chapter 4 • Troubleshooting and support If you are using a phone splitter, this can cause faxing problems. (A splitter is a two-cord connector that plugs into a telephone wall jack.) Try removing the splitter and connecting the product directly to the telephone wall jack. • Try connecting a working phone and phone cord to the telephone wall jack that you are using for the product and check for a dial tone. If you do not hear a dial tone, contact your telephone company and have them check the line.
Troubleshooting and support • 1 Telephone wall jack 2 Phone cord supplied in the box with the product Check the connection between the telephone wall jack and the product to make sure the phone cord is secure. The "Fax Line Condition" test failed Solution • Make sure you connect the product to an analog phone line or you will not be able to send or receive faxes. To check if your phone line is digital, connect a regular analog phone to the line and listen for a dial tone.
Chapter 4 NOTE: If you are unsure of the kind of phone line you have (analog or digital), check with your service provider. Troubleshooting and support The "Dial Tone Detection" test failed Solution • Other equipment, which uses the same phone line as the product, might be causing the test to fail. To find out if other equipment is causing a problem, disconnect everything except the product from the phone line, and then run the test again.
• Check to make sure the country/region setting is set appropriately for your country/region. If the country/region setting is not set or is set incorrectly, the test might fail and you might have problems sending and receiving faxes. Make sure you connect the product to an analog phone line or you will not be able to send or receive faxes. To check if your phone line is digital, connect a regular analog phone to the line and listen for a dial tone.
Chapter 4 4. Troubleshooting and support 5. 6. If the paper jam is cleared, proceed to step 5. If the paper jam is not cleared, do the following: a. Open the Two-sided printing accessory by pulling the tabs up. b. Remove any paper from inside the accessory. c. Close the Two-sided printing accessory by pressing the tabs down until they lock into place. Replace the Two-sided printing accessory. Gently push the accessory forward until it snaps into place.
If you have a problem, follow these steps: 1. Check the documentation that came with the product. 2. Visit the HP online support Web site at www.hp.com/support. HP online support is available to all HP customers.
5 Technical information The technical specifications and international regulatory information for the HP Photosmart are provided in this section. For additional regulatory and environmental information, including the Declaration of Conformity statement, see the Electronic Help. System requirements Software system requirements are located in the Readme file. Product specifications For product specifications, go to the HP Web site at www.hp.com/support.
Technical information Warranty Warranty 81
Chapter 5 Technical information 82 Technical information
www.hp.