HP LaserJet M9040/M9050 MFP EN FR DE IT ES CA NL PT Getting Started Guide Guide de mise en route Leitfaden zur Inbetriebnahme Guida introduttiva Guía de instalación inicial Guia de primers passos Beknopte handleiding Guia de primeiros passos Read me First A lire avant de continuer Bittte zuerst lesen Informazioni preliminari Lea esto primero Llegiu això primer Lees eerst deze handleiding Leia-me primeiro
Copyright and License Copyright et licence © 2008 Copyright Hewlett-Packard Development Company, L.P. © 2008 Copyright Hewlett-Packard Development Company, L.P. Reproduction, adaptation or translation without prior written permission is prohibited, except as allowed under the copyright laws. Toute reproduction, adaptation ou traduction sans autorisation expresse par écrit est interdite, sauf dans les cas permis par les lois régissant les droits d’auteur.
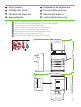
EN IT NL EN Overview FR Présentation DE Überblick IT Panoramica ES Visión general CA Descripció general NL Overzicht PT Visão geral In-box documentation Documentazione acclusa alla confezione Meegeleverde documentatie FR ES PT Documentation fournie Documentación incluida Documentação contida na caixa IT Device location Posizione della periferica ES Emplacement du périphérique Ubicación del dispositivo NL Apparaatlocatie PT Localização do dispositivo EN Unpack the Device FR IT
EN DE ES NL EN DE In-box documentation Mitgelieferte Dokumentation Documentación incluida Meegeleverde documentatie FR IT CA PT Documentation fournie Documentazione acclusa alla confezione Documentació que hi ha a la caixa Documentação contida na caixa Getting Started Guide Wall Poster • Control Panel information • Device features Software/Customer information CD • User Guide • Install Notes • Hp Jet Direct • Embedded Web Server • Software Drivers HP Digital Sending Software 4.
EN DE ES NL 1 Device location Aufstellort des Geräts Ubicación del dispositivo Apparaatlocatie FR IT CA PT Emplacement du périphérique Posizione della periferica Ubicació del dispositiu Localização do dispositivo EN Select a well-ventilated, dust-free area to position the Device. FR Choisissez une zone correctement ventilée et exempte de poussière pour installer le périphérique. DE Stellen Sie das Gerät an einem gut belüfteten, staubfreien Ort auf.
2 EN Power/Current specifications. FR Spécifications d’alimentation/électriques DE Netzanforderungen IT Specifiche di alimentazione. ES Especificaciones de alimentación/corriente eléctrica. CA Especificacions elèctriques i sobre l’alimentació. NL Stroomspecificaties. PT Especificações de energia/corrente.
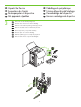
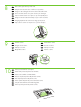
EN DE ES NL 3 Unpack the Device Auspacken des Geräts Desempaquetar el dispositivo Het apparaat uitpakken EN Remove the outer box and the packing foam. FR Retirez la caisse extérieure et le carton d’emballage. FR IT CA PT DE Entfernen Sie die äußere Verpackung und die Styroporstücke. IT Rimuovere la scatola esterna e il materiale di protezione. ES Retire la caja exterior y la espuma de embalaje. CA Retireu la capsa i les escumes d’embalatge.
4 5 EN Install the ramps. FR Installez les rampes. DE Bringen Sie die Rampen an. IT Installare le rampe. ES Instale las rampas. CA Instal·leu les rampes. NL Plaats de steunrails. PT Instale as rampas. EN Use two people to gently roll the device off of the pallet. FR Faites que deux personnes se chargent de faire glisser doucement le périphérique hors du plateau de chargement. DE Rollen Sie das Gerät mit einer zweiten Person vorsichtig von der Palette herunter.
6 7 EN Remove the shipping tape. FR Retirez le ruban adhésif d’expédition. DE Entfernen Sie die Klebestreifen. IT Rimuovere il nastro di trasporto. ES Retire la cinta de embalaje. CA Retireu les cintes adhesives de transport. NL Verwijder de verpakkingstape. PT Remova a fita de embalagem. EN Open scanner lid and remove foam. FR Ouvrez le couvercle du scanner et retirez le carton. DE Öffnen Sie den Scannerdeckel, und nehmen Sie das Styroporstück heraus.
8 9 10 EN Clean scanner glass with a dry, lint-free cloth. FR Nettoyez la vitre du scanner avec un chiffon sec non pelucheux. DE Reinigen Sie das Scannerglas mit einem trockenen und fusselfreien Tuch. IT Pulire il vetro dello scanner con un panno asciutto e privo di lanugine. ES Limpie el cristal del escáner con un paño seco que no desprenda pelusa. CA Netegeu el vidre de l’escàner amb un drap sec que no deixi restes de fils.
EN Install the optional output device. Specific installation guides are shipped with each of the optional output devices. FR Installez le périphérique de sortie optionnel. Les différents guides d’installation sont expédiés avec chaque périphérique de sortie optionnel correspondant. DE Installieren Sie das optionale Ausgabegerät. Die entsprechenden Informationen finden Sie in der beiliegenden Anleitung. IT Installare la periferica di output opzionale.
EN DE ES NL Set up the Device Einrichten des Geräts Instalar el dispositivo Het apparaat installeren 12 FR IT CA PT Configuration du périphérique Configurazione della periferica Configuració del dispositiu Configuração do dispositivo EN Change the control panel language overlay (if necessary). FR Changez la langue du transparent du panneau de commande (si nécessaire). DE Wechseln Sie, falls erforderlich, die Sprachschablone für das Bedienfeld.
EN Install the print cartridge. FR Installez la cartouche d’impression. DE Setzen Sie die Druckpatrone ein. IT Installare la cartuccia di stampa. ES Instale el cartucho de impresión. CA Instal·leu el cartutx d’impressió. NL Installeer de printcartridge. PT Instale o cartucho de impressão.
EN Connect a Network cable (optional). FR Branchez le câble réseau (facultatif). DE Schließen Sie ein Netzwerkkabel an (optional). IT Collegare il cavo di rete (opzionale). ES Conecte un cable de red (opcional). CA Connecteu un cable de xarxa (opcional). NL Sluit een netwerkkabel aan (optioneel). PT Conecte um cabo de rede (opcional). EN NOTE: Connection required for Device network features and utilities.
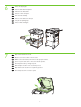
16 EN Lock the wheels on the printer stand. FR Bloquez les roues sur l’emplacement de l’imprimante. DE Blockieren Sie die Rollen des Geräts. IT Bloccare le ruote sul supporto della stampante. ES Bloquee las ruedas del soporte de la impresora. CA Bloquegeu les rodes de la impressora. NL Vergrendel de wielen in het onderstel van de printer. PT Trave as rodas do suporte da impressora. EN Plug in the power cord, turn on the device and wait for green ready light.
17 18 EN Set language, date and time. If prompted, select your language, the date, and the time. Follow the instructions on the control panel touch screen. FR Configuration de la langue, la date et l’heure. Si vous y êtes invité, sélectionnez votre langue, la date et l’heure. Suivez les instructions données à l’écran tactile du panneau de commande. DE Stellen Sie Sprache, Datum und Uhrzeit ein. Wählen Sie bei der entsprechenden Aufforderung Ihre Sprache, das Datum und die Uhrzeit aus.
19 20 21 FR Réglez le ou les guides du papier. IT Regolare le guide della carta. EN Adjust the paper guide(s). DE Stellen Sie die Papierführungen ein. ES Ajuste las guías de papel. CA Ajusteu les guies de paper. NL Stel de papiergeleider(s) bij. PT Corrija a(s) guia(s) do papel. EN Load the print media. Legen Sie Druckmedien ein. FR DE IT Chargez le support d’impression. Caricare i supporti di stampa. ES Coloque el papel de impresión. CA Carregueu el suport d’impressió.
22 EN To connect to a network: By default, an IP Address will automatically be assigned using DHCP. To assign a static IP address for a network connection, do the following: On the control panel touch Administration. Scroll to and touch Initial Setup, and then touch Networking and I/O. Touch Embedded Jetdirect, and touch TCP/IP. Touch IPV4 Settings, touch Config Method, and then touch Manual. Touch Save. Touch Manual Settings, touch IP Address, type in the assigned IP address.
23 EN FR DE IT ES CA Verify functionality by printing a configuration page. From the control panel, A) scroll to and touch Administration. B) Touch Information. C) Touch Configuration/Status Pages. D) Touch Configuration Page. E) Touch Print. If you are connected using a network cable, the IP address will be on the Jetdirect page, under “TCP/IP”. IP is needed for software to install. Save the configuration page printout for use during the software installation.
24 EN Verify copy. Place configuration page, print side-down, in the ADF (Automatic Document Feeder), and press the Start button. The ADF will automatically feed the paper through the scanner and the copied page will be ejected into the output bin. FR Vérifiez la copie. Placez la page de configuration, face imprimée vers le bas, dans le BAA (bac d’alimentation automatique) et appuyez sur le bouton Démarrer.
EN DE ES NL Install software Installieren der Software Instalar el software Software installeren FR IT CA PT Installation du logiciel Installazione del software Instal·lació del programari Instalação do software PT Go to step 25. Passez à l’étape 25. Fahren Sie mit Schritt 25 fort. Andare al punto 25. Vaya al paso 25. Aneu al pas 25. Ga naar stap 25. Vá para a etapa 25. EN Mac: Go to step 27. FR Mac : passez à l’étape 27. EN FR DE IT ES CA NL 19 DE Mac OS: Fahren Sie mit Schritt 27 fort.
25 EN Note: Do not connect a USB cable until prompted during the software installation. FR Remarque : ne branchez pas le câble USB avant d’y avoir été invité lors de l’installation du logiciel. DE Hinweis: Schließen Sie das USB-Kabel erst an, wenn Sie während der Softwareinstallation dazu aufgefordert werden. IT Nota: non collegare un cavo USB finché non viene richiesto durante l’installazione del software.
26 EN Install software. A) Insert the Software CD that came with the printer. B) At the welcome screen, click install. The print driver selection screen appears. C) Select the print driver to be installed. D) Follow the on screen instructions. E) At the end of the driver install, click Finish. F) From the Next Steps screen, select additional options if desired. G) Select Exit to close installer. If prompted, restart the computer. Note: If the welcome screen does not appear, click Start and then click Run.
EN DE ES NL Install Mac software Installieren der Mac OS-Software Instalar el software para Mac Mac-software installeren Installation du logiciel pour Mac Installazione del software Mac Instal·lació del programari per al Mac Instalação do Mac FR IT CA PT 27 EN Note: Do not connect a USB cable until CD installation is complete. FR Remarque : Ne branchez pas le câble USB avant que l’installation du CD-ROM ne soit terminée.
28 EN Place the CD in the CD-ROM drive and run the installer. Complete an “easy” install. FR Placez le CD-ROM dans le lecteur de CD-ROM et lancez le programme d’installation. Effectuez une installation « simple ». DE Legen Sie die CD in das CD-Laufwerk ein, und starten Sie das Installationsprogramm. Führen Sie die einfache Installation durch. IT Inserire il CD nell’unità CD-ROM ed eseguire il programma di installazione. Completare la procedura di installazione standard.
30 EN FR To add your new printer, and create a new printer queue, click the ‘+’ icon to launch the Printer Browser. By default, the Printer Browser shows printers that are connected via USB, Bonjour, Appletalk networking or shared through another Mac. Pour ajouter votre nouvelle imprimante et créer une file d’attente de l’imprimante, cliquez sur l’icône « + » pour lancer le Navigateur de l’imprimante.
31 EN FR DE IT ES CA NL PT From the Printer Browser window, select the HP printer from the Printer Name section. For Mac OS X v10.4: If HP software is installed, the printer software should be automatically configured. Make sure that the HP LaserJet M9040 MFP/M9050 MFP model name is selected in the Print Using pull down list. Note: Mac OS X v10.2 and v10.3 might require you to manually select the printer model from the Printer Model drop-down list.
32 EN Click Add to create a printer queue. You may be prompted to manually configure the installable options. FR Cliquez sur Ajouter pour créer une file d’attente de l’imprimante. Vous pouvez être invité à configurer manuellement les options installables. DE Klicken Sie auf Hinzufügen, um die Warteliste für den Drucker zu erstellen. Sie werden evtl. zum manuellen Konfigurieren der installierbaren Optionen aufgefordert. IT Fare clic su Aggiungi per creare una coda di stampa.
35 EN FR DE Use Scan Setup Wizard to set up Send to Folder. A) Open the embedded Web server by opening a Web browser and typing the product IP address or hostname in the URL window. The IP address can be found on the Configuration Page you printed in Step 23. B) Click the Digital Sending tab. C) In the left column, click Send to Folder. D) On the Send to Folder page, click the Enable Scan Setup Wizard checkbox. E) Click the Apply button. F) Insert the Printing System CD into your computer.
CA Feu servir Scan Setup Wizard (Auxiliar per a la configuració de l’exploració) per configurar Send to Folder (Carpeta Envia a). A) Per obrir el servidor Web integrat, obriu un navegador Web i escriviu l’adreça IP o el nom d’amfitrió del producte a la finestra d’adreces URL. L’adreça IP està disponible a la pàgina de configuració que heu imprès al pas 23. B) Feu clic a la pestanya Digital Sending (Enviament digital). C) A la columna de l’esquerra, feu clic a Send to Folder (Carpeta Envia a).
EN FR DE IT ES CA NL PT Set up the embedded digital send features Configuration des fonctions d’envoi numérique intégrées Einrichten der integrierten digitalen Sendefunktionen Configurazione delle funzioni di invio digitale incorporate Configurar las funciones de envío digital incorporadas Configuració de les opcions d’enviament digital integrat De geïntegreerde digitale verzendfuncties instellen Configure os recursos de envio digital integrados 36 EN Set up Send to Folder.
IT Configurare Invio a cartella. A) Per configurare una cartella condivisa sul computer o sull’unità di rete, fare clic con il pulsante destro del mouse sulla cartella che si desidera condividere. Fare clic su Condivisione e sicurezza e seguire le istruzioni visualizzate. B) Aprire il server Web incorporato aprendo un browser Web e digitando l’indirizzo IP del prodotto o il nome host nella finestra dell’URL. L’indirizzo IP può essere trovato nella Pagina di configurazione stampata al passo 23.
37 EN FR DE IT ES CA Set up E-mail Settings. A) Open the embedded Web server by opening a Web browser and typing the product IP address or hostname in the URL window. The IP address can be found on the Configuration Page you printed in Step 23. B) Click the Digital Sending tab and complete the information under General Settings: name, e-mail address, phone number, and location. C) Click OK. D) On the left navigation menu, select Send to E-mail.
NL PT E-mailinstellingen configureren: A) Open de geïntegreerde webserver door een webbrowser te openen en het IP-adres of de hostnaam van het product in het URL-venster te typen. Het IP-adres is te vinden op de Configuratiepagina die u in stap 23 hebt afgedrukt. B) Klik op het tabblad Digitaal verzenden en voer de gevraagde gegevens in onder Algemene instellingen: naam, e-mailadres, telefoonnummer en plaats. C) Klik op OK. D) Selecteer in het linkernavigatiemenu Verzenden naar e-mail.
EN DE ES NL EN DE ES NL EN FR DE IT ES CA NL PT Troubleshooting Fehlerbehebung Solución de problemas Problemen oplossen Area Bereich Área Probleemgebied FR IT CA PT Zone Area Àrea Área Control-panel display. Ecran du panneau de commande Bedienfeldanzeige Display del pannello di controllo. Pantalla del panel de control. Display del tauler de control Scherm van het bedieningspaneel Exibição do painel de controle.
CA En blanc CA 1) Assegureu-vos que el cable d’alimentació estigui connectat a una presa de corrent que funcioni. 2) Assegureu-vos que el dispositiu estigui engegat. Consulteu la pàgina 13 per obtenir més informació. 3) Si els llums d’estat de l’esquerra del tauler de control funcionen, comproveu el contrast del display amb el comandament giratori d’ajustament de la brillantor. NL Leeg NL 1) Controleer of de stroomkabel is aangesloten op een werkend stopcontact.
NL Knop op het touchscreen wordt grijs weergegeven met “!” NL 1) Controleer of de scanner ontgrendeld is. Zie pagina 8 voor meer informatie. 2) Schakel het apparaat uit en weer in. PT O botão na tela de toque é exibido em cinza com os marcadores “!” PT 1) Verifique se o scanner está destravado. Consulte a página 8 para obter mais informações. 2) Desative o dispositivo e ative-o novamente.
FR Ne répond pas ou répond de manière incorrecte aux touches FR 1) Mettez le périphérique hors tension. 2) Maintenez enfoncées les touches # et C en remettant le périphérique sous tension. 3) Relâchez les touches lorsqu’un petit carré s’affiche dans l’angle supérieur gauche. 4) Touchez le petit carré à l’aide d’un stylo. Attention : Ne touchez le petit carré dans l’angle supérieur gauche qu’UNE SEULE FOIS, le point ne disparaît pas lorsque vous le touchez.
ES CA NL No responde o al tocar se obtiene una respuesta incorrecta Les tecles tàctils no responen o la resposta és incorrecta Reageert niet of er is een onjuiste reactie op aanraking 37 ES CA NL 1) Apague el dispositivo. 2) Mantenga las teclas # y C pulsadas mientras enciende el dispositivo. 3) Suelte las teclas cuando aparezca un pequeño cuadrado en la esquina superior izquierda. 4) Toque el cuadrado con un lápiz.
DE Print. Impression. Drucken IT Stampa. ES NL Imprimir. Impressió. Afdrukken PT Imprimir. EN FR CA PT Não responde ou há uma resposta incorreta ao toque PT 1) Desative o dispositivo. 2) Mantenha pressionadas as teclas # e C durante a ativação do dispositivo. 3) Solte as teclas quando um quadradinho for exibido no canto superior esquerdo. 4) Toque no quadradinho utilizando uma caneta.
NL Drukt niet af NL PT Não imprimir PT 1) Verifique o cabo USB ou de rede. Consulte a página 16 ou 21 para obter mais informações. 2) Se você estiver imprimindo por meio de uma rede, imprima uma página de configuração e verifique se o endereço IP está correto. 3) Reinstale o driver de impressão. EN Jams EN 1) Make sure that the orange packing tape and cardboard have been removed. See page 7 for more information. 2) Make sure that you are using supported paper.
EN Copy. FR Copie. DE Kopieren IT Copia. ES Copia. CA Còpia. NL Kopiëren PT Cópia. CA Encallaments CA 1) Assegureu-vos d’haver retirat la cinta de transport de color taronja i els cartrons. Consulteu la pàgina 7 per obtenir més informació. 2) Assegureu-vos de fer servir un tipus de paper admès pel dispositiu. Consulteu la guia de l’usuari del CD per obtenir més informació. 3) Assegureu-vos que el paper estigui ben carregat. Consulteu la pàgina 15 per obtenir més informació.
EN E-mail. FR Message électronique. DE E-Mail IT E-mail. ES Correo electrónico. CA Correu electrònic. NL E-mail PT E-mail. EN Digital sending tab in the embedded Web server (EWS) does not appear EN An administrative password might be configured. Select Log On in the upper right corner of the EWS. FR L’onglet Envoi numérique ne s’affiche pas dans le serveur Web intégré FR Vous devez configurer un mot de passe administratif.
DE Die Meldung E-Mail-Gateway reagiert nicht wird beim Senden einer E-Mail auf dem Bedienfeld angezeigt. DE 1) Die Adresse des SMTP-Gateways ist möglicherweise nicht richtig. Fragen Sie Ihren ITAdministrator nach der richtigen Adresse. 2) Wenn Sie den E-Mail-Dienst eines Internetproviders nutzen, holen Sie von diesem den Hostnamen des SMTP-Gateways ein (den vollständigen Domänennamen, (nicht die IP-Adresse).
NL E-mailgateway reageert niet verschijnt op het scherm van het bedieningspaneel als u een e-mail probeert te verzenden NL 1) Het SMTP-gateway-adres is mogelijk onjuist. Neem contact op met de netwerkbeheerder om het juiste adres op te vragen. 2) Als u een Internet serviceprovider gebruikt (ISP) voor uw e-maildiensten, vraagt u uw ISP om de hostnaam van uw SMTP-gateway (vraag naar de fully qualified domain name (FQDN), niet het IPadres).
EN You want to scan and send-to-email in black and white TIFF format EN Use the EWS to change the default image file format by selecting Digital Sending, Send to E-mail, and Advanced. FR Vous voulez scanner et envoyer vers la messagerie électronique en format TIFF en noir et blanc FR Utilisez le serveur Web intégré pour modifier le format de fichier image par défaut en sélectionnant Envoi numérique, Envoi vers messagerie électronique et Avancé.
EN A “job failed” message is received with a document is scanned and sent to e-mail EN 1) Send a test e-mail to make sure that the e-mail address is correct. 2) Make sure that the scanned document does not exceed your SMTP gateway’s maximum allowable attachment size. If it does, use the EWS to change the size by selecting Digital Sending and Send to E-mail.
EN Other. FR Autres. DE Andere IT Altro. ES Otro. CA Altres. NL Overige PT Outros. PT Uma mensagem “ocorreu uma falha no trabalho” é recebida com um documento digitalizado e enviado para o e-mail PT 1) Envie um e-mail de teste para verificar se o endereço de e-mail está correto. 2) Verifique se o documento digitalizado não excede o tamanho máximo de anexo permitido por seu gateway SMTP. Em caso afirmativo, use o EWS para alterar o tamanho selecionando Envio digital e Enviar para e-mail.
ZZZ KS FRP VXSSRUW OMP PIS ZZZ KS FRP VXSSRUW OMP PIS 47
48
49
© 2008 Hewlett-Packard Development Company, L.P. www.hp.