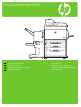
HP LaserJet M9040/M9050 MFP EN EL RU TR Getting Started Guide Başlangıç Kılavuzu Read me First Δ Önce Beni Oku
Copyright and License © 2008 Copyright Hewlett-Packard Development Company, L.P. Reproduction, adaptation or translation without prior written permission is prohibited, except as allowed under the copyright laws. The information contained herein is subject to change without notice. The only warranties for HP products and services are set forth in the express warranty statements accompanying such products and services. Nothing herein should be construed as constituting an additional warranty.
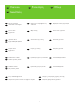
EN Overview TR Genel Bakış EN In-box documentation TR Ürünle birlikte verilen belgeler EN TR Device location Aygıt konumu EN Unpack the Device TR Aygıtı Ambalajından Çıkarma EN Setup the Device TR Aygıtı Kurma EN Install Windows software Windows yazılımını yükleme TR EL RU EL µ µ RU EL RU EL RU E
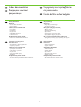
EN RU EN RU In-box documentation EL TR µ µ Ürünle birlikte verilen belgeler Getting Started Guide Wall Poster • Control Panel information • Device features Software/Customer information CD • User Guide • Install Notes • Hp Jet Direct • Embedded Web Server • Software Drivers HP Digital Sending Software 4.
EN RU 1 Device location EL TR Aygıt konumu EN Select a well-ventilated, dust-free area to position the Device. EL µ µ , , . RU . TR Aygıtı yerleştirmek için iyi havalandırmalı, tozsuz bir alan seçin.
2 EN Power/Current specifications. EL /µ. RU T TR Güç/Akım özellikleri.
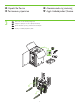
EN RU 3 Unpack the Device EL TR EN Remove the outer box and the packing foam. EL . RU . TR Dış kutuyu ve ambalaj köpüklerini çıkartın.
4 5 EN Install the ramps. EL µ. RU EN Use two people to gently roll the device off of the pallet. EL µ µ . RU . TR Aygıtı paletten dikkatli bir şekilde indirmek için iki kişi birlikte çalışmalıdır. 6 TR Rampaları takın.
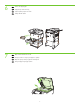
6 7 EN Remove the shipping tape. EL . RU . TR Nakliye bandını çıkartın. EN Open scanner lid and remove foam. EL . RU . TR Tarayıcı kapağını açıp köpüğü çıkartın.
8 9 10 EN Clean scanner glass with a dry, lint-free cloth. EL µ . RU , . TR Tarayıcı camını kuru ve lif bırakmayan bir bezle temizleyin. EN Unlock the scanner. EL . RU TR Tarayıcının kilidini açın. EN Remove protective film from control panel. EL .
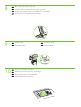
EN Install the optional output device. Specific installation guides are shipped with each of the optional output devices. EL . µ µ . RU . . TR İsteğe bağlı çıkış aygıtını takın.
EN RU Set up the Device 12 EL TR µ Aygıtı Kurma EN Change the control panel language overlay (if necessary). EL ( ). RU . TR Kontrol paneli dil kaplamasını değiştirin (gerekiyorsa).
EN Install the print cartridge. EL . RU . TR Yazıcı kartuşunu takın.
EN Connect a Network cable (optional). EL (). RU (). TR Ağ kablosunu bağlayın (isteğe bağlı). EN NOTE: Connection required for Device network features and utilities. EL : µµ . RU .
16 EN Lock the wheels on the printer stand. EL . RU . TR Yazıcının sehpasındaki tekerlekleri kilitleyin. EN Plug in the power cord, turn on the device and wait for green ready light. EL , µ µ.
17 18 EN Set language, date and time. If prompted, select your language, the date, and the time. Follow the instructions on the control panel touch screen. EL , µµ . , , µµ . . RU , . , . .
19 20 21 EN Adjust the paper guide(s). EL µ . RU . TR Kağıt kılavuzunu (kılavuzlarını) ayarlayın. EN Load the print media. . EL RU TR µ . Baskı ortamını yükleyin. EN Close paper tray(s). EL . RU () . TR Kağıt tepsisini (tepsilerini) kapatın.
22 EN To connect to a network: By default, an IP Address will automatically be assigned using DHCP. To assign a static IP address for a network connection, do the following: On the control panel touch Administration. Scroll to and touch Initial Setup, and then touch Networking and I/O. Touch Embedded Jetdirect, and touch TCP/IP. Touch IPV4 Settings, touch Config Method, and then touch Manual. Touch Save. Touch Manual Settings, touch IP Address, type in the assigned IP address.
23 EN EL RU TR Verify functionality by printing a configuration page. From the control panel, A) scroll to and touch Administration. B) Touch Information. C) Touch Configuration/Status Pages. D) Touch Configuration Page. E) Touch Print. If you are connected using a network cable, the IP address will be on the Jetdirect page, under “TCP/IP”. IP is needed for software to install. Save the configuration page printout for use during the software installation.
24 EN Verify copy. Place configuration page, print side-down, in the ADF (Automatic Document Feeder), and press the Start button. The ADF will automatically feed the paper through the scanner and the copied page will be ejected into the output bin. EL . µ, µ , ADF (µ µ ) µ .
EN RU Install software . EL TR µ Yazılım yükleme TR Go to step 25. µ 25. 25. 25. adıma geçin. EN Mac: Go to step 27. EN EL RU 19 EL Mac: µ 27. RU Mac. 27. TR Mac: 27. adıma geçin.
25 EN Note: Do not connect a USB cable until prompted during the software installation. EL µ: USB µ , µ. RU . USB- . TR Not: Yazılım yükleme sırasında sorulana kadar USB kablosunu bağlamayın. EN Note: The USB connections does not support the device network features and utilities.
26 EN Install software. A) Insert the Software CD that came with the printer. B) At the welcome screen, click install. The print driver selection screen appears. C) Select the print driver to be installed. D) Follow the on screen instructions. E) At the end of the driver install, click Finish. F) From the Next Steps screen, select additional options if desired. G) Select Exit to close installer. If prompted, restart the computer. Note: If the welcome screen does not appear, click Start and then click Run.
EN RU Install Mac software Mac µ Mac Mac yazılımını yükleme EL TR 27 EN Note: Do not connect a USB cable until CD installation is complete. EL µ: USB µ CD. RU . USB-, . TR Not: CD’den yükleme işlemi tamamlanana kadar USB kablosunu bağlamayın.
28 EN Place the CD in the CD-ROM drive and run the installer. Complete an “easy” install. EL CD µ CD-ROM µµ . Easy Install ( ). RU - - . «Easy Install» ( ). TR CD’yi CD-ROM sürücüsüne takın ve yükleme programını çalıştırın. “Kolay” yükleme işlemini uygulayın.
30 EN EL RU TR To add your new printer, and create a new printer queue, click the ‘+’ icon to launch the Printer Browser. By default, the Printer Browser shows printers that are connected via USB, Bonjour, Appletalk networking or shared through another Mac. µ µ , ‘+’, Printer Browser ( ).
32 EN Click Add to create a printer queue. You may be prompted to manually configure the installable options. EL µ Add (), µ µ . µ µ µ µ µ . RU Add () . . TR Bir yazıcı kuyruğu oluşturmak için Add (Ekle) düğmesini tıklatın.
35 EN EL RU TR Use Scan Setup Wizard to set up Send to Folder. A) Open the embedded Web server by opening a Web browser and typing the product IP address or hostname in the URL window. The IP address can be found on the Configuration Page you printed in Step 23. B) Click the Digital Sending tab. C) In the left column, click Send to Folder. D) On the Send to Folder page, click the Enable Scan Setup Wizard checkbox. E) Click the Apply button. F) Insert the Printing System CD into your computer.
EN EL RU TR Set up the embedded digital send features µ µµ Katıştırılmış dijital gönderme özelliklerini ayarlama 36 EN Set up Send to Folder. A) To set up a Shared folder on your computer or network drive, right click on the folder you would like to share. Click Sharing and Security… and follow the instructions there.
TR Klasöre Gönder Özelliğini Ayarlayın. A) Bilgisayarınızda veya ağ sürücünüzde bir Paylaşılan klasör ayarlamak için, paylaşmak istediğiniz klasörü sağ tıklatın. Paylaşım ve Güvenlik…’i tıklatıp ekrandaki yönergeleri uygulayın. B) Bir Web tarayıcısı açıp URL penceresine ürünün IP adresini veya ana bilgisayar adını yazarak katıştırılmış Web sunucusunu açın. IP adresi, 23. Adımda yazdırdığınız Yapılandırma Sayfası’nda yer almaktadır. C) Dijital Gönderme sekmesini tıklatın.
38 EN EL RU TR Register your device. Register at http://www.register.hp.com. This is the quickest and easiest way for you to register to receive the following information: technical support updates, enhanced support options, ideas for and ways to use your new HP device, and news about emerging technologies. Δ . Δ http://www.register.hp.com.
EN RU EN RU EN EL RU TR Troubleshooting Area EL TR Alan Control-panel display. . . Kontrol paneli ekranı. EL TR µ µ Sorun giderme RU Symptom EN Blank EN 1) Make sure that the power cable is connected to a working power outlet. 2) Make sure that the device is turned on. See page 13 for more information.
RU «!» RU 1) , . . 8 . 2) . TR Dokunmatik ekrandaki düğme “!” işaretiyle birlikte gri renkte görünüyor TR 1) Tarayıcı kilidinin açık olduğundan emin olun. Daha fazla bilgi için 8. sayfaya bakın. 2) Aygıtı kapatın ve ardından yeniden açın.
RU Print. . TR Yazdırma. EN EL RU RU 1) . 2) # C . 3) . 4) . : ; .
EN Copy. EL . RU . TR Kopyalama. 1) Make sure that the orange packing tape and cardboard have been removed. See page 7 for more information. 2) Make sure that you are using supported paper. See the user guide on the CD for more information. 3) Make sure that the paper is loaded correctly. See page 15 for more information.
EN E-mail. EL E-mail. RU TR E-posta. EN Digital sending tab in the embedded Web server (EWS) does not appear EN An administrative password might be configured. Select Log On in the upper right corner of the EWS. EL Digital sending ( ) µµ µ Web (EWS) µ EL µ . Log On () EWS.
TR E-posta göndermeye çalışıldığında, kontrol paneli ekranında E-posta Ağ Geçidi Yanıt Vermiyor mesajı görüntüleniyor TR 1) SMTP ağ geçidi adresi yanlış olabilir. Doğru adresi edinmek için BT yöneticinize başvurun. 2) E-posta için bir Internet Servis Sağlayıcısı (ISP) kullanıyorsanız, SMTP ağ geçidinizin ana bilgisayar adı için ISP sağlayıcınıza başvurun (IP adresini değil, tam etki alanı adını (FQDN) isteyin). 3) Girilen SMTP kimlik denetimi kullanıcı adının ve parolasının doğru olduğundan emin olun.
EN EL RU EN Other. EL . RU . TR Diğer. You want to change the file type or the color setting for e-mail attachments EN On the control-panel e-mail feature, select More Options to change the image file format before sending the e-mail. µ µ µµ e-mail EL e-mail , More Options ( ) µ , e-mail.
ZZZ KS FRP VXSSRUW OMP PIS ZZZ KS FRP VXSSRUW OMP PIS 37
© 2008 Hewlett-Packard Development Company, L.P www.hp.com .