HP LaserJet M9040/M9050 MFP User Guide
Copyright information © 2008 Copyright Hewlett-Packard Development Company, L.P. Reproduction, adaptation or translation without prior written permission is prohibited, except as allowed under the copyright laws. The information contained herein is subject to change without notice. The only warranties for HP products and services are set forth in the express warranty statements accompanying such products and services. Nothing herein should be construed as constituting an additional warranty.
Table of contents 1 Product Basics Product introduction ............................................................................................................................. 2 Product features ................................................................................................................................... 3 Product walkaround .............................................................................................................................. 7 Output devices .............
Print Quality menu ............................................................................................................. 42 Troubleshooting menu ....................................................................................................... 44 Resets menu ...................................................................................................................... 46 Service menu .........................................................................................................
5 Connectivity USB connection .................................................................................................................................. 72 Auxiliary connection ........................................................................................................................... 73 Network configuration ......................................................................................................................... 74 Configure TCP/IPv4 parameters .......................
Configure the device to stop or continue when the staple cartridge is empty .................. 105 Load staples .................................................................................................................... 105 Cancel a print job ............................................................................................................................. 109 Stop the current print job from the control panel ..............................................................
Perform basic e-mail functions ......................................................................................................... 137 Load documents .............................................................................................................. 137 Send documents .............................................................................................................. 137 Send a document ............................................................................................
Enable the FIH portal ...................................................................... 166 Disable the FIH portal ..................................................................... 166 Secure Disk Erase ........................................................................................................... 166 Data affected ................................................................................................... 167 Gain access to Secure Disk Erase .....................................
Printer pulls from incorrect tray ........................................................................................ 213 Media does not feed automatically .................................................................................. 214 Media does not feed from tray 2, 3, or 4 .......................................................................... 214 Transparencies will not feed ............................................................................................
Order directly through the embedded Web server (for printers that are connected to a network) ........................................................................................................................... 240 Order directly through the HP Easy Printer Care software .............................................. 240 Part numbers ....................................................................................................................................
Canadian DOC regulations .............................................................................................. 261 VCCI statement (Japan) .................................................................................................. 261 Power cord statement (Japan) ......................................................................................... 261 EMI statement (Korea) .....................................................................................................
xii ENWW
1 ENWW Product Basics ● Product introduction ● Product features ● Product walkaround ● Output devices 1
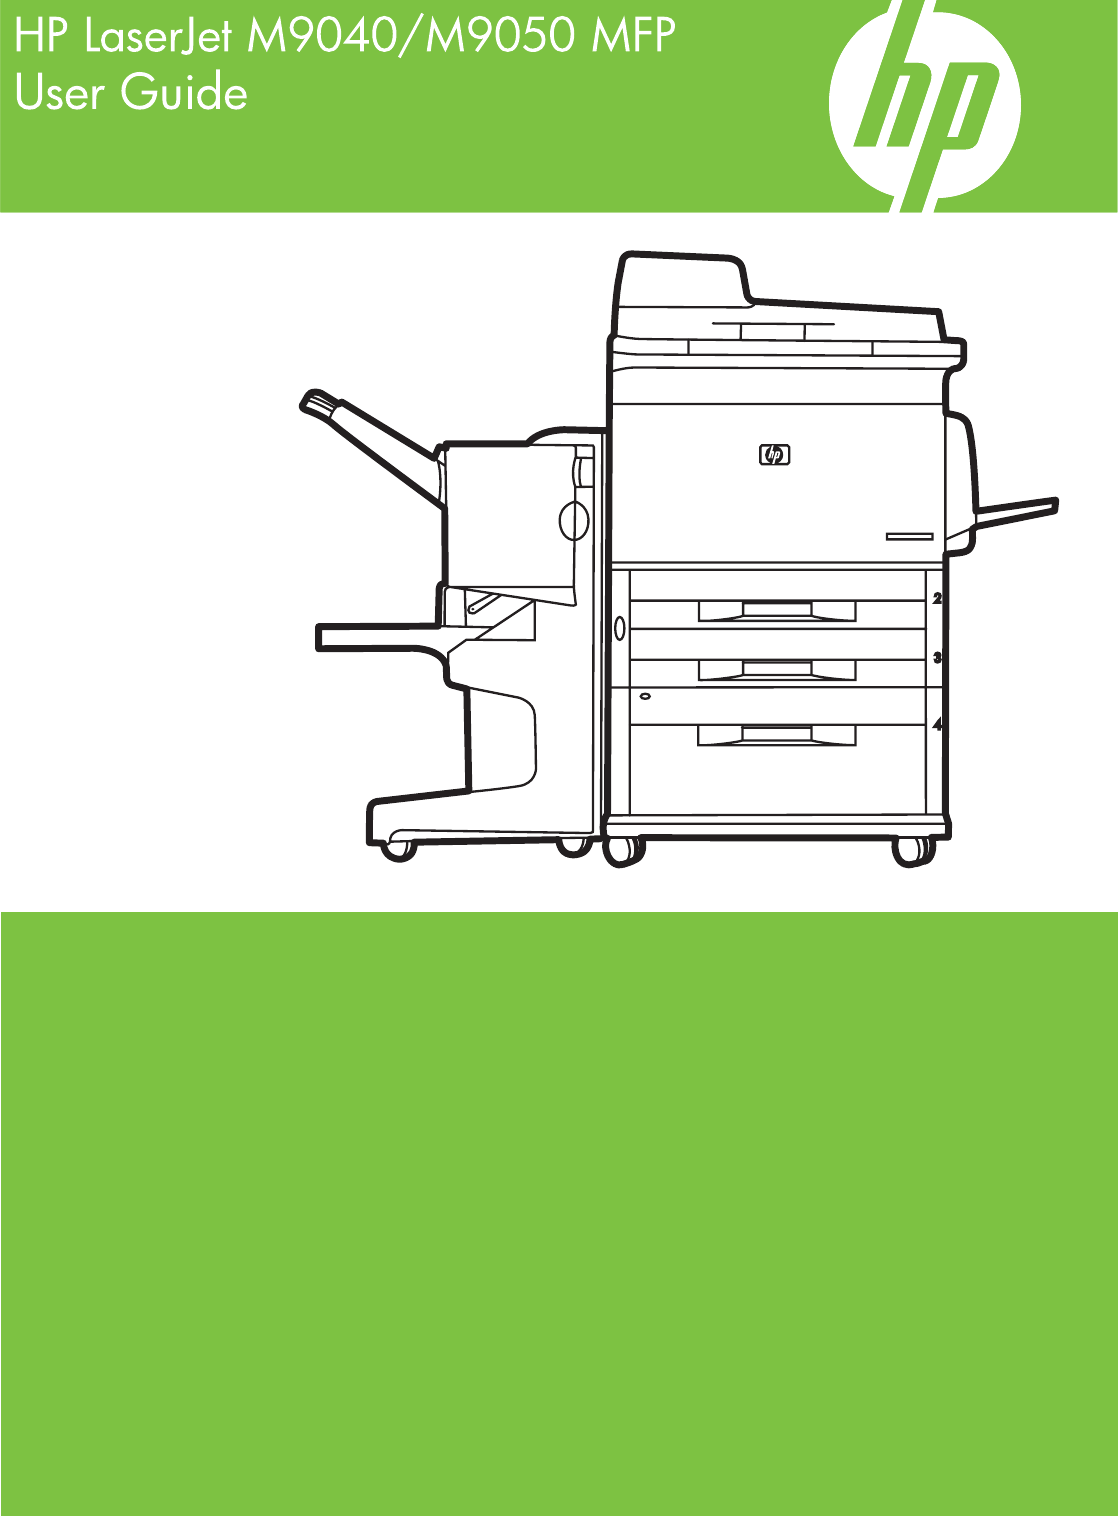
Product introduction Figure 1-1 HP LaserJet M9040 MFP and HP LaserJet M9050 MFP The HP LaserJet M9040 MFP and HP LaserJet M9050 MFP come standard with the following items: 2 ● 100-sheet multipurpose input tray (tray 1) ● Two 500-sheet input trays ● One 2,000-sheet input tray ● Automatic document feeder (ADF) ● HP Jetdirect embedded print server for connecting to a 10/100/1000Base-TX network (Gigabit support) ● 384 megabytes (MB) of random access memory (RAM) ● Duplexer ● Hard drive ● Out
Product features The HP LaserJet M9040 MFP and HP LaserJet M9050 MFP are designed to be shared by a workgroup. The MFP is a standalone copier that does not require connection to a computer. With the exception of network printing, you can select all functions at the MFP control panel.
User interface ● Graphical display on control panel ● Embedded Web server to gain access to support and order supplies (for network-connected products) ● HP Toolbox software to provide MFP status and alerts and print internal information pages Language and fonts ● HP Printer Command Language (PCL) 6 ● HP PCL 5e for compatibility ● Printer Management Language ● 80 scalable TrueType typefaces ● HP postscript 3 emulation Copying and sending ● Modes for text, graphics, and mixed text and graphi
● ◦ Automatic Document Feeder (ADF): Holds up to 100 sheets of Letter- or A4-size paper or 50 sheets of 11 x 17- or A3-size paper. ◦ Duplex printing: Provides two-sided printing (printing both sides of the paper). Output The MFP includes one of the following output choices. ◦ 3000-sheet stacker: Stacks up to 3,000 sheets of paper. Upper bin (face-up): Holds up to 100 sheets of paper. Lower bin (face-down): Holds up to 3,000 sheets of paper. The output bins are part of the output device.
Environmental features ● Sleep setting saves energy (meets Energy Star® guidelines, Version 1.0 HP LaserJet M9050 MFP only) ● Firmware updates provide the ability to upgrade the MFP firmware. To download the latest firmware, go to www.hp.com/go/ljm9040mfp_firmware or www.hp.com/go/ljm9050mfp_firmware and follow the onscreen instructions. To easily send firmware updates to multiple products, use the HP Web Jetadmin software (go to www.hp.com/go/webjetadmin).
Product walkaround Figure 1-2 Product walkaround ENWW 1 Document-feeder cover 2 Document feeder (ADF) 3 Control panel with touchscreen graphical display 4 Tray 1 5 Right door 6 Vertical transfer door 7 Tray 4 8 Tray 3 9 Tray 2 10 Left door (behind output device) 11 Output device 12 Front door 13 Duplex printing accessory (inside the MFP) 14 ADF output bin 15 Left door 16 Printer power cable 17 Tray 4 power cable 18 EIO slot 1 19 Copy processor EIO card Product walkaro
Output devices This MFP comes with a 3000-sheet stacker, a 3000-sheet stapler/stacker, a multifunction finisher, or an 8-bin mailbox. 3,000-sheet stacker ● Stacks up to 3,000 sheets of A4- or letter-size paper ● Stacks up to 1,500 sheets of A3- or ledger-size paper ● Can offset jobs, or offset the first page of jobs The lower bin (face-down bin) is the default bin for all output jobs.
● Staples up to 25 sheets of paper per document A3- and ledger-size paper ● Folds single pages ● Saddle-stitches and folds up to 40 booklets of 5 sheets stacked, or 20 booklets of 10 sheets stacked. Stapling information The finisher can staple documents that contain between two pages and 50 pages of 75 g/m2 (20 lb) A-4-or letter-size paper or 25 pages of A3- 11 x 17-size paper or equivalent to 5.5 mm (0.22 inches). The pages must be 64 to 199 g/m2 (17 to 53 lb) of all sizes supported by the MFP.
The booklet-printing feature of the multifunction finisher supports the saddle stitch and fold feature for the following paper sizes: ● A3 ● A4-Rotated (A4-R)* ● Letter-Rotated (Letter-R)* ● Legal ● Ledger See the HP Multifunction Finisher User Guide at www.hp.com/support/ljm9040mfp or www.hp.com/ support/ljm9050mfp for more information about making booklets. * A4-R and Letter-R are A4- and letter-size paper that is rotated 90˚ in the source tray.
2 ENWW Control panel ● Use the control panel ● Use the Administration menu 11
Use the control panel The control panel has a VGA touchscreen that provides access to all device functions. Use the buttons and numeric keypad to control jobs and the device status. The LEDs indicate overall device status. Control-panel layout The control panel includes a touchscreen graphical display, job-control buttons, a numeric keypad, and three light-emitting diode (LED) status lights.
Home screen The home screen provides access to the device features, and it indicates the current status of the device. NOTE: Depending on how the system administrator has configured the device, the features that appear on the home screen can vary.
Buttons on the touchscreen The status line on the touchscreen provides information about the status of the device. Various buttons can appear in this area. The following table describes each button. Home button. Touch the home button to go to the Home screen from any other screen. Start button. Touch the Start button to begin the action for the feature that you are using. NOTE: The name of this button changes for each feature. For example, in the Copy feature, the button is named Start Copy. Error button.
Use the Administration menu Use the administration menu to set up default device behavior and other global settings, such as the language and the format for date and time. NOTE: Menus can be locked by the administrator. Contact the administrator if a menu or menu item is not available. Navigate the Administration menu From the Home screen, touch Administration to open the menu structure. You might need to scroll to the bottom of the Home screen to see this feature.
Information menu Administration > Information Use this menu to print information pages and reports that are stored internally on the device. Table 2-1 Information menu Menu item Sub-menu item Configuration Page Fax Reports (only available if the HP LaserJet Analog Fax Accessory 300 is installed) Values Description Administration Menu Map Print Shows the basic structure of the Administration menu and current administration settings.
Default Job Options menu Administration > Default Job Options Use this menu to define the default job options for each function. If the user does not specify the job options when creating the job, the default options are used.
Default Copy Options Administration > Default Job Options > Default Copy Options NOTE: Values shown with “(default)” are the factory-default values. Some menu items have no default. Table 2-3 Default Copy Options menu Menu item Sub-menu item Values Description Number of Copies Type the number of copies. The factory default setting is 1. Set the default number of copies for a copy job. Number of Sides 1 (default) Set the default number of sides for copies.
Default Fax Options Administration > Default Job Options > Default Fax Options NOTE: This menu is only available if the HP LaserJet Analog Fax Accessory 300 is installed. Table 2-4 Fax Send menu Menu item Sub-menu item Resolution Values Description Standard (100x200dpi) (default) Set the resolution for sent documents. Higher resolution images have more dots per inch (dpi), so they show more detail. Lower resolution images have fewer dots per inch and show less detail, but the file size is smaller.
Default E-mail Options Administration > Default Job Options > Default E-mail Options Use this menu to set default options for e-mails that are sent from the device. NOTE: Values shown with “(default)” are the factory-default values. Some menu items have no default. Menu item Values Description Document File Type PDF (default) Choose the file format for the e-mail. JPEG TIFF M-TIFF Output Quality High (large file) Choosing higher quality for output increases the size of the output file.
Default Send to Folder Options Administration > Default Job Options > Default Send to Folder Options Use this menu to set default options for scan jobs sent to the computer. NOTE: Values shown with “(default)” are the factory-default values. Some menu items have no default. Menu item Values Description Color/Black Color scan Specify whether the file will be in black or in color. Black/white scan (default) Document File Type PDF (default) Choose the file format for the file.
Default Print Options Administration > Default Job Options > Default Print Options Use this menu to set default options for jobs that are sent from a computer. NOTE: Values shown with “(default)” are the factory-default values. Some menu items have no default. Table 2-6 Default Print Options menu Menu item Values Description Copies Per Job Type a value. Use this feature to set the default number of copies for print jobs. Default Paper Size (List of supported sizes.) Choose a paper size.
Time/Scheduling menu Administration > Time/Scheduling Use this menu to set options for setting the time and for setting the device to enter and exit sleep mode. NOTE: Values shown with "(default)" are the factory-default values. Some menu items have no default.
Table 2-7 Time/Scheduling menu (continued) Menu item Sub-menu item Sub-menu item Values Description Monday Off (default) Tuesday Custom Select Custom to set a sleep time for each day of the week. The device is put in sleep mode according to this schedule. Using a sleep schedule helps conserve energy.
Management menu Administration > Management Use this menu to set up global device-management options. NOTE: Values shown with "(default)" are the factory-default values. Some menu items have no default. Table 2-8 Management menu Menu item Sub-menu item Network Address Button Values Description Display (default) Select this option to display the Network Address button on the control-panel home screen.
Initial Setup menu Administration > Initial Setup The Initial Setup menu contains the sub-menus shown: ● Networking and I/O menu ● Fax Setup menu ● E-mail Setup menu NOTE: Values shown with "(default)" are the factory-default values. Some menu items have no default. Networking and I/O Administration > Initial Setup > Networking and I/O Table 2-9 Networking and I/O Menu item Sub-menu item I/O Timeout Embedded Jetdirect Values Description Select a value in the range.
Table 2-10 Jetdirect menus (continued) Menu item Sub-menu item Sub-menu item Values and Description Manual: Use the Manual Settings menu to configure TCP/IPv4 parameters. DHCP Release This menu appears if Config Method was set to DHCP and a DHCP lease for the print server exists. No (default): The current DHCP lease is saved. Yes: Release the current IP address. Note that the printer will lose network connectivity until it reboots at which point it may have a new address.
Table 2-10 Jetdirect menus (continued) Menu item Sub-menu item Sub-menu item Values and Description Address Use this item to manually configure an IPv6 address. Manual Settings: Use the Manual Settings menu to enable and manually configure a TCP/ IPv6 address. DHCPV6 Policy Router Specified (Default): The stateful autoconfiguration method to be used by the print server is determined by a router.
Table 2-10 Jetdirect menus (continued) Menu item Sub-menu item A Talk Enable Sub-menu item Values and Description Off : Disable the AppleTalk protocol. On (default): Enable the AppleTalk protocol. DLC/LLC Enable Off : Disable the DLC/LLC protocol. On (default): Enable the DLC/LLC protocol. Security Print Sec Page Yes: Prints a page that contains the current security settings on the HP Jetdirect print server. No (default): A security settings page is not printed.
Table 2-10 Jetdirect menus (continued) Menu item Sub-menu item Sub-menu item Values and Description Select Yes to choose this test, or No to not choose it. HTTP Test This test checks operation of HTTP by retrieving predefined pages from the device, and tests the embedded Web server. Select Yes to choose this test, or No to not choose it. SNMP Test This test checks operation of SNMP communications by accessing predefined SNMP objects on the device.
Table 2-10 Jetdirect menus (continued) Menu item Sub-menu item Sub-menu item Ping Test Values and Description This test is used to check network communications. This test sends link-level packets to a remote network host, then waits for an appropriate response. To run a ping test, set the following items: Dest Type Specify whether the target device is an IPv4 or IPv6 node. Dest IP IPV4: Type the IPv4 address. IPV6: Type the IPv6 address.
Table 2-10 Jetdirect menus (continued) Menu item Sub-menu item Sub-menu item Ping Results Link Speed Values and Description Use this item to view the ping test status and results using the control panel display. You can select the following items: Packets Sent Shows the number of packets (0 - 65535) sent to the remote host since the most recent test was initiated or completed.
Table 2-10 Jetdirect menus (continued) Menu item Sub-menu item Sub-menu item Values and Description 1000TX Full: 1000 Mbps, full-duplex operation. Print Protocols ENWW Use this item to print a page that lists the configuration of the following protocols: IPX/SPX, Novell NetWare, AppleTalk, DLC/LLC.
Fax Setup Administration > Initial Setup > Fax Setup NOTE: This menu is only available if the HP LaserJet Analog Fax Accessory 300 is installed. Table 2-11 Fax Setup menu Menu item Sub-menu item Required Settings Country/Region Sub-menu item Values Description (Countries/regions listed) Configure the settings that are legally required for outgoing faxes. Disabled Use this feature to enable or disable PC Fax Send.
Table 2-11 Fax Setup menu (continued) Menu item Sub-menu item Fax Send Settings Fax Dial Volume Sub-menu item Values Description Off Use this feature to set the volume of the tones that you hear while the device dials the fax number. Low (default) High Error Correction Mode Enabled (default) Disabled JBIG Compression Enabled (default) Disabled When Error Correction Mode is enabled and an error occurs during fax transmission, the device sends or receives the error portion again.
Table 2-11 Fax Setup menu (continued) Menu item Sub-menu item Sub-menu item Values Description Redial Interval The range is between 1 and 5 minutes. The factory default is 5 minutes. Use this feature to specify the number of minutes between dialing attempts if the recipient number is busy or not answering. Detect Dial Tone Enabled Use this feature to specify whether the device should check for a dial tone before sending a fax.
E-mail Setup Administration > Initial Setup > E-mail Setup Use this menu to enable the e-mail feature and to configure basic e-mail settings. NOTE: To configure advanced e-mail settings, use the embedded Web server. For more information, see Embedded Web server on page 152. Table 2-12 E-mail Setup menu Menu item Values Description Address Validation On (default) This option enables the device to check e-mail syntax when you type an e-mail address. Valid e-mail addresses require the "@" sign and a ".".
Device Behavior menu Administration > Device Behavior NOTE: Values shown with "(default)" are the factory-default values. Some menu items have no default. Table 2-14 Device Behavior menu Menu item Sub-menu item Sub-menu item Values Description Language Select the language from the list. Use this feature to select a different language for control-panel messages. When you select a new language, the keyboard layout might also change.
Table 2-14 Device Behavior menu (continued) Menu item Sub-menu item Sub-menu item Values [output device menu] Use this menu to set the finishing options for the installed output device. NOTE: This menu varies depending on the output device installed. General Copy Behavior Description Hold Off Print Job On Prevents print jobs from beginning to print while a walk-up user is setting up a job.
Table 2-14 Device Behavior menu (continued) Menu item Sub-menu item General Printing Behavior Override A4/Letter Sub-menu item Values Description No Use this feature to print on letter-size paper when an A4 job is sent but no A4-size paper is loaded in the device (or to print on A4 paper when a letter-size job is sent but no letter-size paper is loaded). This option will also override A3 with ledger-size paper and ledger with A3size paper.
Table 2-14 Device Behavior menu (continued) Menu item Sub-menu item Sub-menu item Values Description PCL Form Length Type a value between 5 and 128 lines. The factory default is 60 lines. PCL is a set of printer commands that Hewlett-Packard developed to provide access to printer features. Orientation Portrait (default) Select the orientation that is most often used print jobs. Select Portrait if the short edge is at the top or select Landscape if the long edge is at the top.
Print Quality menu Administration > Print Quality NOTE: Values shown with "(default)" are the factory-default values. Some menu items have no default. Table 2-15 Print Quality menu Menu item Sub-menu item Values Description Set Registration Test Page Print (button) Print a test page for setting the registration. Follow the instructions that are printed on the page to adjust each tray.
Table 2-15 Print Quality menu (continued) Menu item Sub-menu item Values Description Calibration/Cleaning Create Cleaning Page Create (button) Generate a page for cleaning excess toner off the pressure roller in the fuser. The page has instructions that guide you through the cleaning process. Process Cleaning Page Process (button) Process the cleaning page that was created by using the Create Cleaning Page menu item. The process takes up to 2.5 minutes.
Troubleshooting menu Administration > Troubleshooting NOTE: Many of the menu items under the Troubleshooting menu are for advanced troubleshooting purposes. Table 2-16 Troubleshooting menu Menu item Sub-menu item Event Log Fax T.30 Trace (only available if the HP LaserJet Analog Fax Accessory 300 is installed) Sub-menu item Values Description Print This shows the event codes and their corresponding engine cycles on the controlpanel display. Print T.
Table 2-16 Troubleshooting menu (continued) Menu item Sub-menu item Paper Path Test Sub-menu item Values Description Print Test Page Print Generate a test page for testing the paperhandling features. Define the path for the test in order to test specific paper paths. Source All trays Specify whether the test page is printed from all trays or from a specific tray. Tray 1 Tray 2 (Additional trays are shown, if applicable.
Resets menu Administration > Resets Table 2-17 Resets menu Menu item Values Description Clear Local Address Book Clear (button) Use this feature to clear all addresses from the address books that are stored on the device. Clear Fax Activity Log Yes Use this feature to clear all events from the Fax Activity Log. No (default) Restore Factory Telecom Setting Restore (button) Use this option to restore the telephone-related settings that are in the Initial Setup menu to factory default values.
3 ENWW Software for Windows ● Supported operating systems for Windows ● Supported printer drivers for Windows ● HP Universal Print Driver (UPD) ● Select the correct printer driver for Windows ● Priority for print settings ● Change printer-driver settings for Windows ● Install the Windows software ● Supported utilities ● Software for other operating systems 47
Supported operating systems for Windows The product supports the following Windows operating systems: 48 ● Windows XP (32-bit and 64-bit) ● Windows Server 2003 (32-bit and 64-bit) ● Windows 2000 ● Windows Vista Chapter 3 Software for Windows ENWW
Supported printer drivers for Windows ● PCL 6 ● PCL 5 – Product Specific Driver based on the HP Universal Print Driver. ● PS – Product Specific Driver based on the HP Universal Print Driver. The printer drivers include online Help that has instructions for common printing tasks and also describes the buttons, checkboxes, and drop-down lists that are in the printer driver.
HP Universal Print Driver (UPD) The HP Universal Print Driver (UPD) for Windows is a single driver that gives you instant access to virtually any HP LaserJet product, from any location, without downloading separate drivers. It is built on proven HP print driver technology and has been tested thoroughly and used with many software programs. It is a powerful solution that performs consistently over time.
Select the correct printer driver for Windows Printer drivers provide access to the product features and allow the computer to communicate with the product (using a printer language). Check the installation notes and readme files on the device CD for additional software and languages.
Priority for print settings Changes to print settings are prioritized depending on where the changes are made: NOTE: The names of commands and dialog boxes might vary depending on your software program. 52 ● Page Setup dialog box: Click Page Setup or a similar command on the File menu of the program you are working in to open this dialog box. Settings changed here override settings changed anywhere else.
Change printer-driver settings for Windows Change the settings for all print jobs until the software program is closed Change the default settings for all print jobs Change the product configuration settings 1. On the File menu in the software program, click Print. 1. 1. 2. Select the driver, and then click Properties or Preferences. The steps can vary; this procedure is most common. 2.
Install the Windows software Install Windows software for direct connections When installing the product software in a direct-connect environment, always install the software before connecting the USB cable. In addition, make sure to use a standard 2-meter USB cable. 1. Close all software programs that are open or running. 2. Insert the product CD-ROM into the CD-ROM drive. If the welcome screen does not open, start it by using the following procedure: 3. a. On the Start menu, click Run. b.
4. Insert the product CD-ROM into the CD-ROM drive. If the welcome screen does not open, start it by using the following procedure: a. On the Start menu, click Run. b. Type the following: X:\setup (where X is the letter of the CD-ROM drive). c. Click OK. 5. When prompted, click Install. The print driver screen appears. 6. Select the driver to be installed and follow the instructions on the computer screen 7. Click Finish when the installation has completed. 8.
Supported utilities This MFP is equipped with several utilities that make it easy to monitor and manage the MFP on a network. HP Web Jetadmin HP Web Jetadmin is a browser-based management tool for HP Jetdirect-connected printers within your intranet, and it should be installed only on the network administrator’s computer. To download a current version of HP Web Jetadmin and for the latest list of supported host systems, visit www.hp.com/go/webjetadmin.
Supported operating systems Supported browsers ● Microsoft® Windows 2000 ● Microsoft Windows XP, Service Pack 2 (Home and Professional editions) ● Microsoft Windows Server 2003 ● Microsoft Windows Vista™ ● Microsoft Internet Explorer 6.0 or 7.0 To download HP Easy Printer Care software , go to www.hp.com/go/easyprintercare. This Web site also provides updated information about supported browsers and a list of HP products that support HP Easy Printer Care software.
Software for other operating systems 58 OS Software UNIX For HP-UX and Solaris networks, go to www.hp.com/support/net_printing to download the HP Jetdirect printer installer for UNIX. Linux For information, go to www.hp.com/go/linuxprinting.
4 ENWW Use the product with Macintosh ● Software for Macintosh ● Use features in the Macintosh printer driver 59
Software for Macintosh Supported operating systems for Macintosh The device supports the following Macintosh operating systems: ● Mac OS X V10.2.8, V10.3, V10.4 and later NOTE: For Mac OS V10.4 and later, PPC and Intel Core Processor Macs are supported. Supported printer drivers for Macintosh The HP installer provides PostScript® Printer Description (PPD) files, Printer Dialog Extensions (PDEs), and the HP Printer Utility for use with Macintosh computers.
Mac OS X V10.3 and later 1. Make sure the product is turned on. 2. Insert the CD into the CD-ROM drive. If the CD does not run automatically, double-click the CD icon on the desktop. 3. Double-click the Installer icon in the HP LaserJet Installer folder. 4. Follow the instructions on the computer screen. 5. Connect a USB cable between the product USB port and the computer USB port. Use a standard 2-meter (6.56-foot) USB cable.
IP Printing a. Enter the IP address for the product. b. Select the printer model if one is not already selected. 8. Click Add. The Installable Options dialog box appears. Select the product options that you are using. 9. Print a test page from any software program to make sure that the software is correctly installed. If installation fails, reinstall the software. If this fails, see the installation notes or late-breaking readme files on the device CD or the flyer that came in the box for help.
You can use the HP Printer Utility when the product uses a universal serial bus (USB) cable or is connected to a TCP/IP-based network. Open the HP Printer Utility Open the HP Printer Utility in Mac OS X V10.2.8 1. Open the Finder, and then click Applications. 2. Click Library, and then click Printers. 3. Click hp, and then click Utilities. 4. Double-click HP Printer Selector to open the HP Printer Selector. 5. Select the product that you want to configure, and then click Utility.
Item Description IP Settings Changes the device network settings and provides access to the embedded Web server. Bonjour Settings Provides the ability to turn on or off Bonjour support or change the device service name that is listed on a network. Additional Settings Provides access to the embedded Web server. E-mail Alerts Configures the device to send e-mail notices for certain events.
Change the settings for all print jobs until the software program is closed Change the default settings for all print jobs Change the product configuration settings Mac OS X V10.3 or Mac OS X V10.4 1. From the Apple menu, click System Preferences and then Print & Fax. 2. Click Printer Setup. 3. Click the Installable Options menu. Mac OS X V10.5 1. From the Apple menu, click System Preferences and then Print & Fax. 2. Click Options & Supplies. 3. Click the Driver menu. 4.
Use features in the Macintosh printer driver Create and use printing presets in Macintosh Use printing presets to save the current printer driver settings for reuse. Create a printing preset 1. On the File menu, click Print. 2. Select the driver. 3. Select the print settings. 4. In the Presets box, click Save As..., and type a name for the preset. 5. Click OK. Use printing presets 1. On the File menu, click Print. 2. Select the driver. 3.
Use watermarks A watermark is a notice, such as “Confidential,” that is printed in the background of each page of a document. 1. On the File menu, click Print. 2. Open the Watermarks menu. 3. Next to Mode, select the type of watermark to use. Select Watermark to print a semi-transparent message. Select Overlay to print a message that is not transparent. 4. Next to Pages, select whether to print the watermark on all pages or on the first page only. 5.
Print on both sides of the page (duplex printing) Use automatic duplex printing 1. Insert enough paper into one of the trays to accommodate the print job. If you are loading special paper such as letterhead, load it in one of the following ways: ● For tray 1, load the letterhead paper face-up with the bottom edge feeding into the printer first. ● For all other trays, load the letterhead paper face-down with the top edge at the back of the tray. 2. On the File menu, click Print. 3.
Store jobs You can store jobs on the product so you can print them at any time. You can share stored jobs with other users, or you can make them private. 1. On the File menu, click Print. 2. Open the Job Storage menu. 3. In the Job Storage: drop-down list, select the type of stored job. 4. For the Stored Job, Private Job, and Private Stored Job types of stored jobs, enter a name for the stored job in the box next to Job Name:. Select which option to use if another stored job already has that name.
70 Chapter 4 Use the product with Macintosh ENWW
5 ENWW Connectivity ● USB connection ● Auxiliary connection ● Network configuration 71
USB connection This MFP supports a Type B Hi-speed USB 2.0 connection for printing.
Auxiliary connection This MFP supports an auxiliary connection for paper handling output devices. The port is located on the back of the MFP.
Network configuration You might need to configure certain network parameters on the device.
6. Touch IPV4 Settings. 7. Touch Config Method. 8. Touch Manual. 9. Touch Save. 10. Touch Manual Settings. 11. Touch IP Address. 12. Touch the IP Address text box. 13. Use the touchscreen keypad to type the IP address. 14. Touch OK. 15. Touch Save. Set the subnet mask 1. Scroll to and touch Administration. 2. Scroll to and touch Initial Setup. 3. Touch Networking and I/O. 4. Touch Embedded Jetdirect. 5. Touch TCP/IP. 6. Touch IPV4 Settings. 7. Touch Config Method. 8. Touch Manual.
5. Touch TCP/IP. 6. Touch IPV4 Settings. 7. Touch Config Method. 8. Touch Manual. 9. Touch Save. 10. Touch Manual Settings. 11. Touch Default Gateway. 12. Touch the Default Gateway text box. 13. Use the touchscreen keyboard to type the default gateway. 14. Touch OK. 15. Touch Save. Configure TCP/IPv6 parameters For information about configuring the device for a TCP/IPv6 network, see the HP Jetdirect Print Server Administrator's Guide.
Disable AppleTalk 1. Scroll to and touch Administration. 2. Scroll to and touch Initial Setup. 3. Touch Networking and I/O. 4. Touch Embedded Jetdirect. 5. Touch AppleTalk. 6. Touch Enable. 7. Touch Off. 8. Touch Save. Disable DLC/LLC 1. Scroll to and touch Administration. 2. Scroll to and touch Initial Setup. 3. Touch Networking and I/O. 4. Touch Embedded Jetdirect. 5. Touch DLC/LLC. 6. Touch Enable. 7. Touch Off. 8. Touch Save.
78 Chapter 5 Connectivity ENWW
6 ENWW Paper and print media ● Understand paper and print media use ● Supported paper and print media sizes ● Custom paper sizes ● Special paper or print media guidelines ● Load paper and print media ● Configure trays ● Select the output bin 79
Understand paper and print media use This product supports a variety of paper and other print media in accordance with the guidelines in this user guide. Paper or print media that does not meet these guidelines might cause the following problems: ● Poor print quality ● Increased jams ● Premature wear on the product, requiring repair For best results, use only HP-brand paper and print media designed for laserjets or multiuse. Do not use paper or print media made for inkjet printers.
Supported paper and print media sizes This product supports a number of paper sizes, and it adapts to various media. NOTE: To obtain best print results, select the appropriate paper size and type in your print driver before printing. Table 6-1 Supported paper and print media sizes Size Dimensions Letter 216 x 279 mm (8.5 x 11 in.) Legal 216 x 356 mm (8.5 x 14 in.) A4 210 x 297 mm (8.27 x 11.69 in.) Executive 184 x 267 mm (7.24 x 10.51 in.) Executive (JIS) 216 x 330 mm (8.5 x 13 in.
Table 6-2 Supported envelopes and postcards (continued) 82 Size Dimensions Double Post Card 148 x 200 mm (5.83 x 7.87 in.) Postcard (US) 88.9 x 139.7 mm (3.5 x 5.5 in.) Postcard (European) 105 x 148 mm (4.13 x 5.83 in.
Custom paper sizes This product supports a variety of custom paper sizes. Supported custom sizes are sizes that are within the minimum- and maximum-size guidelines for the product but are not listed in the supported paper sizes table. When using a supported custom size, specify the custom size in the print driver, and load the paper in a tray that supports custom sizes.
Special paper or print media guidelines This product supports printing on special media. Use the following guidelines to obtain satisfactory results. When using special paper or print media, be sure to set the type and size in your print driver to obtain the best print results. CAUTION: HP LaserJet printers use fusers to bond dry toner particles to the paper in very precise dots. HP laser paper is designed to withstand this extreme heat.
Load paper and print media This section contains information about loading standard- and custom-size media into the four input trays. CAUTION: To avoid a jam, never add or remove paper from tray 1 or open tray 2, tray 3, or tray 4 while printing or copying from that tray. To avoid damaging the MFP, print labels, envelopes, and transparencies from tray 1 only. Send labels, envelopes, and transparencies to the upper bin. Print on only one side of labels, envelopes, and transparencies.
NOTE: If printing on A3- or 11 x 17-size paper, or other long media, also pull out the tray extension until it stops. Load trays 2, 3, and 4 Trays 2 and 3 hold up to 500 sheets of standard media. Tray 4 holds up to 2,000 sheets of standard media. For information about paper specifications, see Supported paper and print media sizes on page 81. Load detectable standard-size paper in trays 2, 3, and 4 Follow this procedure to load detectable standard-size paper in the tray.
2. Adjust the left (Y) paper guide by pressing the tab on the guide and set the guide to the correct paper size. Figure 6-5 Load trays 2, 3, and 4 (2 of 6) 3. Adjust the front (X) paper guide by pressing the tab on the guide and set the guide to the correct paper size. Figure 6-6 Load trays 2, 3, and 4 (3 of 6) 4. Load (orient) the paper according to size. Figure 6-7 Load trays 2, 3, and 4 (4 of 6) 5. Set the Custom/Standard switch to Standard.
6. Close the tray. The MFP control panel might show the tray media type and size. If the configuration is not correct, touch Modify on the control panel. If the configuration is correct, touch OK. Figure 6-9 Load trays 2, 3, and 4 (6 of 6) Load undetectable standard-size paper in trays 2, 3, and 4 Follow this procedure to load undetectable standard-size paper in the tray. The following are the undetectable sizes: ● 8K ● 16K ● Statement ● JIS Executive ● 8.5 x 13 (216 x 330 mm).
5. Adjust the left paper guide by pressing the tab on the guide and slide the guide until it gently touches the paper Figure 6-12 Load undetectable standard-size paper in trays 2, 3, and 4 (3 of 6) 6. Adjust the front paper guide by pressing the tab on the guide and slide the guide until it gently touches the paper. Figure 6-13 Load undetectable standard-size paper in trays 2, 3, and 4 (4 of 6) NOTE: When loading tray 4, make sure that the paper guide lock is in the up position. 7.
CAUTION: To avoid a jam, never add or remove paper from a tray while printing from that tray. 1. Open the tray until it stops. Figure 6-16 Load custom media in trays 2, 3, and 4 (1 of 6) 2. Press the tab on the front (X) paper guide and slide the guide all the way out. 3. Press the tab on the left (Y) paper guide and slide the guide all the way out. 4. Load (orient) the paper according to size. Figure 6-17 Load custom media in trays 2, 3, and 4 (2 of 6) 5. Set the Custom/Standard switch to Custom.
7. Adjust the front (X) paper guide by pressing the tab on the guide and slide the guide until it gently touches the paper. Figure 6-20 Load custom media in trays 2, 3, and 4 (5 of 6) 8. Note the orientation of the paper, as well as the value of the X dimension and the Y dimension. The X and Y dimensions are marked in the tray. You will need this information for a later step. NOTE: When loading tray 4, make sure that the paper guide lock is in the up position. 9. Close the tray.
Configure trays The MFP might automatically prompt you to configure a tray for type and size when you load media into the tray. The following message appears on the control panel: Tray [type] [size] To change size or type, touch “Modify”. To accept, touch “OK”.. NOTE: The prompt does not appear if you are printing from tray 1 and tray 1 is configured for Any Size and Any Type.
Source To print by Source select a specific tray from MFP to pull from. The MFP tries to print from this tray, no matter what type or size is loaded. If you select a tray that is configured for a type or size that does not match your print job, the MFP does not print automatically. Instead, it waits for you to load the tray with the type or size of print media for your print job. If you load the tray, the MFP begins printing.
Select the output bin The MFP has at least two output bin locations: the ADF output bin (1) and an output bin on the output device. Figure 6-22 Output bins It is recommended that you select an output location through the software program or printer driver. Stacker or stapler/stacker output bins If you choose the 3,000-sheet stacker or 3,000-sheet stapler/stacker, the output bins are the upper bin (2) (face up) and the lower bin (3) (face down).
Select an output location Printing It is recommended that you select an output location (bin) through your program or driver. Where and how you make selections depends on your program or driver, set the default output location from the MFP control panel. 1. Scroll to and touch Administration. 2. Touch Default Job Options. 3. Touch Default Print Options. 4. Touch Output Bin. 5. Touch the desired output bin.
96 Chapter 6 Paper and print media ENWW
7 ENWW Print tasks ● Media type and tray loading ● Use features in the Windows printer driver ● Staple documents ● Cancel a print job ● Print on envelopes ● Job storage features for print 97
Media type and tray loading Minimum media dimensions are 98 x 191 mm (3.8 x 7.5 inches). Maximum media dimensions are 312 x 470 mm (12.3 x 18.5 inches). Table 7-1 Tray 1 media information Media type Media specifications Media quantity Driver settings Paper orientation Paper and cardstock, standard sizes 64 g/m2 (17 lb) bond to 216 g/m2 (58 lb) bond Maximum stack height: 10 mm (0.
Table 7-3 Tray 4 media information (continued) ENWW Media type Media specifications Media quantity Driver settings Paper orientation Heavy 64 g/m2 (17 lb) bond to 199 g/m2 (53 lb) bond Up to 2000 sheets Light glossy, glossy, or heavy glossy Side to be printed on facing up Glossy 64 g/m2 (17 lb) bond to 199 g/m2 (53 lb) bond Up to 2000 sheets Light glossy, glossy, or heavy glossy Side to be printed on facing up Media type and tray loading 99
Use features in the Windows printer driver Open the printer driver How do I Steps to perform Open the printer driver On the File menu in the software program, click Print. Select the printer, and then click Properties or Preferences. Get help for any printing option Click the ? symbol in the upper-right corner of the printer driver, and then click any item in the printer driver. A pop-up message displays that provides information about the item. Or, click Help to open the online Help.
Set document effects To perform the following tasks, open the printer driver and click the Effects tab. How do I Steps to perform Scale a page to fit on a selected paper size Click Print document on, and then select a size from the dropdown list. Scale a page to be a percent of the actual size Click % of actual size, and then type the percent or adjust the slider bar. Print a watermark a) Select a watermark from the Watermarks drop-down list.
Set job storage options To perform the following tasks, open the printer driver and click the Job Storage tab. How do I Steps to perform Print one copy for proof before printing all the copies In the Job Storage Mode area, click Proof and Hold. The product prints the first copy only. A message appears on the product control panel that prompts you to print the rest of the copies. Temporarily store a private job on the product and print it later a) In the Job Storage Mode area, click Personal Job.
How do I Steps to perform Change the number of copies that are printed Open the Paper/Output section, and then enter the number of copies to print. If you select 2 or more copies, you can select the option to collate the pages. NOTE: If the software program that you are using does not provide a way to print a particular number of copies, you can change the number of copies in the driver. Changing this setting affects the number of copies for all print jobs.
Staple documents NOTE: Stapling features are only available if the stapler/stacker or multifunction finisher are attached to the MFP. Set the stapler at the control panel for printed jobs You can usually select the stapler in your software program or printer driver, although some options might be available only in the printer driver. See Change printer-driver settings for Windows on page 53 for more information. Where and how you make selections depends on your program or driver.
Configure the device to stop or continue when the staple cartridge is empty You can specify whether the MFP stops printing when the staple cartridge is empty or if it continues printing but does not staple the jobs. 1. Scroll to and touch Administration. 2. Scroll to and touch Device Behavior. 3. Scroll to and touch Stapler/Stacker or Multifunct. Finisher. 4. Touch Staples Out. 5. Touch the option that you want to use: ● Select Stop to stop all printing until the staple cartridge is replaced.
3. On the empty staple cartridge, pull up on the green tab, and then pull the empty cartridge out. Figure 7-3 Load staples in the stapler/stacker (3 of 5) 4. Insert the new staple cartridge, and push down on the green tab so that the cartridge locks into place. Figure 7-4 Load staples in the stapler/stacker (4 of 5) 5. Close the stapler unit door and push the stapler/stacker back into place. Figure 7-5 Load staples in the stapler/stacker (5 of 5) Load staples in the multifunction finisher 1.
2. Slide the stapler unit toward you. Figure 7-7 Load staples in the multifunction finisher (2 of 8) 3. Turn the large green knob until the blue dot appears in the window of the stapler unit. Figure 7-8 Load staples in the multifunction finisher (3 of 8) 4. Turn the small green knob at the top of the stapler unit clockwise until the staple cartridge moves to the left of the stapler unit.
6. Insert the new staple cartridge so that it locks into place. Figure 7-11 Load staples in the multifunction finisher (6 of 8) 7. Slide the stapler unit into the finisher. Figure 7-12 Load staples in the multifunction finisher (7 of 8) 8. Close the stapler unit door and realign the multifunction finisher against the MFP.
Cancel a print job You can stop a print request by using the control panel or by using the software program. For instructions about how to stop a print request from a computer on a network, see the online Help for the specific network software. NOTE: It can take some time for all printing to clear after you have canceled a print job. Stop the current print job from the control panel 1. Press Stop on the control panel. 2. On the touchscreen, on the Device Has Been Paused screen, touch Cancel current job.
Print on envelopes Envelopes must be printed from tray 1, which holds up to 10 envelopes. Printing performance depends on the construction of the envelope. Always test a few sample envelopes before purchasing a large quantity. For envelope specifications, see Supported paper and print media sizes on page 81 or go to www.hp.com/support/ljm9040mfp or www.hp.com/support/ljm9050mfp.
3. Adjust the guides to touch the envelope stack without bending the envelopes. Make sure that the envelopes fit under the tabs on the guides. Figure 7-16 Load envelopes in tray 1 (3 of 3) 4. Change the fuser levers (see Change the fuser levers on page 111). Change the fuser levers 1. Move the output device away from the MFP to gain access to the left door. Figure 7-17 Change the fuser levers (1 of 4) 2. Open the left door.
3. Locate and lift up the two blue levers. NOTE: Return the fuser levers to the down position after printing on envelopes. CAUTION: Failure to return levers to the down position for standard paper types can result in poor print quality. Figure 7-19 Change the fuser levers (3 of 4) 4. Close the left door. Figure 7-20 Change the fuser levers (4 of 4) 5. Push the output device back into place. Print on envelopes from a program 1. Load envelopes into tray 1. 2.
Job storage features for print The following job-storage features are available for print jobs: ● Proof and hold jobs: This feature provides a quick and easy way to print and proof one copy of a job and then print the additional copies. ● Personal jobs: When you send a private job to the device, the job does not print until you provide the required personal identification number (PIN) at the control panel.
Use the proof and hold feature The proof and hold feature provides a quick and easy way to print and proof one copy of a job. To permanently store the job and prevent the device from deleting it when space is needed for something else, select the Stored Job option in the driver. Create a proof and hold job CAUTION: If the device needs additional space to store newer proof and hold jobs, the device deletes other stored proof and hold jobs, starting with the oldest job.
Create a personal job To specify that a job is personal, in the driver, select the Personal Job option, type a user name and job name, and then type a four-digit PIN into the Make Job Private field. The job will not print until you enter the PIN at the device control panel. Print a personal job You can print a personal job at the control panel after the job has been sent to the device. 1. From the Home screen, touch Job Storage. 2. Touch the Retrieve tab. 3.
Create a QuickCopy job CAUTION: If the device needs additional space to store newer QuickCopy jobs, the device deletes other stored QuickCopy jobs, starting with the oldest job. To permanently store a job and prevent the device from deleting it when space is needed, select the Job Storage option in the driver instead of the QuickCopy option. In the driver, select the QuickCopy option, and then type a user name and a job name.
Create a stored print job In the driver, select the Stored Job option, and then type a user name and job name. The job does not print until someone requests it at the device control panel. Print a stored print job At the control panel, you can print a job that is stored on the device hard disk. 1. From the Home screen, touch Job Storage. 2. Touch the Retrieve tab. 3. Scroll to and touch the job storage folder that holds the stored job. 4. Scroll to and touch the stored job that you want to print.
118 Chapter 7 Print tasks ENWW
8 Copy This device can function as a standalone, walk-up copier. It is not necessary to install the printing system software on the computer; you can adjust the copy settings at the control panel. You can also copy originals by using either the document feeder or the scanner glass.
Use the Copy screen From the Home screen, touch Copy to view the Copy screen. Note that only the first six copy features are immediately visible. In order to view additional copy features, touch More Options.
Set the default copy options You can use the administration menu to establish default settings that apply to all copy jobs. If necessary, you can override most settings for an individual job. After that job is complete, the device returns to the default settings. 1. From the Home screen, scroll to and touch Administration. 2. Touch Default Job Options, and then touch Default Copy Options. 3. Several options are available. You can configure defaults for all options, or for only some options.
Basic copy instructions This section provides the basic instructions for copying. Copy from the scanner glass Use the scanner glass to make as many as 999 copies of small, lightweight media or heavy media. This includes media such as receipts, newspaper clippings, photographs, old documents, worn documents, and books. Place original documents face-down on the glass. Align the corner of the original with the upper-left corner of the glass.
Adjust the copy settings The device offers several features so you can optimize copied output. These features are all available on the Copy screen. The Copy screen consists of several pages. From the first page, touch More Options to go to the next page. Then touch the up or down arrow buttons to scroll to other pages. For details about how to use an option, touch the option, and then touch the help ( ) button in the upperright corner of the screen.
Copy two-sided documents Two-sided documents can be copied manually or automatically. Copying two-sided documents manually Copies resulting from this procedure are printed on one side, and need to be hand-collated. 1. Load the documents to be copied into the document feeder input tray with the first page facing down, and with the top of the page leading into the document feeder. 2. Touch Start Copy. The odd-numbered pages are copied and printed. 3.
4. Touch 2-sided original, 2-sided output. 5. Touch OK. 6. Touch Start Copy. Make one-sided copies from two-sided documents ENWW 1. Load the documents to be copied into the document feeder with the first page facing down, and with the top of the page leading. 2. On the control panel, touch Copy. 3. Touch Sides. 4. Touch 2-sided original, 1-sided output. 5. Touch OK. 6. Touch Start Copy.
Copy mixed-size originals You can copy original documents that are printed on different sizes of paper as long as the sheets of paper have one common dimension. For example, you could combine letter and legal sizes, or you could combine A4 and A5 sizes. 1. Arrange the sheets in the original document so they all have the same width. 2. Place the sheets face-down into the document feeder, and adjust both paper guides against the document. 3. From the Home screen, touch Copy. 4. Touch Original Size.
Change the copy-collation setting You can set the device to automatically collate multiple copies into sets. For example, if you are making two copies of three pages and the automatic collation is on, the pages print in this order: 1,2,3,1,2,3. If automatic collation is off, the pages print in this order: 1,1,2,2,3,3. To use the automatic collation, the original document size must fit into the memory. If it does not, the device makes only one copy and a message appears notifying you of the change.
Copy photos and books Copy a photo NOTE: Photos should be copied from the flatbed scanner, not from the document feeder. 1. Lift the lid and place the photo on the flatbed scanner with the picture-side down and the upperleft corner of the photo in the upper-left corner of the glass. 2. Gently close the lid. 3. Touch Start Copy. Copy a book 1. Place the book face down on the glass with the top edge toward the rear of the glass. Align the along the top edge of the glass.
Combine copy jobs by using Job Build Use the Job Build feature to build a single copy job from multiple scans. You can use either the document feeder or the scanner glass. The settings for the first scan are used for subsequent scans. 1. Touch Copy. 2. Scroll to and touch Job Build. 3. Touch Job Build On. 4. Touch OK. 5. If necessary, select the desired copy options. 6. Touch Start Copy. After each page is scanned, the control panel prompts you for more pages. 7.
Cancel a copy job To cancel the copy job that is currently running, touch Stop on the control panel. This pauses the device. Then touch Cancel Current Job. NOTE: If you cancel a copy job, clear the document from the flatbed scanner or from the automatic document feeder.
Job storage features for copy You can create a stored copy job at the device control panel that can be printed at a later time. Create a stored copy job 1. Place the original document face-down on the glass or face-down in the ADF. 2. From the Home screen, touch Job Storage. 3. Touch the Create tab. 4. Specify the name for the stored job in one of these ways: ● Select an existing folder from the list. Touch New Job and type a job name.
4. Scroll to and touch the stored job that you want to delete. 5. Touch Delete. 6. Touch Yes. If the file has 132 Chapter 8 Copy (lock symbol) next to it, the job requires a PIN to delete it.
9 Scan and send to e-mail The MFP offers color-scanning and digital-sending capabilities. By using the control panel, you can scan black-and-white or color documents and send them to an e-mail address as an e-mail attachment. To use digital sending, the device must be connected to a local area network (LAN). NOTE: The e-mail icon is not shown on the control panel if e-mail is not configured.
Configure the device to send e-mail Before you can send a document to e-mail, you must configure the device. NOTE: The instructions that follow are for configuring the device at the control panel. You can also perform these procedures by using the embedded Web server. For more information, see Embedded Web server on page 152. Supported protocols The HP LaserJet M9040 and HP LaserJet M9050 MFP models support Simple Mail Transfer Protocol (SMTP) and Lightweight Directory Access Protocol (LDAP).
Test the SMTP settings 1. From the Home screen, touch Administration. 2. Touch Initial Setup. 3. Touch E-mail Setup, and then touch Test Send Gateway. If the configuration is correct, Gateways OK appears on the control-panel display. If the first test was successful, send an e-mail to yourself by using the digital-send feature. If you receive the e-mail, you have successfully configured the digital-sending feature.
Use the Send E-mail screen Use the touchscreen to navigate through the options on the Send E-mail screen. 1 Send E-mail button Touching this button scans the document and sends an e-mail file to the provided e-mail addresses. 2 Home button Touching this button opens the Home screen. 3 From: field Touch this field to open the keyboard, and then type your e-mail address. If the system administrator has configured the device to do so, this field might automatically insert a default address.
Perform basic e-mail functions The device e-mail feature offers the following benefits: ● Sends documents to multiple e-mail addresses, saving time and delivery costs. ● Delivers files in black-and-white or in color. Files can be sent in different file formats that the recipient can manipulate. With e-mail, documents are scanned into the device memory and sent to an e-mail address or multiple addresses as an e-mail attachment. Digital documents can be sent in several graphics formats, such as .TFF and .
Use the auto-complete function When you type characters into the To:, CC:, or From: fields on the Send E-mail screen, the autocomplete function is activated. As you type the required address or name by using the keyboard screen, the device automatically searches the address book list and completes the address or name by using the first match. You can then select that name by touching Enter, or continue typing the name until autocomplete finds the correct entry.
Use the address book You can send e-mail to a list of recipients by using the address book feature of the device. See your system administrator for information about configuring address lists. NOTE: You can also use the embedded Web server (EWS) to create and manage the e-mail address book. The EWS e-mail address book can be used to add, edit, or delete single e-mail addresses or email distribution lists. For more information, see Embedded Web server on page 152. Create a recipient list 1.
Add e-mail addresses to the local address book 1. Touch Local. 2. Touch 3. (Optional) Touch the Name field, and in the keyboard that appears type a name for the new entry. Touch OK. . The name is the alias for the e-mail address. If you do not type an alias name, the alias will be the e-mail address itself. 4. Touch the Address field, and in the keyboard that appears type the e-mail address for the new entry. Touch OK.
Change e-mail settings for the current job Use the More Options button to change the following e-mail settings for the current print job: ENWW Button Description Document File Type Touch this button to change the type of file the device creates after scanning the document. Output Quality Touch this button to increase or decrease the print quality of the file being scanned. A higher quality setting produces a larger file size. Resolution Touch this button to change the scan resolution.
Scan to a folder If the system administrator has made the feature available, the device can scan a file and send it to a folder on the network. Supported operating systems for folder destinations include Windows 2000, Windows XP, Windows Server 2003, and Windows Vista. NOTE: You might be required to supply a user name and password in order to use this option, or to send to certain folders. See your system administrator for more information. 1.
Scan to a workflow destination NOTE: This device feature is provided by the optional Digital Sending Software. If the system administrator has enabled the workflow functionality, you can scan a document and send it to a custom workflow destination. A workflow destination gives you the ability to send additional information, along with the scanned document, to a specified network or file transfer protocol (FTP) location. Prompts for specific information appear on the control-panel display.
144 Chapter 9 Scan and send to e-mail ENWW
10 Fax ENWW ● Analog fax ● Digital fax 145
Analog fax Add analog fax capabilities to the MFP by purchasing and installing the Analog Fax Accessory 300. When the analog fax accessory is installed, the MFP can function as a standalone fax machine. See Order parts, accessories, and supplies on page 240 for information about ordering the analog fax accessory. The Analog Fax Accessory 300 Fax Guide and the Analog Fax Accessory 300 Send Fax Driver Guide are available at www.hp.com/go/mfpfaxaccessory300.
Use the Send Fax driver to send a fax from a computer without going to the MFP control panel. See the HP LaserJet MFP Analog Fax Accessory 300 Send Fax Driver Guide for more information.
Digital fax Digital faxing is available when you install the optional HP Digital Sending Software. For information about ordering this software, go to http://www.hp.com/go/digitalsending. With digital faxing, the MFP does not need to be connected directly to a phone line. Instead, the MFP can send a fax in one of three ways: ● LAN fax sends faxes through a third-party fax provider.
11 Manage and maintain ENWW ● Information pages ● Embedded Web server ● HP Easy Printer Care ● Use HP Web Jetadmin software ● HP Printer Utility for Macintosh ● Security features ● Set the real-time clock ● Clean the MFP ● Calibrate the scanner ● Configure alerts ● Manage supplies ● Printer maintenance kit ● Manage memory ● Economy settings 149
Information pages Information pages provide details about the device and its current configuration. The following table provides the instructions for printing the information pages. Page description How to print the page from the MFP control panel Menu map 1. From the Home screen, touch Administration. Shows the control-panel menus and available settings. 2. Touch Information. 3. Touch Configuration/Status Pages. 4. Touch Administration Menu Map. 5. Touch Print.
Page description How to print the page from the MFP control panel 4. Touch File Directory. 5. Touch Print. Fax reports 1. From the Home screen, touch Administration. Five reports show fax activity, fax calls, billing codes, blocked fax numbers, and speed-dial numbers. 2. Touch Information. 3. Touch Fax Reports. NOTE: Fax reports are available only on models that have the fax accessory installed. 4. Touch one of the following buttons to print the corresponding report: 5.
Embedded Web server Use the embedded Web server to view MFP and network status and to manage printing functions from your computer instead of from the MFP control panel. The following are examples of what you can do using the embedded Web server: NOTE: When the printer is directly connected to a computer, use the HP Easy Printer Care to view the printer status. ● View MFP status information. ● Set the type of media that is loaded in each tray.
Embedded Web server sections Tab or section Options Information tab ● Device Status: Shows the device status and shows the life remaining of HP supplies, with 0% indicating that a supply is empty. The page also shows the type and size of print paper set for each tray. To change the default settings, click Change Settings. ● Configuration Page: Shows the information found on the configuration page.
Tab or section Options ● User PIN: Allows you to add user PIN records into the device, and to edit or delete user PIN records that have already been saved in the device. You can set up the device to require each user to provide their PIN when they access the device. ● Edit Other Links: Allows you to add or customize a link to another Web site. This link is displayed in the Other Links area on all embedded Web server pages.
Tab or section Options NOTE: You must have Internet access in order to use any of these links. If you use a dial-up connection and did not connect when you first opened the embedded Web server, you must connect before you can visit these Web sites. Connecting might require that you close the embedded Web server and reopen it.
HP Easy Printer Care HP Easy Printer Care is a software program that you can use for the following tasks: ● Checking the device status ● Checking the supplies status ● Setting up alerts ● Viewing device documentation ● Gaining access to troubleshooting and maintenance tools ● Printing usage reports ● Fixing problems with HP drivers, software, and device firmware You can use the HP Easy Printer Care when the printer is directly connected to your computer or when it is connected to a network.
Section Options Device List tab ● NOTE: The product information appears either in list form or as icons, depending on the setting for the View as option. When you open the software, this is the first page that appears. NOTE: To return to this page from any tab, click My HP Printers in the left side of the window. ● The information on this tab includes current alerts for the product. ● If you click a product in the list, the HP Easy Printer Care opens the Overview tab for that product.
Section Options NOTE: This item is available from the Overview and Support tabs. software, firmware, and HP printer drivers. You can accept or decline each recommended update. Supplies Ordering button ● Ordering list: Shows the supplies that you can order for each product. To order a certain item, click the Order check box for that item in the supplies list. You can sort the list by product, or by the supplies that need to be ordered the soonest.
Use HP Web Jetadmin software HP Web Jetadmin is a Web-based software solution for remotely installing, monitoring, and troubleshooting network-connected peripherals. The intuitive browser interface simplifies cross-platform management of a wide range of devices, including HP and non-HP devices. Management is proactive, allowing network administrators the ability to resolve issues before users are affected. Download this free, enhanced-management software at www.hp.com/go/webjetadmin_software.
HP Printer Utility for Macintosh Use the optional HP Printer Utility to configure and maintain a printer from a Mac OS X V10.2, V10.3, or V10.4 computer. This section describes several functions that you can perform through the HP Printer Utility. Open the HP Printer Utility The process that you use to start the HP Printer Utility depends on the Macintosh operating system that you are using. Open the HP Printer Utility in Mac OS X V10.2 1. Open the Finder, and then click Applications. 2.
View supplies status View the status of the printer supplies (such as print cartridges, imaging drum, or print media) from a computer. 1. Open the HP Printer Utility. 2. In the Configuration Settings list, select Supplies Status. 3. Click the Supplies tab to view the status of various replaceable supplies, and click the Media tab to view the status of print media. ● To view a more detailed status list, click Detailed Supplies Information. The Supplies Information dialog box appears.
Update the firmware Update the printer firmware by loading the new firmware file from the computer. You can find new firmware files for your printer at www.hp.com/go/ljm9040mfp_firmware or www.hp.com/go/ ljm9050mfp_firmware. 1. Open the HP Printer Utility. 2. In the Configuration Settings list, select Firmware Update. 3. Click Choose, navigate to the firmware file that you want to upload, and then click OK. 4. Click Upload to load the firmware file.
Configure trays Change the default printer tray settings from the computer. 1. Open the HP Printer Utility. 2. In the Configuration Settings list, select Tray Configuration. 3. In the Trays list, select the tray to be configured. NOTE: To make the selected tray the default tray for printing, click Make Default. 4. In the Default Media Size pop-up menu, select the default media size for the tray. 5. In the Default Media Type pop-up menu, select the default media type for the tray. 6.
Set up e-mail alerts Set up e-mail messages that alert you to certain events that occur with the printer, such as a low toner level in a print cartridge. 1. Open the HP Printer Utility. 2. In the Configuration Settings list, select E-mail Alerts. 3. Click the Server tab, and, in the SMTP Server box, type the server name. 4. Click the Destination tab, click the add (+) button, and then type the e-mail addresses, mobile device numbers, or Web site URLs to which you want the e-mail alerts sent.
Security features This section explains important security features that are available for the MFP: ● Secure the embedded Web server ● Foreign Interface Harness (FIH) ● Secure Disk Erase ● Security Lock ● Authentication ● Lock the control-panel menus Secure the embedded Web server Assign a password for access to the embedded Web server so that unauthorized users cannot change the MFP settings. 1. Open the embedded Web server. See Embedded Web server on page 152. 2. Click the Settings tab. 3.
Enable the FIH portal 1. Double-click the FIH.EXE file. The Foreign Interface Harness dialog box appears. 2. Click OK. 3. Click Enable. 4. If you have not entered a PIN before, click No. If you have entered a PIN before, click Yes. If you click No, type and confirm the PIN, and then click OK. If you click Yes, type the PIN and click OK. NOTE: The PIN must be numeric. 5. Click the appropriate button for the type of connection: Direct or Network. If Direct is selected, type the MFP port.
Data affected Data affected (covered) by the Secure Disk Erase feature includes temporary files that are created during the print and copying process, stored jobs, proof and hold jobs, disk-based fonts, disk-based macros (forms), stored fax files, address books, and HP and third-party applications. NOTE: Stored jobs will be securely overwritten only when they have been deleted through the Retrieve Job menu on the MFP after the appropriate erase mode has been set.
following procedure describes how to restrict access to the control-panel menus by using the HP Web Jetadmin software. (See Use HP Web Jetadmin software on page 159.) 1. Open the HP Web Jetadmin program. 2. Open the DEVICE MANAGEMENT folder in the drop-down list in the Navigation panel. Navigate to the DEVICE LISTS folder. 3. Select the MFP. 4. In the Device Tools drop-down list, select Configure. 5. Select Security from the Configuration Categories list. 6. Type a Device Password. 7.
Set the real-time clock Use the real-time clock feature to set the date and time settings. The date and time information is attached to stored print, fax, and digital-send jobs, so you can identify the most recent versions of stored print jobs. ENWW 1. On the control panel, scroll to and touch Administration. 2. Touch Time/Scheduling. 3. Touch Date/Time. 4. Choose a date format. 5. Choose a time format. 6. Touch the Date fields to enter the date. 7. Touch the Time fields to enter the time.
Clean the MFP Print a cleaning page 1. From the Home screen, touch Administration. 2. Touch Print Quality. 3. Touch Calibration/Cleaning. 4. Touch Create Cleaning Page. The device prints a cleaning page. 5. Follow the instructions printed on the cleaning page. Clean the MFP hardware To maintain print quality, clean the MFP thoroughly: ● every time you change the print cartridge ● whenever print-quality problems occur Clean the outside of the MFP with a lightly water-dampened cloth.
2. Open the front cover of the MFP, rotate the green lever downward to the unlocked position, and remove the print cartridge. Figure 11-3 Clean the paper path (2 of 6) CAUTION: To prevent damage to the print cartridge, use two hands when removing it from the MFP. Do not expose the print cartridge to light for more than a few minutes. Cover the print cartridge when it is outside of the MFP. NOTE: If toner gets on your clothes, wipe it off with a dry cloth, and wash your clothes in cold water.
6. Close the front cover, reconnect all cables, and turn the MFP on (button in). Figure 11-7 Clean the paper path (6 of 6) Clean the outside of the MFP ● Clean the outside of the MFP if it is visibly marked. ● Use a soft, lint-free cloth dampened with water. Clean the touchscreen ● Clean the touch screen when needed (fingerprints, dust build-up). ● Wipe the touch screen gently with a clean, water-dampened, lint-free cloth. CAUTION: Use water only. Solvents or cleaners can damage the touch screen.
2. Locate the top and bottom ADF glass strips. Figure 11-9 Clean the ADF delivery system (2 of 5) 3. Clean the glass strips by wiping them gently with a clean, damp, lint-free cloth. 4. Locate the white, vinyl backing. Figure 11-10 Clean the ADF delivery system (3 of 5) 5. Locate the white, vinyl calibration strips. Figure 11-11 Clean the ADF delivery system (4 of 5) 6. Clean the ADF backing and the calibration strips by wiping them with a clean, damp, lint-free cloth. 7. Close the top cover.
CAUTION: Clean this area only if you see copy defects such as streaks, and you notice dust inside the glass strip. Cleaning this area frequently could introduce dust into the MFP. 1. Open the ADF cover. Figure 11-13 Clean the top ADF glass strip (1 of 4) 2. Locate the latch that releases the top ADF glass strip. Push the latch to the left, and pull down to expose the inside of the glass strip. Figure 11-14 Clean the top ADF glass strip (2 of 4) 3. Gently wipe the glass with a dry, lint-free cloth.
Clean the ADF rollers You should clean the rollers in the ADF if you are experiencing misfeeds or if your originals show marks as they exit the ADF. 1. Open the top cover. CAUTION: Clean the rollers only if you experience misfeeds or marks on the originals, and you notice dust on the rollers. Cleaning the rollers frequently could introduce dust into the MFP. Figure 11-17 Clean the ADF rollers (1 of 6) 2. Locate the rollers near the glass strips. Figure 11-18 Clean the ADF rollers (2 of 6) 3.
5. Open the ADF cover. Figure 11-20 Clean the ADF rollers (4 of 6) 6. Locate the rollers. Figure 11-21 Clean the ADF rollers (5 of 6) 7. Wipe the rollers with a clean, water-dampened, lint-free cloth. CAUTION: Do not pour water directly onto the rollers. Doing so might damage the MFP. 8. Close the ADF cover. Figure 11-22 Clean the ADF rollers (6 of 6) 9. Close the delivery guide and wipe its outside surface with the cloth.
Calibrate the scanner Calibrate the scanner to compensate for offsets in the scanner imaging system (carriage head) for ADF and flatbed scans. Because of mechanical tolerances, the scanner's carriage head might not read the position of the image accurately. During the calibration procedure, scanner offset values are calculated and stored. The offset values are then used when producing scans so that the correct portion of the document is captured.
Configure alerts You can use HP Web Jetadmin or the MFP’s embedded Web server to configure the system to alert you of problems with the MFP. The alerts take the form of e-mail messages to the e-mail account or accounts that you specify.
Manage supplies Use genuine HP print cartridges for the best printing results. HP print cartridges When you use a genuine new HP print cartridge, you can obtain the following supplies information: ● Percentage of supplies remaining ● Estimated number of pages remaining ● Number of pages printed NOTE: See Supplies and accessories on page 239 for cartridge ordering information.
Table 11-1 Print cartridge temperature specifications Environmental condition Recommended Allowed Storage/standby Temperature (print cartridge) 17° to 25°C (62.6° to 77°F) 15° to 30°C (59° to 86°F) -20° to 40°C (-4° to 104°F) Print cartridge life expectancy Average cartridge yield is 38,000 pages in accordance with ISO/IEC 19752. Actual yield depends on specific use.
Printer maintenance kit NOTE: The printer maintenance kit is a consumable and is not covered under warranty. To ensure optimum print quality, HP recommends that a new printer maintenance kit be installed approximately every 350,000 pages. Depending on how you use the MFP, you might need to replace the kit more often. If you have questions about how frequently you should replace the printer maintenance kit, contact the support center at www.hp.com/support/ljm9040mfp or www.hp.com/ support/ljm9050mfp.
Manage memory The MFP has two double data rate (DDR) DIMM slots to provide more MFP memory. DDR DIMMs are available in 64, 128, and 256 MB, for a maximum of 512 MB. The MFP has two compact flash slots to provide the following features: ● To add flash-based memory accessory fonts, macros, and patterns, use the appropriate DDR DIMM. ● To add other flash-based printer languages and MFP options, use the appropriate DDR DIMM.
3. Turn the MFP off. Disconnect the power cord and any cables. Figure 11-24 Install DDR memory DIMMs (2 of 8) 4. Loosen the two captive thumb screws on the back of the MFP. Figure 11-25 Install DDR memory DIMMs (3 of 8) 5. Grasp the screws and pull the formatter board out of the MFP. Place it on a flat, non-conductive surface. Figure 11-26 Install DDR memory DIMMs (4 of 8) 6. Remove the DIMM from the antistatic package.
7. Press the DIMM straight into the slot (press firmly). Make sure the locks on each side of the DIMM snap inward into place. (To remove a DIMM, the locks must be released.) Figure 11-28 Install DDR memory DIMMs (6 of 8) 8. Slide the formatter board back into the MFP and tighten the two screws. Figure 11-29 Install DDR memory DIMMs (7 of 8) 9. Plug in the power cord and connect all cables. Turn the MFP on. Figure 11-30 Install DDR memory DIMMs (8 of 8) 10.
Verify memory installation Follow this procedure to verify that DDR DIMMs are installed correctly: 1. Check that the MFP control panel displays Ready when the MFP is turned on. If an error message appears, a DIMM might have been incorrectly installed. 2. Print the configuration page. 3. Check the memory section on the configuration page and compare it to the configuration before the DIMM installation.
Economy settings Sleep and wake Set the sleep delay Use the sleep-delay feature to set the period of time that the MFP must be idle before it enters the sleep mode. The default setting is 45 minutes. 1. Scroll to and touch Administration. 2. Touch Time/Scheduling. 3. Touch Sleep Delay. 4. Touch the sleep-delay setting that you want. Set the sleep time Use the sleep time feature to put the MFP in sleep mode at a set time each day. 1. Scroll to and touch Administration. 2. Touch Time/Scheduling.
ENWW 7. Touch the appropriate options to set the correct hour, minute, and AM/PM setting. 8. If you want to wake the MFP at the same time every day (including weekends), on the Apply to All Days screen, touch Yes. If you want to set the time for individual days, touch No, and repeat the procedure for each day.
188 Chapter 11 Manage and maintain ENWW
12 Problem solve ENWW ● Solve problems ● Determining Solve MFP problems ● Control-panel message types ● Control-panel messages ● Clear jams ● Media-handling problems ● Solve print-quality problems ● Solve fax problems ● Solve copy problems ● Solve e-mail problems ● Solve network connectivity problems ● Solve common Macintosh problems 189
Solve problems If the MFP is not responding correctly, complete the steps in the following checklist, in order. If the MFP does not pass a step, follow the corresponding troubleshooting suggestions. If a step resolves the problem, you can stop without performing the other steps on the checklist. Troubleshooting checklist 1. 2. Make sure that the MFP Ready light is on. If no lights are on, complete these steps: a. Check the power-cable connections. b. Check that the power switch is on. c.
Determining Solve MFP problems Situation/Message Solution The control-panel display is blank, and internal fans are not running. Make sure that the MFP power is on. Press all the keys to see if one is stuck. Contact your HP-authorized service representative if these steps do not work. The MFP is turned on, but the internal fans are not running. Make sure that the line voltage is correct for the MFP power configuration. (See the label on the back of the device for voltage requirements.
Control-panel message types Four types of control-panel messages can indicate the status of or problems with the device. Message type Description Status messages Status messages reflect the current state of the device. They inform you of normal device operation and require no interaction to clear them. They change as the state of the device changes. Whenever the device is ready, not busy, and has no pending warning messages, the status message Ready appears if the device is online.
Control-panel messages The product provides robust control panel messaging. When a message appears on the control panel, follow the on-screen instructions to resolve the issue. If the product displays an “Error” or “Attention” message, and no steps are shown to resolve the issue, turn the product off then on. Contact HP support if you continue to experience issues with the product.
Clear jams If a jam message appears on the control panel, look for media in the locations indicated in the following illustration. You might need to look for jammed media in locations other than those that are indicated in the jam message. If the location of the jam is not obvious, look first in the front door area. After looking at the illustration, you can go to the procedure for clearing the jam. When clearing jams, be very careful not to tear the media.
11 Front door and print-cartridge area 12 Upper bin Clear jams from the duplexer 1. Move the output device away from the MFP to gain access to the left door. Figure 12-2 Clear jams in the duplex printing accessory (1 of 6) 2. Open the left door and carefully pull out any paper from area. WARNING! Avoid touching the adjacent fusing area. It can be hot. Figure 12-3 Clear jams in the duplex printing accessory (2 of 6) 3.
5. Open the front door. Figure 12-5 Clear jams in the duplex printing accessory (4 of 6) 6. Check for paper in the duplex printing accessory area, and remove any paper by pulling it out of the MFP. Be careful not to tear the paper. Figure 12-6 Clear jams in the duplex printing accessory (5 of 6) 7. Reinstall the duplex printing accessory by sliding it back into the slot until it locks into place. Figure 12-7 Clear jams in the duplex printing accessory (6 of 6) 8. Close all open doors.
2. Open and close the right door to reset the MFP. Figure 12-9 Clear jams in tray 1 (2 of 2) Clear jams inside the right door 1. Open the right door. Figure 12-10 Clear jams inside the right door (1 of 3) 2. Check for media in the right door area, and remove any media from this area. Carefully check to be sure you have removed all pieces of torn media. 3. Open the jam access cover. Pull out and lift the green tab. Figure 12-11 Clear jams inside the right door (2 of 3) 4.
Clear jams in trays 2 and 3 1. Open the tray until it stops. Figure 12-13 Clear jams in trays 2 and 3 (1 of 3) 2. Check for media in the tray area, and remove any media from this area. Carefully check to be sure you have removed all pieces of torn media. 3. Close the tray. Figure 12-14 Clear jams in trays 2 and 3 (2 of 3) 4. Open the right door, remove any visible media, and close the right door. This resets the MFP. Figure 12-15 Clear jams in trays 2 and 3 (3 of 3) Clear jams in tray 4 1.
3. If you did not see any paper in the vertical transfer door, open tray 4. Figure 12-17 Clear jams in tray 4 (2 of 4) 4. Check for paper in the tray area, and remove any paper from this area. Carefully check to be sure you have removed all pieces of torn paper. 5. Close tray 4. Figure 12-18 Clear jams in tray 4 (3 of 4) 6. Close the vertical transfer door. Figure 12-19 Clear jams in tray 4 (4 of 4) Clear jams from the output areas Clear jams in the stacker or stapler/stacker 1.
2. Move the output device away from the MFP. Figure 12-21 Clear jams in the stacker or stapler/stacker (2 of 7) 3. On the stacker, lift the wire on the lower bin of the device, and carefully pull out any media from this area. On the stapler/stacker, carefully pull out any media that might be protruding from the accumulator area. NOTE: Only the stacker has the wire on the lower bin. Figure 12-22 Clear jams in the stacker or stapler/stacker (3 of 7) 4.
6. Locate the green handle in the paper path module, and then pull down on the handle. Figure 12-25 Clear jams in the stacker or stapler/stacker (6 of 7) 7. Carefully pull out any media from the paper path module. 8. Close all open doors. Push the output device back into place. Figure 12-26 Clear jams in the stacker or stapler/stacker (7 of 7) Clear jams in the paper-path area of the multifunction finisher 1. Open the top cover.
3. Close the finisher cover. Figure 12-29 Clear jams in the paper-path area of the multifunction finisher (3 of 3) Clear jams in between the multifunction finisher and the MFP 1. Move the finisher away from the MFP. Figure 12-30 Clear jams in between the multifunction finisher and the MFP (1 of 4) 2. Carefully remove any paper from the MFP output area. Figure 12-31 Clear jams in between the multifunction finisher and the MFP (2 of 4) 3. Carefully remove any paper from the finisher input area.
4. Push the multifunction finisher back into place. Figure 12-33 Clear jams in between the multifunction finisher and the MFP (4 of 4) Clear booklet jams in the multifunction finisher 1. Move the finisher away from the MFP. Figure 12-34 Clear booklet jams in the multifunction finisher (1 of 7) 2. If paper is jammed in the finisher input area but has not entered the folding rollers, carefully remove the paper from the input area and then skip to step 7.
4. Open the stapler-unit door. Figure 12-37 Clear booklet jams in the multifunction finisher (4 of 7) 5. Turn the bottom green knob clockwise to advance the jammed paper through the folding rollers and into the booklet bin. Figure 12-38 Clear booklet jams in the multifunction finisher (5 of 7) 6. Close the stapler-unit door. Figure 12-39 Clear booklet jams in the multifunction finisher (6 of 7) 7. Push the multifunction finisher back into place.
Clear a staple jam from the multifunction finisher 1. Open the stapler-unit door. Figure 12-41 Clear a staple jam from the multifunction finisher (1 of 11) 2. Slide the stapler unit toward you. Figure 12-42 Clear a staple jam from the multifunction finisher (2 of 11) 3. Turn the large green knob until you see the blue dot (this indicates that the stapler is fully open). Figure 12-43 Clear a staple jam from the multifunction finisher (3 of 11) 4.
5. Remove the staple cartridge. Figure 12-45 Clear a staple jam from the multifunction finisher (5 of 11) 6. Pull up on the lever labeled with a green dot. Figure 12-46 Clear a staple jam from the multifunction finisher (6 of 11) 7. Remove the damaged staple. Figure 12-47 Clear a staple jam from the multifunction finisher (7 of 11) 8. Press down on the lever labeled with a green dot.
9. Reinstall the staple cartridge. Figure 12-49 Clear a staple jam from the multifunction finisher (9 of 11) 10. Slide the stapler unit into the device. Figure 12-50 Clear a staple jam from the multifunction finisher (10 of 11) 11. Close the stapler-unit door. Figure 12-51 Clear a staple jam from the multifunction finisher (11 of 11) Clear a jam in the upper half of the stapler head in the multifunction finisher 1.
Clear a staple jam from the stapler/stacker 1. Move the stapler/stacker away from the MFP. Figure 12-53 Clear a staple jam from the stapler/stacker (1 of 9) 2. Open the stapler unit door. Figure 12-54 Clear a staple jam from the stapler/stacker (2 of 9) 3. Pull the cartridge out. Figure 12-55 Clear a staple jam from the stapler/stacker (3 of 9) 4. Pull up on the lever labeled with a green dot.
5. Remove the damaged staple. Figure 12-57 Clear a staple jam from the stapler/stacker (5 of 9) 6. Press down on the lever labeled with a green dot. Figure 12-58 Clear a staple jam from the stapler/stacker (6 of 9) 7. Reinstall the staple cartridge. Figure 12-59 Clear a staple jam from the stapler/stacker (7 of 9) 8. Close the stapler unit door.
9. Push the stapler/stacker back into place. Figure 12-61 Clear a staple jam from the stapler/stacker (9 of 9) NOTE: The stapler needs to reload after clearing a staple jam, so the first few documents (no more than five) might not be stapled. If a print job is sent and the stapler is jammed or is out of staples, the job will still print as long as the path to the output bin is not blocked. Clear jams in the left door (fuser area) 1.
4. Press down on the green tab and carefully check for media. Be sure to remove all pieces of torn media. Figure 12-64 Clear jams in the left door (3 of 4) 5. Close the left door. Push the output device back into place. Figure 12-65 Clear jams in the left door (4 of 4) Clear jams in the 8-bin mailbox 1. Move the 8-bin mailbox away from the MFP. To do this, stand on the left side of the MFP and pull the 8-bin mailbox straight toward you. Figure 12-66 Clear jams in the 8-bin mailbox (1 of 3) 2.
4. Push the 8-bin mailbox back into place, and then reattach the upper bin. Figure 12-68 Clear jams in the 8-bin mailbox (3 of 3) NOTE: Check that the paper used is not thicker than the 8-bin mailbox supports. See Supported paper and print media sizes on page 81. Solve repeated jams Situation Solution General repeated jam problems 1. Verify that the media is correctly loaded in the trays and that all width guides are correctly set (see Print tasks on page 97). 2.
Media-handling problems Use only media that meets the specifications outlined in the HP LaserJet Printer Family Print Media Guide. This guide is available at www.hp.com/support/ljpaperguide. Printer feeds multiple sheets Printer feeds multiple sheets Cause Solution The input tray is overfilled. Remove excess media from the input tray. Print media is sticking together. Remove media, flex it, rotate it 180° or flip it over, and then reload it into the tray. NOTE: Do not fan media.
Printer pulls from incorrect tray Cause Solution The Use Requested Tray option is set to First in the Tray Behavior sub-menu of the Device Behavior menu. Change the setting to Exclusively. The media size is not configured correctly for the input tray. Print a configuration page or use the control panel to determine the media size for which the tray is configured. The guides in the tray are not against the paper. Verify that the guides are touching the paper.
Media does not feed from tray 2, 3, or 4 Cause Solution The media size is not configured correctly for the input tray. Print a configuration page or use the control panel to determine the media size for which the tray is configured. The guides in the tray are not against the paper. Verify that the guides are touching the paper. Transparencies will not feed Transparencies will not feed Cause Solution The correct media type is not specified in the software or printer driver.
Output is curled or wrinkled Output is curled or wrinkled Cause Solution Media does not meet the specifications for this MFP. Use only media that meets the HP media specifications for this MFP. Media is damaged or in poor condition. Remove media from the input tray and load media that is in good condition. Printer is operating in an excessively humid environment. Verify that the printing environment is within humidity specifications. You are printing large, solid-filled areas.
Solve print-quality problems This section helps you define print-quality problems and what to do to correct them. Often print- quality problems can be handled easily by making sure that the device is correctly maintained, using print media that meets HP specifications, or running a cleaning page. Print-quality problems associated with media Some print-quality problems arise from the use of inappropriate media. ● Use media that meets HP specifications.
Light print (partial page) Figure 12-69 Light print (partial page) 1. Make sure that the print cartridge is fully installed. 2. The print cartridge might be defective. Replace the print cartridge. 3. The media might not meet HP specifications (for example, the media is too moist or too rough). See Supported paper and print media sizes on page 81. Light print (entire page) Figure 12-70 Light print (entire page) 1. Make sure that the print cartridge is fully installed. 2.
Specks Figure 12-71 Specks Specks might appear on a page after a jam has been cleared. 1. Print a few more pages to see if the problem corrects itself. 2. Clean the inside of the device and run a cleaning page. See Clean the MFP on page 170. 3. Try using a different type of media. 4. Check the print cartridge for leaks. If the print cartridge is leaking, replace it. Dropouts Figure 12-72 Dropouts ENWW 1. Make sure that the environmental specifications for the device are being met.
Lines Figure 12-73 Lines Aa Bb C c Aa Bb C c Aa Bb C c Aa Bb C c Aa Bb C c Aa Bb C c Aa Bb C c Aa Bb C c Aa Bb C c Aa Bb C c 1. Print a few more pages to see if the problem corrects itself. 2. Clean the inside of the device and run a cleaning page. See Clean the MFP on page 170. 3. Replace the print cartridge. Gray background Figure 12-74 Gray background 1. Do not use media that has already been run through the device. 2. Try using a different type of media. 3.
Toner smear Figure 12-75 Toner smear 1. Print a few more pages to see if the problem corrects itself. 2. Verify that the fuser levers are in the down position (unless printing on envelopes). 3. Try using a different type of media. 4. Make sure that the environmental specifications for the device are being met. See Operating environment on page 252. 5. Clean the inside of the device and run a cleaning page. See Clean the MFP on page 170. 6. Replace the print cartridge.
Repeating defects Figure 12-77 Repeating defects 1. Print a few more pages to see if the problem corrects itself. 2. If the distance between defects is 44 mm (1.73 in.), 53 mm (2.1 in.), 63 mm (2.5 in.), or 94 mm (3.7 in.), the print cartridge might need to be replaced. 3. Clean the inside of the device and run a cleaning page. See Clean the MFP on page 170. Also see Repeating image on page 222. Repeating image Figure 12-78 Repeating image Dear Mr.
Misformed characters Figure 12-79 Misformed characters AaBbCc AaBbCc AaBbCc AaBbCc AaBbCc AaBbCc 1. Print a few more pages to see if the problem corrects itself. 2. Make sure that the environmental specifications for the device are being met. See Operating environment on page 252. Page skew Figure 12-80 Page skew ENWW 1. Print a few more pages to see if the problem corrects itself. 2. Verify that no torn pieces of media are inside the device. 3.
Curl or wave Figure 12-81 Curl or wave 1. Turn over the stack in the tray. Also, try rotating the stack 180°. 2. Make sure that the type and quality of the media you are using meet HP specifications. (See Supported paper and print media sizes on page 81.) 3. Make sure that the environmental specifications for the device are being met. (See Operating environment on page 252.) 4. Try printing to a different output bin. 5.
Vertical white lines Figure 12-83 Vertical white lines 1. Print a few more pages to see if the problem corrects itself. 2. Make sure that the type and quality of the media you are using meet HP specifications. See Supported paper and print media sizes on page 81. 3. Replace the print cartridge.
3. Make sure that the environmental specifications for the device are being met. See Operating environment on page 252. 4. Replace the print cartridge. Scattered lines Figure 12-86 Scattered lines 1. Make sure that the type and quality of the media you are using meet HP specifications. See Supported paper and print media sizes on page 81. 2. Make sure that the environmental specifications for the device are being met. See Operating environment on page 252. 3. Turn over the stack in the tray.
Random image repetition Figure 12-88 Random image repetition (1 of 2) Figure 12-89 Random image repetition (2 of 2) If an image that appears at the top of the page (in solid black) repeats further down the page (in a gray field), the toner might not have been completely erased from the last job. (The repeated image might be lighter or darker than the field it appears in.) ENWW ● Change the tone (darkness) of the field that the repeated image appears in.
Solve fax problems For help solving fax problems, see the Analog Fax Accessory 300 Fax Guide and the Analog Fax Accessory 300 Send Fax Driver Guide, which are included on the software CD that came with the fax accessory. You can also go to http://www.hp.com/go/mfpfaxaccessory300.
Solve copy problems Prevent copy problems The following are a few simple steps you can take to improve copy quality: ● Copy from the flatbed scanner. This will produce a higher quality copy than copying from the automatic document feeder (ADF). ● Use quality originals. ● Load the media correctly. If the media is loaded incorrectly, it might skew, causing unclear images and problems with the OCR program. See Load paper and print media on page 85 for instructions.
Problem Cause Solution To optimize the image for text, touch Copy and then touch Optimize Text/ Picture. Select Text. Media-handling problems Problem Cause Solution Poor print quality or toner adhesion The paper is too moist, too rough, too heavy or too smooth, or it is embossed or from a faulty paper lot. Try another kind of paper, between 100 and 250 Sheffield, 4 to 6% moisture content. Use only media that meets the specifications outlined in the HP LaserJet Printer Family Print Media Guide.
Problem Cause Solution Print is crooked or misaligned on the page. The media guides might be incorrectly adjusted. Remove all media from the input tray, straighten the stack, and then load the media in the input tray again. Adjust the media guides to the width and length of the media that you are using and try printing again. The scanner might require a calibration. Perform a tray alignment and then calibrate the scanner. More than one sheet feeds at one time.
Performance problems Problem Cause Solution No copy came out. The input tray might be empty. Load media in the device. The original might have been loaded incorrectly. Load the original face down in the ADF or flatbed scanner. The sealing tape might not have been properly removed from the cartridge. Replace the print cartridge and return the defective cartridge. The original might have been loaded incorrectly. Load the original face down in the ADF or flatbed scanner.
Solve e-mail problems If you are unable to send e-mails by using the digital-send feature, you might need to reconfigure the SMTP gateway address or the LDAP gateway address. Print a configuration page to find the current SMTP and LDAP gateway addresses. See Information pages on page 150. Use the following procedures to check if the SMTP and LDAP gateway addresses are valid. Validate the SMTP gateway address NOTE: This procedure is for Windows operating systems. 1.
Solve network connectivity problems If the MFP is having problems communicating with the network, use the information in this section to resolve the problem. Solve network printing problems NOTE: HP recommends that you use the MFP CD to install and set up the MFP on a network. ● Make sure that the network cable is securely seated into the formatter RJ45 connector. ● Make sure that the Link LED on the formatter RJ45 connector is lit and is flashing. ● Make sure that the I/O card is ready.
its physical address to the hardware address that is listed on the HP Jetdirect configuration page in the section called HP Jetdirect Configuration. If the addresses match, all network communications are valid. 4. ENWW If you cannot verify that the MFP is communicating over the network, contact the network administrator.
Solve common Macintosh problems This section lists problems that can occur when using Mac OS X. Table 12-1 Problems with Mac OS X The printer driver is not listed in the Print Center or Printer Setup Utility. Cause Solution The printer software might not have been installed or was installed incorrectly. Make sure that the printer PPD is in the following hard-drive folder: Library/Printers/PPDs/Contents/Resources/ .
Table 12-1 Problems with Mac OS X (continued) The printer driver does not automatically set up your selected printer in the Print Center or Printer Setup Utility. Cause Solution The Postscript Printer Description (PPD) file is corrupt. Delete the PPD file from the following hard-drive folder: Library/ Printers/PPDs/Contents/Resources/.lproj, where is the two-letter language code for the language that you are using. Reinstall the software. See the getting started guide for instructions.
Table 12-1 Problems with Mac OS X (continued) When connected with a USB cable, the printer does not appear in the Print Center or Printer Setup Utility after the driver is selected. Cause Solution Hardware troubleshooting ● Check that the printer is turned on. ● Verify that the USB cable is connected correctly. ● Check that you are using the appropriate high-speed USB cable. ● Ensure that you do not have too many USB devices drawing power from the chain.
A Supplies and accessories This section provides information about ordering parts, supplies, and accessories. Use only parts and accessories that are specifically designed for this device.
Order parts, accessories, and supplies Several methods are available for ordering parts, supplies, and accessories: ● Order directly from HP ● Order through service or support providers ● Order directly through the embedded Web server (for printers that are connected to a network) ● Order directly through the HP Easy Printer Care software Order directly from HP You can obtain the following items directly from HP: ● Replacement parts: To order replacement parts in the U.S., go to www.hp.
Part numbers Type of item Item Description or use Order number Paper handling 3,000-sheet stacker One 3,000-sheet stacking device. The device also offers job offset capabilities. C8084A 3,000-sheet stapler/stacker One 3,000-sheet stacking device provides stapling for as many as 50 sheets of paper per document. The device also offers job offset capabilities.
Type of item Item Description or use Order number Cable and interface accessories Enhanced EIO Cards HP Jetdirect Connectivity Card for USB, serial, and LocalTalk connectivity J4135A HP Jetdirect 615N Print Server for Fast Ethernet (10/100Base-TX) networks (RJ-45 only) J6057A HP 680N Wireless 802.
B Service and support Hewlett-Packard limited warranty statement HP PRODUCT DURATION OF LIMITED WARRANTY HP LaserJet M9040 MFP and HP LaserJet M9050 MFP One-year on-site warranty HP warrants to you, the end-user customer, that HP hardware and accessories will be free from defects in materials and workmanship after the date of purchase, for the period specified above.
(INCLUDING LOST PROFIT OR DATA), OR OTHER DAMAGE, WHETHER BASED IN CONTRACT, TORT, OR OTHERWISE. Some countries/regions, states or provinces do not allow the exclusion or limitation of incidental or consequential damages, so the above limitation or exclusion may not apply to you. THE WARRANTY TERMS CONTAINED IN THIS STATEMENT, EXCEPT TO THE EXTENT LAWFULLY PERMITTED, DO NOT EXCLUDE, RESTRICT OR MODIFY AND ARE IN ADDITION TO THE MANDATORY STATUTORY RIGHTS APPLICABLE TO THE SALE OF THIS PRODUCT TO YOU.
Print cartridge limited warranty statement This HP product is warranted to be free from defects in materials and workmanship. This warranty does not apply to products that (a) have been refilled, refurbished, remanufactured or tampered with in any way, (b) experience problems resulting from misuse, improper storage, or operation outside of the published environmental specifications for the device product or (c) exhibit wear from ordinary use.
HP Customer Care Online Services For 24-hour access to updated HP device-specific software, product information, and support information through an Internet connection, go to the Web site: www.hp.com/support/ljm9040mfp or www.hp.com/support/ljm9050mfp. Go to www.hp.com/support/net_printing for information about the HP Jetdirect external print server. HP Instant Support Professional Edition (ISPE) is a suite of Web-based troubleshooting tools for desktop computing and printing products. Go to instantsupport.
HP Easy Printer Care To check the device status and settings and view troubleshooting information and online documentation, use the HP Easy Printer Care. You must have performed a full software installation in order to use the HP Easy Printer Care. See HP Easy Printer Care on page 156. HP support and information for Macintosh computers Go to www.hp.com/go/macosx for Macintosh OS X support information and HP subscription service for driver updates. Go to www.hp.
248 Appendix B Service and support ENWW
C ENWW Specifications ● Physical specifications ● Electrical specifications ● Acoustic emissions ● Operating environment 249
Physical specifications Table C-1 Dimensions 1 Model Height Depth Width Weight1 HP LaserJet M9040 MFP 1219 mm (48 in.) 1085 mm (43 in.) 1334 mm (53 in.) 143 kg (317 lb) HP LaserJet M9050 MFP 1219 mm (48 in.) 1085 mm (43 in.) 1334 mm (53 in.) 143 kg (317 lb) Without print cartridge Table C-2 Dimensions with all doors and trays fully opened Model Height Depth Width HP LaserJet M9040 MFP 1664 mm (66 in.) 1296 mm (52 in.) 2501 mm (98.5 in.) HP LaserJet M9050 MFP 1664 mm (66 in.
Electrical specifications WARNING! Power requirements are based on the country/region where the device is sold. Do not convert operating voltages. This can damage the device and void the product warranty. Table C-3 Power requirements Specification 110-volt models 220-volt models Power requirements 100 to 127 Vac 220 to 240 Vac 50/60 Hz 50/60 Hz 12 Amps 5.
Acoustic emissions Table C-5 Sound power level1, 2 1 Sound power level Declared per ISO 9296 Printing3 LWAd= 7.4 Bels (A) [74 dB(A)] Ready Essentially Inaudible Values are based on preliminary data. See www.hp.com/go/ljm9040mfp/regulatory or www.hp.com/go/ljm9050mfp/ regulatory for current information. 2 Configuration tested: Base unit printing and scanning continuous with ADF on A4 paper with no output device. 3 Print speed is 50 ipm HP LaserJet M9050 MFP and 40 ipm HP LaserJet M9040 MFP.
D ENWW Regulatory information 253
FCC regulations This equipment has been tested and found to comply with the limits for a Class A digital device, pursuant to Part 15 of the FCC rules. These limits are designed to provide reasonable protection against harmful interference in a residential installation. This equipment generates, uses, and can radiate radio frequency energy. If this equipment is not installed and used in accordance with the instructions, it may cause harmful interference to radio communications.
Environmental product stewardship program Protecting the environment Hewlett-Packard Company is committed to providing quality products in an environmentally sound manner. This product has been designed with several attributes to minimize impacts on our environment. Ozone production This product generates no appreciable ozone gas (O3).
HP LaserJet print supplies It’s easy to return and recycle your empty HP LaserJet print cartridges—free of charge—with HP Planet Partners. Multilingual program information and instructions are included in every new HP LaserJet print cartridge and supplies package. You help reduce the toll on the environment further when you return multiple cartridges together rather than separately.
Non-US returns To participate in HP Planet Partners return and recycling program, just follow the simple directions in the recycling guide (found inside the packaging of your new printer supply item) or visit http://www.hp.com/recycle. Select your country/region for information on how to return your HP LaserJet printing supplies. Paper This product is capable of using recycled papers when the paper meets the guidelines outlined in the HP LaserJet Printer Family Print Media Guide.
Material restrictions This HP product contains mercury in the fluorescent lamp of the scanner and/or control panel liquid crystal display that may require special handling at end-of-life. This HP product contains a battery that might require special handling at end-of-life. The batteries contained in or supplied by Hewlett-Packard for this product include the following: HP LaserJet M9040 and HP LaserJet M9050 device Type Carbon monofluoride lithium battery BR1632 Weight 1.
Material Safety Data Sheet (MSDS) Material Safety Data Sheets (MSDS) for supplies containing chemical substances (for example, toner) can be obtained by contacting the HP Web site at www.hp.com/go/msds or www.hp.com/hpinfo/ globalcitizenship/environment.
Country/region specific statements Declaration of Conformity Declaration of Conformity according to ISO/IEC 17050-1 and EN 17050-1 Manufacturer's Name: Manufacturer's Address: Hewlett-Packard Company 11311 Chinden Boulevard, Boise, Idaho 83714-1021, USA declares, that the product Product Name: HP LaserJet M9040/ M9050 MFP series Including: 2000 sheet input feed unit (C8531A) 8-bin mailbox (Q5693A)(GUADA-0401-00) Regulatory Model2): Product Options: Toner Cartridge BOISB-0403-01 All C8543X conforms
under the U.S. Department of Health and Human Services (DHHS) Radiation Performance Standard according to the Radiation Control for Health and Safety Act of 1968. Since radiation emitted inside the device is completely confined within protective housings and external covers, the laser beam cannot escape during any phase of normal user operation. WARNING! Using controls, making adjustments, or performing procedures other than those specified in this user guide may result in exposure to hazardous radiation.
HP LaserJet M9040, M9050, laserkirjoitin on käyttäjän kannalta turvallinen luokan 1 laserlaite. Normaalissa käytössä kirjoittimen suojakotelointi estää lasersäteen pääsyn laitteen ulkopuolelle. Laitteen turvallisuusluokka on määritetty standardin EN 60825-1 (1994) mukaisesti. VAROITUS ! Laitteen käyttäminen muulla kuin käyttöohjeessa mainitulla tavalla saattaa altistaa käyttäjän turvallisuusluokan 1 ylittävälle näkymättömälle lasersäteilylle.
Index Symbols/Numerics 3000-sheet stacker capacity 5 features 8 ordering 241 3000-sheet stapler/stacker bins 94 capacity 5 jams, clearing 199 ordering 241 selecting output location 95 staple cartridge, ordering 241 staple jams, clearing 208 stapling documents 8 500-sheet input tray models including 2 8-bin mailbox bins 94 capacity 5 features 10 jams, clearing 211 ordering 241 A A4 paper settings 40 accessories locating 7 ordering 240, 241 accounting hardware 165 acoustic specifications 252 activity log, fa
capacity bins 4 cards, EIO ordering 242 cartridges management menu 25 ordering through embedded Web server 154 recycling 256 warranty 245 cartridges, print Macintosh status 69 ordering 241 cartridges, staple empty, stop or continue settings 105 jams, clearing from stapler/ stacker 208 loading 105 characters, misformed 223 checking toner level HP Easy Printer Care software 180 cleaning ADF delivery system 172 glass 172 MFP 170, 172 paper path 170 touch-screen 172 clearing jams stapler head 207 clock setting
LDAP support 134 loading documents 137 recipient lists 139 sending documents 137 Setup menu 37 SMTP support 134 troubleshooting 191 validating gateway addresses 233 workflow 143 Digital Sending tab, embedded Web server 154 DIMMs expansion options 3 installing 182 ordering 241 slots 182 verifying installation 185 Disk Erase feature 166 disposal, end-of-life 258 DLC/LLC settings 29 document feeder copying two-sided documents 124 doors jam locations 194 left, clearing jams 210 locating 7 right, clearing jams 1
firmware updates 6 Firmware Update, Macintosh 63 first page speed, specifications 3 use different paper 66 flash memory upgrading 182 folders default settings 21 sending to 142 fonts Courier settings 40 EPS files, troubleshooting 237 list, printing 16, 151 Upload Macintosh 63 Foreign Interface Harness (FIH) 165 front door jam locations 194 locating 7 FTP, sending to 143 fuser modes 42 warranty 245 G gateways configuring 134 testing 135 validating addresses 233 glass sizes supported 137 graphical display, co
jobs Macintosh settings 63 K keys, control panel locating 12 sounds, settings 38 touchscreen 14 Korean EMI statement 261 L LAN connector 5 LAN fax 148 landscape orientation setting, Windows 101 language default, setting 38 language, control panel 191 language, printer default settings 40 laser safety statements 260, 261 LDAP servers connecting to 134 validating gateway addresses 233 letterhead paper, loading 102 light copying 229 light print problem-solving 218 lights control panel 12 lines, problem-solving
networks AppleTalk settings 29 configuring 74 configuring gateway addresses 134 default gateway 75 diagnostics 29 disabling DLC/LLC 77 disabling protocols 76 DLC/LLC settings 29 HP Web Jetadmin 159 IP address 74 IPX/SPX settings 28 link speed settings 32 Macintosh installation 61, 62 Macintosh settings 64 print servers included 2 protocol configuration page, printing 33 security 29 SMTP servers 134 subnet mask 75 TCP/IP parameters 74 TCP/IP settings 26 testing SMTP settings 135 troubleshooting printing 234
print server 5 priority, settings 52, 64 private jobs Windows 102 problem-solving blurred print 226 copy quality 229 copy size 232 copying 229, 232 curled paper 224 dropouts 219 e-mail alerts 64 environment 217 Error button, control panel touchscreen 14 gray background 220 light print 218 lines 220, 225 lines, copies 229 media 217, 230 messages, types of 192 networks 29 repeating defects 222 repetitive images 227 scattered lines 226 skewed pages 223 smeared toner 221 specks 219 text quality 223, 226 tire tr
separator page Windows 101 service HP-Authorized Dealers 246 Service menu, control panel 46 Services tab Macintosh 69 settings Default Job Options menu 17 driver presets (Macintosh) 66 drivers 53, 64 priority 52, 64 Settings tab, embedded Web server 153 shortcuts 100 size, copy problem-solving 232 size, media A4 settings 40 default, selecting 22 skewed pages 223 Sleep button 12 Sleep mode power specifications 251 settings 23, 25 sleep settings delay 186 sleep time 186 wake time 186 sleep time, setting 24, 1
temperature requirements 180 temperature specifications 252 tests networks 29 text, problem-solving blurred 226 blurry 229 dropouts 219 misformed characters 223 time zone 23 time, setting 23, 169 Time/Scheduling menu, control panel 23 timeout settings 26, 38 tire tracks, problem-solving 225 toner adhesion problems, solving 230 density setting 63 Economode 42 loose, problem-solving 221 smeared, problemsolving 221 transfer unit warranty 245 tray 1 capacity 4 fuser levers 111, 112 jam locations 194 jams, clear
272 Index ENWW