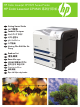
HP Color LaserJet CP3525 Series Printer HP Color LaserJet CP3525 系列打印机 EN Getting Started Guide CN 入门指南 ID JA KO TH TW Panduan Persiapan セットアップ ガイド 시작 설명서 คูมื่ อเริ่มตนใช ้ งาน ้ 入門指南 VI Hướng Dẫn Bắt Đầu Sử Dụng EN Read me first CN 请先阅读 ID Baca dulu saya JA はじめにお読みください 먼저 읽어 보십시오. KO TH TW VI โปรดอานก งาน ่ อนใช ่ ้ 請先閱讀 Đọc tài liệu này trước Terdaftar di Deperindag Provinsi DKI Jakarta No : 0089/1.824.
Copyright and License © 2008 Copyright Hewlett-Packard Development Company, L.P. Reproduction, adaptation or translation without prior written permission is prohibited, except as allowed under the copyright laws. The information contained herein is subject to change without notice. The only warranties for HP products and services are set forth in the express warranty statements accompanying such products and services. Nothing herein should be construed as constituting an additional warranty.
JA EN Topic トピック Page ページ In-box documentation and CD contents 3 同梱されている文書と CD の内容 3 Set up the product hardware 7 製品のハードウェアのセットアップ 7 Install the product software 14 製品ソフトウェアのインストール 14 Solve problems 40 問題の解決 40 CN 主题 KO 页码 항목 페이지 随附文档和 CD 内容 3 제품 설명서 및 CD 내용물 3 安装产品硬件 7 제품 하드웨어 설정 7 安装产品软件 14 解决问题 40 ID Topik Halaman Dokumentasi dalam kotak dan isi CD 3 Memasang perangkat keras produk 7 Menginstal perangkat lunak produk 14 Mengatasi masalah 40 제품 소프트웨어
TH หัวข้อ VI Chủ đề หน้า เอกสารที่อยูในกล องและข อมู นซี ่ ่ ้ ลที่อยูบนแผ ่ ่ ดี 3 ติดตั้งฮาร์ดแวร์ของเครื่องพิมพ์ 7 ติดตั้งซอฟตแ์ วรข์ องเครื่องพิมพ์ 14 การแกไขปั ้ ญหา 41 TW 主題 頁 包裝盒中的文件和 CD 內容 3 設定本產品硬體 7 安裝本產品軟體 14 解決問題 41 Trang Tài liệu trong hộp và nội dung trên đĩa CD 3 Cài đặt phần cứng sản phẩm 7 Cài đặt phần mềm sản phẩm 14 Giải quyết sự cố 41
EN TH In-box documentation HP Support Flyer Software CD contents: • User Guide • Job Aids • Software drivers • Installer • Embedded Web Server Guide CN ใบปลิวสนับสนุนของ HP ขอ้ มูลที่อยูบนแผ นซี ่ ่ ดีซอฟตแ์ วร:์ • คูมื ่ อผู้ใช้ • เอกสารประกอบการใชง้ าน • ไดรเวอร์ซอฟต์แวร์ • โปรแกรมติดตั้ง • คูมื ่ อเว็บเซิรฟ์ เวอรใ์ นตัว 随附文档 TW HP 支持说明 软件 CD 内容: • 用户指南 • 辅助工具 • 软件驱动程序 • 安装程序 • 内嵌式 Web 服务器指南 ID Dokumentasi dalam kotak VI Tài liệu trong hộp Tời rơi Hỗ trợ của HP Nội dung CD phần mềm: • Hướng Dẫn S
1 EN Select a sturdy, well-ventilated, dust-free area, away from direct sunlight to position the product. CN 选择一个稳固、通风良好、无尘且远离直射日光的区域放置产品。 ID Pilih tempat yang kokoh, berventilasi baik, bebas debu, jauh dari sinar matahari langsung untuk meletakkan produk. JA 製品の設置場所には、直射日光を避けて、通気がよく埃の少ない、 しっかりした場所を選びます。 KO 직사광선을 피하여 바닥이 단단하고 환기가 잘 되며 먼지가 없는 장소를 선택하여 제품을 내려 놓습니다. 10° - 30°C (50° - 86°F) 10% - 80% NJ OE 82 63.7 2 mm inch es 520 mm 20.5 inches 358 mm 14.1 inches mm 739 inches 29.
TH เลือกวางเครื่องพิมพใ์ นบริเวณที่แข็งแรง อากาศถายเทสะดวก และไมถู่ กแสงแดดโดยตรง ่ TW 請選擇一個穩固、通風良好、沒有灰塵且遠離陽光直射的區域來放置本產品。 VI Chọn nơi vững chắc, được thông hơi tốt, không có bụi bặm, không tiếp xúc trực tiếp với ánh sáng mặt trời để đặt sản phẩm. 10° - 30°C (50° - 86°F) 10% - 80% NJ OE 82 63.7 2 mm inch es 520 mm 20.5 inches 358 mm 14.1 inches mm 739 inches 29.
2 EN Unpack the product. CN 打开产品包装。 ID Buka kemasan produk. JA 製品を開梱します。 KO 제품을 개봉합니다. TH นำเครื่องพิมพอ์ อกจากกลอง ่ TW VI 打開產品包裝。 (CP3525x) Mở sản phẩm.
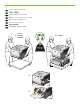
3 EN Set up the product hardware. CN 安装产品硬件。 ID Pasang perangkat keras produk. JA 製品のハードウェアをセットアップします。 KO 제품 하드웨어를 설치합니다. TH ติดตั้งฮารด์ แวรข์ องเครื่องพิมพ์ TW VI 安裝本產品硬體 Cài đặt phần cứng sản phẩm.
4 5 6 7 8 9
4 EN Connect the power. CN 连接电源。 ID Hubungkan ke daya. JA 電源に接続します。 KO 전원을 연결합니다. TH เชื่อมตอสายไฟ ่ TW VI 連接電源。 Cắm dây nguồn vào.
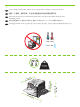
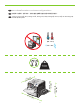
EN Caution! Do not connect the USB now. Wait until the software prompts you. CN 注意! 现在请勿连接 USB。请在稍后软件提示时再连接。 ID Perhatian! Jangan hubungkan USB sekarang. Tunggu hingga diminta oleh perangkat lunak. JA 注意! まだ USB を接続しないでください。指示があるまでお待ちください。 KO 주의! 지금 USB를 연결하지 마십시오. 메시지가 나타날 때까지 기다리십시오. TH ขอควรระวั ง! หามเชื ์แวร์จะพรอมต์ให้คุณดำเนินการ ้ ้ ่อมตอ่ USB ในขั้นตอนนี้ ให้รอจนกวาซอฟต ่ TW 注意! 此時請勿連接 USB。請等待軟體提示您再連接。 VI Cẩn thận! Chưa cắm cáp USB vội. Chờ cho tới khi phần mềm nhắc bạn.
5 EN Turn on the product. On the control panel, if prompted, select a language and a country/region for the product. CN 打开产品电源。如果控制面板上出现提示,请为产品选择语言和所在国家/地区。 ID Hidupkan produk. Pada panel kontrol, jika diminta, pilih bahasa dan negara/kawasan produk. JA プリンタの電源を入れます。画面の指示に従い、 コントロール パネルを使用して製品の言語と国/地域を選択します。 KO 제품의 전원을 켜십시오. 제어판에 메시지가 나타나면 제품에 대한 언어 및 국가/지역을 선택합니다. TH เปิดเครื่องพิมพ์ บนแผงควบคุม หากมีข้อความแจ้ง ให้เลือกภาษา และประเทศ/พื้นที่ของเครื่องพิมพ์.
6 EN Load paper. Make sure the paper is against the right edge of the tray. Adjust the guides so they point to the correct paper size in the tray or so they are against the stack of paper. After closing the tray, use the control panel to configure the correct paper size and type. CN 装入纸张。确保纸张靠近纸盘右边缘。调整导板使其指向纸盘中的正确纸张尺寸,或者使 它们紧贴纸叠。合上纸盘后,请使用控制面板配置正确的纸张尺寸和类型。 ID Muat kertas. Pastikan kertas sejajar dengan tepi kanan baki.
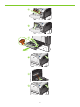
1 3 2 4 5 6 7 13
EN Install the product software. TH CN 安装产品软件。 TW ID Instal perangkat lunak produk. JA 製品ソフトウェアをインストールします。 KO 제품 소프트웨어를 설치합니다. VI ติดตั้งซอฟต์แวร์ของเครื่องพิมพ์ 安裝本產品軟體。 Cài đặt phần mềm sản phẩm. EN For Windows network connections, go to step 7 (page 16). CN 对于 Windows 网络连接,请转至步骤 7(第 16 页)。 ID Untuk koneksi jaringan Windows, pindah ke langkah 7 (halaman 16). JA Windows でネットワーク接続する場合は、手順 7 に進みます(16ページ)。 KO Windows 네트워크 연결의 경우 7단계(16페이지)로 이동합니다.
EN For Macintosh network connections, go to step 11 (page 23). CN 对于 Macintosh 网络连接,请转至步骤 11(第 23 页)。 ID Untuk koneksi jaringan Macintosh, pindah ke langkah 11 (halaman 23). JA Macintosh でネットワーク接続する場合は、手順 11 に進みます(23ページ)。 KO Macintosh 네트워크 연결의 경우 11단계(23페이지)로 이동합니다. TH สำหรับการเชื่อมตอเครื Macintosh ใหไ้ ปที่ขั้นตอนที่ 11 (หนา้ 24) ่ อขายของ ่ TW 有關 Macintosh 網路連線,請移至步驟 11 (第 24 頁)。 VI Với các kết nối mạng Macintosh, hãy đến bước 11 (trang 24).
7 EN Windows network connection At the product control panel, press Menu Press to highlight INFORMATION, and press OK. Press to highlight PRINT CONFIGURATION, and press OK. Locate the IP address on the Embedded Jetdirect page. CN Windows 网络连接 在产品控制面板上,按下菜单 。按下 以突出显示信息,然后按下 OK。按下 显示打印配置,然后按下 OK。找到嵌入式 Jetdirect 页上的 IP 地址。 以突出 ID Koneksi jaringan Windows Pada panel kontrol produk, tekan Menu Tekan untuk menyorot INFORMATION [INFORMASI], dan tekan OK.
TH การเชื่อมตอเครื อขายของ Windows ่ ่ ที่แผงควบคุมของเครื่องพิมพ์ ให้กด เมนู กด เพื่อไฮไลต์ ข้อมูล และกด OK กด เพื่อไฮไลต์ พิมพก์ ารกำหนดคา่ และกด OK คน้ หา IP แอดเดรสในหนา้ Jetdirect ในตัว TW Windows 網路連線 在產品控制面板上,按下功能表 。按下 以反白顯示資訊,然後按下 OK。按下 態,然後按下 OK。在嵌入式 Jetdirect 頁面中,找到 IP 位址。 VI 以反白顯示列印組 Kết nối mạng Windows Trên panen điều khiển của sản phẩm, bấm Menu . Bấm để chọn INFORMATION (THÔNG TIN), và bấm OK. Bấm để chọn PRINT CONFIGURATION (IN CẤU HÌNH), và bấm OK.
8 EN If the IP address is something other than 0.0.0.0, or 192.0.0.192, or 169.254.x.x, the network configuration was successful. Go to step 9. Otherwise, you must manually assign the IP address. Ask your network administrator for the IP address. At the product control panel, press Menu . Press to highlight CONFIGURE DEVICE, and press OK. Highlight I/O, and press OK. Highlight EMBEDDED JETDIRECT MENU, and press OK. Highlight TCP/IP, and press OK. Highlight IPV4 SETTINGS, and press OK.
KO IP 주소가 0.0.0.0이 아니고 192.0.0.192 또는 169.254.x.x인 경우 네트워크 구성에 성공한 것입니다. 9단계로 이동합니다. 그렇지 않으면 IP 주소를 수동으로 할당해야 합니다. 네트워크 관리자에게 IP 주소에 대해 문의 하십시오. 제어판에서 메뉴 를 누릅니다. 를 눌러 장치 구성을 선택하고 OK를 누릅니다. I/O를 선택하고 OK를 누릅니다. 내장 JETDIRECT 메뉴를 선택하고 OK를 누릅니다. TCP/IP를 선택하고 OK를 누릅니다. IPV4 설 정을 선택하고 OK를 누릅니다. 구성 방법을 선택하고 OK를 누릅니다. 수동을 선택하고 OK를 누릅니다. 수동 설정을 선택하고 OK를 누릅니다. IP 주소를 선택하고 OK를 누릅니다. 또는 를 눌러 IP 주소의 첫 번째 바이트를 높이거나 낮춥니다. OK를 눌러 다음 숫자 입력란으로 이 동합니다. IP 주소를 완성할 때까지 이 과정을 반복한 다음 OK를 누릅니다.
9 EN Quit all open programs on the print server or on each computer that will share the product. Install the software from the CD. Follow the onscreen instructions. When prompted, select Connected via the Network, and then click Install Now. The installer shows the available printers. Select the printer that has the appropriate IP address. Click Finish. On the Additional Options screen, you can install additional software, or click exit. Go to step 20.
10 EN Windows USB connection Quit all open programs on the computer. Install the software from the CD. Follow the onscreen instructions. When prompted, select Connected directly to the computer, and then click Install Now. Do not connect the USB cable until you are prompted. At the end of the installation, click Finish. On the Additional Options screen, you can install additional software, or click exit. Go to step 20.
TH การเชื่อมตอ่ USB ของ Windows ออกจากโปรแกรมที่เปิดทั้งหมดในคอมพิวเตอร์ ติดตั้งซอฟตแ์ วรจ์ ากแผนซี ่ ดี ปฏิบัติตามคำแนะนำบนหนา้ จอ เมื่อมีข้อความแจ้ง ให้เลือก Connected directly to the computer (เชื่อมตอเข ่ ้ากับคอมพิวเตอร์โดยตรง) และคลิก Install Now (ติดตั้งทันที) ห้ามต่อสายเคเบิล USB จนกว่าคุณจะได้รับข้อความแจ้ง เมื่อสิ้นสุดการติดตั้ง คลิก Finish (เสร็จสิ้น) ในหนา้ จอ Additional Options (ตัวเลือกเพิ่มเติม) คุณสามารถติดตั้งซอฟตแ์ วรเ์ พิ่มเติม หรือคลิกออก ไปที่ขั้นตอนที่ 20 TW Windows USB 連線 結束電腦上所有開啟
11 EN Macintosh network connection At the product control panel, press Menu . Press to highlight INFORMATION, and press OK. Press to highlight PRINT CONFIGURATION, and press OK. Locate the IP address on the Embedded Jetdirect page. CN Macintosh 网络连接 在产品控制面板上,按下菜单 。按下 以突出显示信息,然后按下 OK。按下 以突出显示打印配置,然后按下 OK。找到嵌入式 Jetdirect 页 上的 IP 地址。 ID Koneksi jaringan Macintosh Pada panel kontrol produk, tekan Menu . Tekan untuk menyorot INFORMATION [INFORMASI], dan tekan OK.
TH การเชื่อมตอเครื อขายของ Macintosh ่ ่ ที่แผงควบคุมของเครื่องพิมพ์ ใหก้ ด เมนู กด เพื่อไฮไลต์ ขอมู ้ ล และกด OK กด เพื่อไฮไลต์ พิมพก์ ารกำหนดคา่ และกด OK คน้ หา IP แอดเดรสในหนา้ Jetdirect ในตัว TW Macintosh 網路連線 在產品控制面板上,按下功能表 。按下 以反白顯示資訊,然後按下 OK。按下 顯示列印組態,然後按下 OK。在嵌入式 Jetdirect 頁面中,找到 IP 位址。 VI 以反白 Kết nối mạng Macintosh Trên panen điều khiển của sản phẩm, bấm Menu . Bấm để chọn INFORMATION (THÔNG TIN), và bấm OK. Bấm để đánh dấu PRINT CONFIGURATION (IN CẤU HÌNH), và bấm OK.
12 EN If the IP address is something other than 0.0.0.0, or 192.0.0.192, or 169.254.x.x, the network configuration was successful. Go to step 13. Otherwise, you must manually assign the IP address. Ask your network administrator for the IP address. At the product control panel, press Menu . Press to highlight CONFIGURE DEVICE, and press OK. Highlight I/O, and press OK. Highlight EMBEDDED JETDIRECT MENU, and press OK. Highlight TCP/IP, and press OK. Highlight IPV4 SETTINGS, and press OK.
JA IP アドレスが 0.0.0.0、192.0.0.192、 または 169.254.
TW 如果 IP 位址不是 0.0.0.0、192.0.0.192 或 169.254.x.x,則表示網路組態成功。請移至步驟 13。 否則,您必須手動指派 IP 位址。請向網路管理員諮詢 IP 位址。在產品控制面板上,按下功能表 。 按下 以反白顯示設定裝置,然後按下 OK。反白顯示 I/O,然後按下 OK。 反白顯示嵌入式 JETDIRECT 功能表,然後按下 OK。反白顯示 TCP/IP,然後按下 OK。反白顯示 IPV4 設定,然後按下 OK。反白顯示設定方法,然後按下 OK。反白顯示手動,然後按下 OK。 反白顯示手動設定,然後按下 OK。反白顯示 IP 位址,然後按下 OK。按下 或 ,以增加或減 少 IP 位址第一個位元組的數字。按下 OK 移至下一組數字。重複此程序,直到完成 IP 位址, 然後按下 OK。 VI Nếu địa chỉ IP khác với 0.0.0.0, hoặc 192.0.0.192, hoặc 169.254.x.x, có nghĩa là cấu hình mạng đã thành công. Đến bước 13.
13 EN Quit all open programs on the print server or on each computer that will share the product. Install the software from the CD. Click the product icon, and follow the onscreen instructions. Click Close when the installation is finished. CN 退出打印服务器上或将共享产品的每台计算机上的所有已打开程序。从 CD 安装软件。单击产品图标,然后按照屏幕上的说明进行操作。安装 完成后单击关闭。 ID Tutup semua program yang sedang dibuka pada server cetak atau pada setiap komputer yang memakai bersama produk tersebut. Instal perangkat lunak dari CD.
14 EN At the computer, open the Apple menu and click System Preferences and then click Print & Fax. click Add or +, and then select the connection type (Default Browser or IP Printer). Default Browser: Select the product from the list. From the Print Using drop-down list, select the printer model if one is not already selected. Click Add. IP Printer: From the Protocol drop-down list, select Socket/HP Jet Direct. Enter the IP address for the product.
TH ที่คอมพิวเตอร์ ให้เปิดเมนู Apple และคลิก System Preferences และคลิก Print & Fax คลิก Add หรือ + และ เลือกประเภทการเชื่อมตอ่ (Default Browser หรือ IP Printer) Default Browser: เลือกเครื่องพิมพจ์ ากรายการ จากรายการแบบดรอปดาวน์ Print Using ใหเลื ้ อกรุนเครื ่ ่องพิมพห์ าก ยังไม่มีการเลือกรุ่นไว้ คลิก Add IP Printer: จากรายการแบบดรอปดาวน์ Protocol ใหเ้ ลือก Socket/HP Jet Direct ป้อน IP แอดเดรสของเครื่องพิมพ์ จากรายการแบบดรอปดาวน์ Print Using ให้เลือกรุนเครื ่ ่องพิมพ์หากยังไมมี่ การเลือกรุนไว ่ ้ TW 在電腦中,
15 EN Configure the product software to recognize the installed accessories. Highlight the product and select Printer Setup. The Installable Options dialog box appears. Select the product options that you are using. Click Apply Changes. Go to step 20. CN 配置产品软件以识别安装的附件。突出显示产品并选择打印机设置。此时 将出现可安装选项对话框。选择您将使用的产品选项。单击应用更改。 转至步骤 20。 ID Konfigurasilah perangkat lunak produk untuk mengenali aksesori yang telah dipasang. Sorot produk dan pilih Printer Setup [Pengaturan Printer].
16 EN Macintosh USB connection Install the software from the CD. Click the product icon, and follow the onscreen instructions. Click Close when the installation is finished. CN Macintosh USB 连接 从 CD 安装软件。单击产品图标,然后按照屏幕上的说明进行操作。安装完成后单击关 闭。 ID Koneksi USB Macintosh Instal perangkat lunak dari CD. Klik ikon produk dan ikuti petunjuk di layar. Klik Close [Tutup] bila instalasi selesai.
17 EN Connect the USB cable between the product and the computer. CN 用 USB 电缆连接产品和计算机。 ID Hubungkan kabel USB antara produk dan komputer. JA USB ケーブルで製品とコンピュータを接続します。 KO 제품과 컴퓨터를 USB 케이블로 연결합니다. TH เชื่อมตอสายเคเบิ ล USB ระหวางเครื ่องพิมพแ์ ละคอมพิวเตอร์ ่ ่ TW VI 將 USB 纜線連接至產品和電腦。 Cắm cáp USB vào sản phẩm và máy tính.
18 EN At the computer, open the Apple menu and click System Preferences and then click Print & Fax. If the product name appears in the printer list, go to step 19. Otherwise, click Add or +, and then select Default Browser or Default. Select the product name from the printer list, and click Add.
19 EN Configure the product software to recognize the installed accessories. Highlight the product and select Printer Setup. The Installable Options dialog box appears. Select the product options that you are using. Click Apply Changes. Go to step 20. CN 配置产品软件以识别安装的附件。突出显示产品并选择打印机设置。此时将出现可安装选 项对话框。选择您将使用的产品选项。单击应用更改。 转至步骤 20。 ID Konfigurasilah perangkat lunak produk untuk mengenali aksesori yang telah dipasang. Sorot produk dan pilih Printer Setup [Pengaturan Printer].
20 EN Test the software installation. Print a page from any program to make sure that the software is correctly installed. Note: If the installation failed, reinstall the software, or see the problem solving section in the User Guide. CN 测试软件安装。从任一程序打印一个页面,确保软件安装正确。注: 如果安装失败,请重 新安装软件,或者参阅《用户指南》中的“解决问题”部分。 ID Uji instalasi perangkat lunak. Cetak halaman dari program apa saja untuk memastikan perangkat lunak telah diinstal dengan benar.
EN Product setup is complete. Register your product at www.register.hp.com. This is the quickest and easiest way for you to register to receive the following information: • Technical support updates • Enhanced support options • Ideas for and ways to use your new HP product • News about emerging technologies. For more information about the following topics, see the electronic User Guide on the CD-ROM or go to: www.hp.com/support/cljcp3525. • Detailed user instructions. • Important safety notices.
JA 製品のセットアップが完了しました。 www.register.hp.com で製品を登録してください。登録はとても簡単です。登録していただくと以下の情報をお知ら せします。 • テクニカル サポートのアップデート • 高機能サポート オプション • ご購入の HP 製品の使用方法に関するヒント • 最新テクノロジに関するニュース 以下のトピックの詳細については、CD-ROM の電子ユーザーガイドまたは次の Web サイトを参照してください。 www.hp.com/support/cljcp6015 • ユーザーへの指示の詳細 • 安全に関する重要な注意事項 • トラブルシューティング情報 • 規制情報 KO 제품 설정이 완료되었습니다. 제품을 www.register.hp.com에서 등록합니다. 이는 다음과 같은 정보를 받기 위해 등록하는 방법 중 가장 빠르 고 손쉬운 방법입니다.
TW 產品設定完成。 請在 www.register.hp.com 註冊您的產品。此網站註冊非常簡單快捷,註冊之後,您將會收到下列資訊: • 技術支援更新 • 增強支援選項 • 您新型 HP 產品的使用方法 • 新興技術的相關新聞。 如需下列主題的詳細資訊,請參閱 CD-ROM 上的電子版使用者指南,或造訪: www.hp.com/support/cljcp3525。 • 詳細使用者指示。 • 重要安全聲明。 • 疑難排解資訊。 • 法規資訊。 VI Cài đặt sản phẩm hoàn tất. Đăng ký sản phẩm tại www.register.hp.com.
EN Solve problems TH CN 解决问题 TW การแก้ไขปัญหา 解決問題 Giải quyết sự cố ID Mengatasi masalah JA 問題の解決 KO 문제 해결 EN 1. If the control panel is blank, verify that the product is connected to a working outlet and that the product is turned on. If the control panel is still blank, remove the formatter at the left rear corner of the product and reinstall it. 2. The product control panel alerts you when problems occur.
KO 1. 제어판에 표시된 내용이 없으면 제품에 연결된 콘센트 상태와 제품의 전원 상태를 확인합니다. 그래도 여 전히 제어판에 아무것도 표시되지 않으면 제품의 왼쪽 뒤 모서리에 있는 포맷터를 분리했다가 다시 설치합 니다. 2. 문제가 발생하면 제품 제어판에 경고 메시지가 표시됩니다. 표시등이 깜박이면 다음 사항을 확인하십시오. • 제품 내부에 걸린 용지가 없습니다. • 하나 이상의 용지함에 용지가 있습니다. • 모든 도어와 용지함이 완전히 닫혀 있습니다. • 디스플레이에서 문제를 설명하는 메시지를 확인합니다. 3. 인쇄가 되지 않으면 제품이 컴퓨터 또는 네트워크에 연결되어 있는지 확인합니다. 4. 문제 해결을 위한 자세한 내용은 사용자 CD에 있는 사용 설명서 파일을 참조하십시오. TH 1.
© 2008 Hewlett-Packard Development Company, L.P. www.hp.