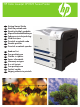
HP Color LaserJet CP3525 Series Printer EN HR CS HU PL RO SR SK SL EN HR CS HU PL RO SR SK SL Getting Started Guide Vodič za početak rada Úvodní příručka k produktu Alapvető tudnivalók kézikönyve Podręczna instrukcja obsługi Ghid de iniţiere Priručnik za početak rada Úvodná príručka Priročnik za začetek uporabe Read me first Prvo pročitajte ovo Přečtěte si nejdříve Fontos információk Informacje wstępne A se citi înainte Prvo pročitajte ovo Prečítať najskôr Najprej preberite ta priročnik
Copyright and License © 2008 Copyright Hewlett-Packard Development Company, L.P. Reproduction, adaptation or translation without prior written permission is prohibited, except as allowed under the copyright laws. The information contained herein is subject to change without notice. The only warranties for HP products and services are set forth in the express warranty statements accompanying such products and services. Nothing herein should be construed as constituting an additional warranty.
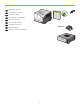
HU EN Topic Téma Page Oldal In-box documentation and CD contents 3 Termékdokumentáció és a CD-lemez tartalma 3 Set up the product hardware 7 A hardver beállítása 7 Install the product software 14 A termékszoftver telepítése 14 Solve problems 42 Problémamegoldás 42 HR Tema PL Str.
RO Subiect SK Téma Pagina Strana Documentaţia inclusă în pachet şi conţinutul CD-ului 3 Dokumentácia v škatuli a obsah CD 3 Configurarea hardware-ului produsului Nastavenie hardvéru produktu 7 7 Instalarea software-ului produsului 14 Inštalácia softvéru produktu 14 Rezolvarea problemelor 43 Riešenie problémov 43 SL SR Tema Tema Stranica Stran Sadržaj pakovanja i CD-a 3 Priložena dokumentacija in vsebina CD-jev 3 Instalirajte hardver 7 Nastavitev strojne opreme naprave 7 In
EN RO In-box documentation Fluturaş de asistenţă HP Conţinutul CD-ului cu software: • Ghidul utilizatorului • Job Aids • Drivere de software • Program de instalare • Ghid pentru serverul Web încorporat HP Support Flyer Software CD contents: • User Guide • Job Aids • Software drivers • Installer • Embedded Web Server Guide HR Dokumentacija iz kutije SR Přehled dokumentace SK Leták s podporou HP Obsah disku CD se softwarem: • Uživatelská příručka • Nápověda k úloze • Softwarové ovladače • Instalační
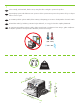
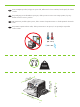
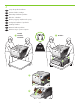
1 EN Select a sturdy, well-ventilated, dust-free area, away from direct sunlight to position the product. HR Za postavljanje proizvoda odaberite čvrstu površinu u dobro prozračenom prostoru bez prašine do koje ne dopire izravno sunčevo svjetlo. CS Pro umístění produktu vyberte stabilní, dobře větraný a bezprašný prostor mimo dosah přímého slunečního světla. HU A készüléket szilárd, jól szellőző, pormentes helyen állítsa fel, és ne tegye ki közvetlen napfény hatásának.
RO Pentru a amplasa produsul, alegeţi un suport solid, aflat într-un loc bine ventilat şi ferit de praf şi de lumina soarelui. SR Za postavljanje proizvoda izaberite postojano, dobro provetreno mesto sa što manje prašine, koje nije direktno izloženo sunčevoj svetlosti. SK Na umiestnenie produktu vyberte pevné, dobre vetrané a bezprašné miesto z dosahu priameho slnečného svetla. SL Za postavitev naprave izberite trden, dobro prezračevan in čist prostor, ki ni izpostavljen neposredni sončni svetlobi.
2 EN Unpack the product. HR Raspakirajte proizvod. CS Rozbalte produkt. HU Csomagolja ki a készüléket. PL Rozpakuj produkt. RO Despachetaţi produsul. SR Raspakujte proizvod. SK Produkt rozbaľte. SL Napravo vzemite iz embalaže.
3 EN Set up the product hardware. HR Postavite hardver uređaja. CS Nainstalujte hardware produktu. HU Állítsa be a hardvert. PL Ustaw i przygotuj urządzenie do pracy. RO Configuraţi hardware-ul produsului. SR Instalirajte hardver. SK Nastavte hardvér produktu. SL Nastavite strojno opremo naprave.
4 5 6 7 8 9
4 EN Connect the power. HR Priključite napajanje. CS Připojte napájecí kabel. HU Csatlakoztassa a tápkábelt. PL Podłącz zasilanie. RO Conectarea sursei de alimentare. SR Povežite napajanje. SK Pripojte napájanie. SL Priključite napajanje.
EN Caution! Do not connect the USB now. Wait until the software prompts you. HR Oprez! Nemojte sad priključivati USB. Pričekajte dok se u softveru ne pojavi odzivnik. CS Pozor! Ještě nepřipojujte USB kabel. Vyčkejte, až software zobrazí výzvu. HU Figyelem! Ne most csatlakoztassa az USB-kábelt. Várjon, míg a szoftver kéri. PL Uwaga! Nie należy jeszcze podłączać kabla USB. Poczekaj na odpowiednie polecenie programu. RO Precauţie! Nu conectaţi deocamdată cablul USB.
5 EN Turn on the product. On the control panel, if prompted, select a language and a country/region for the product. HR Uključite proizvod. Na upravljačkoj ploči, ako se to od vas zatraži, odaberite jezik i državu/regiju za proizvod. CS Zapněte produkt. Pokud jste k tomu vyzváni, na ovládacím panelu vyberte pro produkt jazyk a zemi/oblast. HU Kapcsolja be a készüléket. Ha a rendszer erre kéri, válasszon nyelvet és országot/térséget a termékhez a kezelőpanelen. PL Włącz zasilanie urządzenia.
6 EN Load paper. Make sure the paper is against the right edge of the tray. Adjust the guides so they point to the correct paper size in the tray or so they are against the stack of paper. After closing the tray, use the control panel to configure the correct paper size and type. HR Umetnite papir. Papir mora biti uz desni rub ladice. Podesite vodilice tako da ukazuju na ispravnu veličinu papira ili tako da budu uz snop papira.
1 3 2 4 5 6 7 13
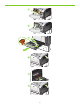
EN Install the product software. RO Instalaţi software-ul produsului. HR Instaliranje softvera za proizvod. SR Instalirajte softver proizvoda. CS Nainstalujte software produktu. SK Nainštalujte softvér produktu. HU Telepítse a termékszoftvert. SL Namestite programsko opremo naprave. PL Zainstaluj oprogramowanie urządzenia. EN For Windows network connections, go to step 7 (page 16). HR Za Windows mrežne veze idite na korak 7 (stranica 16).
EN For Macintosh network connections, go to step 11 (page 25). HR Za Macintosh mrežne veze idite na korak 11 (stranica 25). CS Pro připojení k síti v systému Macintosh přejděte ke kroku 11 (str. 25). HU Macintosh hálózati kapcsolatok esetében folytassa a 11. lépéssel (25. oldal). PL Aby zainstalować oprogramowanie dla połączeń sieciowych w systemie Macintosh, przejdź do kroku 11 (strona 25). RO Pentru conexiunile la reţele Macintosh, mergeţi la pasul 11 (pagina 26).
7 EN Windows network connection At the product control panel, press Menu Press to highlight INFORMATION, and press OK. Press to highlight PRINT CONFIGURATION, and press OK. Locate the IP address on the Embedded Jetdirect page. HR Windows mrežna veza Na upravljačkoj ploči proizvoda pritisnite Izbornik Pritisnite kako biste označili INFORMACIJE, a zatim pritisnite OK. Pritisnite kako biste označili ISPIS KONFIGURACIJE, a zatim pritisnite OK. Pronađite IP adresu na stranici ugrađenog Jetdirecta.
RO Conexiune la reţea Windows Pe panoul de control, apăsaţi Meniu . Apăsaţi pentru a evidenţia INFORMAŢII şi apăsaţi OK. Apăsaţi pentru a evidenţia CONFIGURAŢIE IMPRIMARE şi apăsaţi OK. Identificaţi adresa IP pe pagina Jetdirect încorporat. SR Povezivanje na mrežu u operativnom sistemu Windows Na kontrolnoj tabli za proizvod pritisnite Menu (Meni) Pritisnite da biste označili INFORMATION (INFORMACIJE), a zatim pritisnite OK.
8 EN If the IP address is something other than 0.0.0.0, or 192.0.0.192, or 169.254.x.x, the network configuration was successful. Go to step 9. Otherwise, you must manually assign the IP address. Ask your network administrator for the IP address. At the product control panel, press Menu . Press to highlight CONFIGURE DEVICE, and press OK. Highlight I/O, and press OK. Highlight EMBEDDED JETDIRECT MENU, and press OK. Highlight TCP/IP, and press OK. Highlight IPV4 SETTINGS, and press OK.
PL Jeżeli adres IP ma postać inną niż 0.0.0.0, 192.0.0.192 lub 169.254.x.x, sieć została skonfigurowana pomyślnie. Przejdź do kroku 9. W przeciwnym razie musisz ręcznie przypisać adres IP. Adres IP możesz uzyskać od administratora sieci. Na panelu sterowania urządzenia naciśnij przycisk Menu . Naciśnij przycisk , aby podświetlić opcję KONFIGURACJA URZĄDZENIA, a następnie naciśnij przycisk OK. Podświetl I/O i naciśnij przycisk OK. Podświetl opcję MENU URZĄDZENIA WBUDOWANEGO JETDIRECT i naciśnij przycisk OK.
SK Ak je IP adresa odlišná ako 0.0.0.0 alebo 192.0.0.192, prípadne 169.254.x.x, konfigurácia siete bola úspešná. Prejdite na krok 9. V opačnom prípade musíte manuálne priradiť IP adresu. O túto IP adresu požiadajte svojho správcu siete. Na ovládacom paneli produktu stlačte tlačidlo Menu . Stlačením tlačidla označíte možnosť CONFIGURE DEVICE (KONFIGUROVAŤ ZARIADENIE) a stlačte tlačidlo OK. Označte možnosť I/O a stlačte tlačidlo OK.
9 EN Quit all open programs on the print server or on each computer that will share the product. Install the software from the CD. Follow the onscreen instructions. When prompted, select Connected via the Network, and then click Install Now. The installer shows the available printers. Select the printer that has the appropriate IP address. Click Finish. On the Additional Options screen, you can install additional software, or click exit. Go to step 20.
RO Închideţi toate programele deschise pe serverul de imprimare sau pe fiecare calculator care va partaja produsul. Instalaţi software-ul de pe CD. Urmaţi instrucţiunile de pe ecran. Când vi se solicită, selectaţi opţiunea Conectat la reţea şi apoi faceţi clic pe Instalare acum. Programul de instalare afişează imprimantele disponibile. Selectaţi imprimanta care are adresa IP corespunzătoare. Faceţi clic pe Finalizare.
10 EN Windows USB connection Quit all open programs on the computer. Install the software from the CD. Follow the onscreen instructions. When prompted, select Connected directly to the computer, and then click Install Now. Do not connect the USB cable until you are prompted. At the end of the installation, click Finish. On the Additional Options screen, you can install additional software, or click exit. Go to step 20. HR Windows USB veza Zatvorite sve otvorene programe na računalu.
RO Conexiune USB pentru Windows Închideţi toate programele de pe calculator. Instalaţi software-ul de pe CD. Urmaţi instrucţiunile de pe ecran. Când vi se solicită, selectaţi opţiunea Conectat direct la acest calculator şi faceţi clic pe Instalare acum. Nu conectaţi cablul USB decât atunci când vi se solicită acest lucru. La sfârşitul procesului de instalare, faceţi clic pe Finalizare. Pe ecranul Opţiuni suplimentare, puteţi instala software suplimentar sau face clic pe ieşire. Continuaţi cu pasul 20.
11 EN Macintosh network connection At the product control panel, press Menu . Press to highlight INFORMATION, and press OK. Press to highlight PRINT CONFIGURATION, and press OK. Locate the IP address on the Embedded Jetdirect page. HR Macintosh mrežna veza Na upravljačkoj ploči pritisnite Izbornik . Pritisnite kako biste označili INFORMACIJE, a zatim pritisnite OK. Pritisnite kako biste označili ISPIS KONFIGURACIJE, a zatim pritisnite OK. Pronađite IP adresu na stranici ugrađenog Jetdirecta.
RO Conexiune la reţea Macintosh Pe panoul de control, apăsaţi Meniu . Apăsaţi pentru a evidenţia INFORMAŢII şi apăsaţi OK. Apăsaţi pentru a evidenţia CONFIGURAŢIE IMPRIMARE şi apăsaţi OK. Identificaţi adresa IP pe pagina Jetdirect încorporat. SR Povezivanje na mrežu na Macintosh računarima Na kontrolnoj tabli za proizvod pritisnite Menu (Meni) . Pritisnite da biste označili INFORMATION (INFORMACIJE), a zatim pritisnite OK.
12 EN If the IP address is something other than 0.0.0.0, or 192.0.0.192, or 169.254.x.x, the network configuration was successful. Go to step 13. Otherwise, you must manually assign the IP address. Ask your network administrator for the IP address. At the product control panel, press Menu . Press to highlight CONFIGURE DEVICE, and press OK. Highlight I/O, and press OK. Highlight EMBEDDED JETDIRECT MENU, and press OK. Highlight TCP/IP, and press OK. Highlight IPV4 SETTINGS, and press OK.
PL Jeżeli adres IP ma postać inną niż 0.0.0.0, 192.0.0.192 lub 169.254.x.x, sieć została skonfigurowana pomyślnie. Przejdź do kroku 13. W przeciwnym razie musisz ręcznie przypisać adres IP. Adres IP możesz uzyskać od administratora sieci. Na panelu sterowania urządzenia naciśnij przycisk Menu . Naciśnij przycisk , aby podświetlić opcję KONFIGURACJA URZĄDZENIA, a następnie naciśnij przycisk OK. Podświetl I/O i naciśnij przycisk OK.
SK Ak je IP adresa odlišná ako 0.0.0.0 alebo 192.0.0.192, prípadne 169.254.x.x, konfigurácia siete bola úspešná. Prejdite na krok 13. V opačnom prípade musíte manuálne priradiť IP adresu. O túto IP adresu požiadajte svojho správcu siete. Na ovládacom paneli produktu stlačte tlačidlo Menu . Stlačením tlačidla označte možnosť CONFIGURE DEVICE (KONFIGUROVAŤ ZARIADENIE) a stlačte tlačidlo OK. Označte možnosť I/O a stlačte tlačidlo OK.
13 EN Quit all open programs on the print server or on each computer that will share the product. Install the software from the CD. Click the product icon, and follow the onscreen instructions. Click Close when the installation is finished. HR Zatvorite sve otvorene programe na poslužitelju ispisa ili na svakom računalu koje će koristiti proizvod. Instalirajte programe s CD-a. Pritisnite ikonu proizvoda i pratite upute na zaslonu. Kada se instalacija završi pritisnite Close (Zatvori).
14 EN At the computer, open the Apple menu and click System Preferences and then click Print & Fax. click Add or +, and then select the connection type (Default Browser or IP Printer). Default Browser: Select the product from the list. From the Print Using drop-down list, select the printer model if one is not already selected. Click Add. IP Printer: From the Protocol drop-down list, select Socket/HP Jet Direct. Enter the IP address for the product.
RO Pe calculator, deschideţi meniul Apple şi faceţi clic pe Preferinţe sistem şi apoi pe Imprimare şi fax. Faceţi clic pe Adăugare sau + şi selectaţi tipul de conexiune (Browser implicit sau Imprimantă IP). Browser implicit: Selectaţi produsul din listă. Din lista verticală Imprimare cu ajutorul selectaţi modelul imprimantei, dacă nu este selectat niciunul. Faceţi clic pe Adăugare. Imprimantă IP: Din lista verticală Protocol, selectaţi Soclu/HP Jet Direct. Introduceţi adresa IP a echipamentului.
15 EN Configure the product software to recognize the installed accessories. Highlight the product and select Printer Setup. The Installable Options dialog box appears. Select the product options that you are using. Click Apply Changes. Go to step 20. HR Konfigurirajte softver proizvoda tako da prepozna instalirane dodatke. Označite proizvod i odaberite Printer Setup (Postavljanje pisača). Pojavit će se dijaloški okvir Installable Options (Opcije koje se mogu instalirati).
16 EN Macintosh USB connection Install the software from the CD. Click the product icon, and follow the onscreen instructions. Click Close when the installation is finished. HR Macintosh USB veza Instalirajte programe s CD-a. Pritisnite ikonu proizvoda i pratite upute na zaslonu. Kada se instalacija završi pritisnite Close (Zatvori). CS Připojení USB v systému Macintosh Instalace softwaru z disku CD. Klepněte na ikonu produktu a postupujte podle pokynů na obrazovce.
17 EN Connect the USB cable between the product and the computer. HR Priključite USB kabel na proizvod i računalo. CS Připojte USB kabel mezi produkt a počítač. HU Csatlakoztassa az USB-kábelt a készülékhez és a számítógéphez. PL Podłącz kabel USB do urządzenia i do komputera. RO Conectaţi cablul USB între produs şi calculator. SR Pomoću USB kabla povežite proizvod sa računarom. SL Pripojte kábel USB medzi produkt a počítač. SK S kablom USB povežite napravo in računalnik.
18 EN At the computer, open the Apple menu and click System Preferences and then click Print & Fax. If the product name appears in the printer list, go to step 19. Otherwise, click Add or +, and then select Default Browser or Default. Select the product name from the printer list, and click Add. HR Otvorite izbornik Apple na računalu, pritisnite System Preferences (Preference sustava), a zatim Print & Fax (Ispis i faksiranje). Ako se naziv proizvoda prikaže na popisu pisača, idite na korak 19.
19 EN Configure the product software to recognize the installed accessories. Highlight the product and select Printer Setup. The Installable Options dialog box appears. Select the product options that you are using. Click Apply Changes. Go to step 20. HR Konfigurirajte softver proizvoda tako da prepozna instalirane dodatke. Označite proizvod i odaberite Printer Setup (Postavljanje pisača). Pojavit će se dijaloški okvir Installable Options (Opcije koje se mogu instalirati).
20 EN Test the software installation. Print a page from any program to make sure that the software is correctly installed. Note: If the installation failed, reinstall the software, or see the problem solving section in the User Guide. HR Isprobavanje softverske instalacije. Ispišite stranicu iz bilo kojeg programa da biste provjerili je li softver ispravno instaliran.
EN Product setup is complete. Register your product at www.register.hp.com. This is the quickest and easiest way for you to register to receive the following information: • Technical support updates • Enhanced support options • Ideas for and ways to use your new HP product • News about emerging technologies For more information about the following topics, see the electronic User Guide on the CD-ROM or go to: www.hp.com/support/cljcp3525. • Detailed user instructions. • Important safety notices.
PL Konfiguracja urządzenia została zakończona. Zarejestruj urządzenie pod adresem www.register.hp.com.
SK Nastavenie produktu sa dokončilo. Zaregistrujte svoj produkt na lokalite www.register.hp.com.
EN Solve problems RO Rezolvarea problemelor HR Rješavanje problema SR Rešavanje problema CS Řešení potíží SK Riešenie problémov HU Problémamegoldás SL Odpravljanje težav PL Rozwiązywanie problemów EN 1. If the control panel is blank, verify that the product is connected to a working outlet and that the product is turned on. If the control panel is still blank, remove the formatter at the left rear corner of the product and reinstall it. 2.
PL 1. Jeżeli panel sterowania jest pusty, upewnij się, że urządzenie jest podłączone do sprawnego gniazdka sieciowego i jest włączone. Jeżeli panel sterowania wciąż jest pusty, usuń formatyzer znajdujący się w lewym tylnym rogu urządzenia i włóż go ponownie. 2. Panel sterowania urządzenia informuje o wystąpieniu błędów. Jeżeli lampka miga, sprawdź, czy: • Nie doszło do zacięcia papieru w urządzeniu. • Papier znajduje się w co najmniej jednym podajniku. • Wszystkie drzwiczki i podajniki są zamknięte.
44
45
© 2008 Hewlett-Packard Development Company, L.P. www.hp.