HP Photosmart D7200 series Basics Guide Replacer-front_cover_1_lang.
Hewlett-Packard Company notices The information contained in this document is subject to change without notice. All rights reserved. Reproduction, adaptation, or translation of this material is prohibited without prior written permission of Hewlett-Packard, except as allowed under copyright laws. The only warranties for HP products and services are set forth in the express warranty statements accompanying such products and services. Nothing herein should be construed as constituting an additional warranty.
1 HP Photosmart overview The HP Photosmart at a glance.................................................................................................2 Control panel features................................................................................................................3 Find more information.................................................................................................................4 2 Network setup What you need for a wired network...................................
1 HP Photosmart overview Use the HP Photosmart to quickly and easily accomplish tasks such as printing photos from a memory card or storage device. You can access many HP Photosmart functions directly from the control panel, without turning on your computer. NOTE: This guide introduces basic operations and troubleshooting, as well as provides information for contacting HP support and ordering supplies.
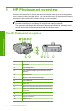
(continued) * Label Description 13 Rear USB port 14 Rear door Use only with the power adapter supplied by HP. Control panel features HP Photosmart overview The following diagram and related table provide a quick reference to the HP Photosmart control panel features. Label Name and Description 1 Color graphics display (also referred to as the display): View menus, photos, and messages. The touch screen display can be adjusted to different positions.
Chapter 1 Find more information A variety of resources, both printed and onscreen, provide information about setting up and using the HP Photosmart. • • • Setup Guide The Setup Guide provides instructions for setting up the HP Photosmart and installing software. Make sure you follow the steps in the Setup Guide in order. If you have problems during setup, see Troubleshooting in the last section of the Setup Guide, or see “Troubleshooting and support” on page 17 in this guide.
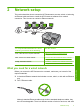
2 Network setup This section describes how to connect the HP Photosmart to a router, switch, or hub using an Ethernet cable and how to install the HP Photosmart software for a network connection. This is known as a wired or Ethernet network. To set up the HP Photosmart on a wired network, you need to do the following: See this section: First, collect all of the required materials. “What you need for a wired network” on page 5 Next, connect to a wired network.
Chapter 2 has a different connector. An Ethernet cable connector (also called an RJ-45 connector) is wider and thicker and always has 8 contacts on the end. A phone connector has between 2 and 6 contacts. ❑ A desktop computer or laptop with an Ethernet connection. NOTE: The HP Photosmart supports both 10 Mbps and 100 Mbps Ethernet networks. If you are purchasing, or have purchased, a network interface card (NIC), make sure it can operate at either speed.
4. Once you have connected the HP Photosmart to the network, install the software as described in “Install the software for a network connection” on page 7. Install the software for a network connection Use this section to install the HP Photosmart software on a computer connected to a network. Before you install the software, make sure you have connected the HP Photosmart to a network.
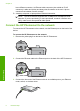
Chapter 2 Change the HP Photosmart from a USB connection to a network connection If you first install the HP Photosmart with a USB connection, you can later change to an Ethernet network connection. If you already understand how to connect to a network, you can use the general directions below. To change a USB connection to a wired (Ethernet) connection 1. Unplug the USB connection from the back of the HP Photosmart. 2.
1. Touch Setup on the display. 2. Touch Network. NOTE: If the menu option you want is not visible on the screen, touch to scroll through all the menu options. or 3. Touch Restore Network Defaults. 4. Touch Yes or No. Change advanced network settings from the control panel settings The advanced network settings are provided for your convenience. However, unless you are an advanced user, you should not change any of these settings.
3 Use the HP Photosmart features This chapter includes information about how to use the HP Photosmart for basic operations. In addition, it provides instructions about how to load paper, view, select, and print photos, and replace the ink cartridges. Load paper This section describes the procedure for loading different types and sizes of paper into the HP Photosmart for your printouts. TIP: To help prevent rips, wrinkles, and curled or bent edges, store all paper flat in a resealable bag.
CAUTION: Make sure that the HP Photosmart is idle and silent when you load paper into the main input tray. If the HP Photosmart is servicing the ink cartridges or otherwise engaged in a task, the paper stop inside the device might not be in place. You could push the paper too far forward, causing the HP Photosmart to eject blank pages. TIP: If you are using letterhead, insert the top of the page first with the print side down.
Chapter 3 2. Insert the stack of photo paper into the photo tray with the short edge forward and the print side down. Slide the stack of photo paper forward until it stops. If the photo paper you are using has perforated tabs, load the photo paper so that the tabs are closest to you. 3. Slide the paper-length and paper-width guides inward against the stack of photo paper until the guides stop.
3. 4. 5. 6. 7. 8. 9.
Chapter 3 Check the estimated ink levels You can easily check the ink supply level to determine how soon you might need to replace an ink cartridge. The ink supply level shows an estimate of the amount of ink remaining in the ink cartridges. NOTE: The HP Photosmart can only detect the ink levels for genuine HP ink. The ink levels in ink cartridges that are refilled or have been used in other devices might not register accurately. To check the ink levels from the control panel 1. Touch Setup on the display.
3. Squeeze the bottom of the latch below the ink cartridge you want to replace, and then lift the latch. If you are replacing the black ink cartridge, lift the latch on the far left. If you are replacing one of the five color ink cartridges, such as yellow, light cyan (blue), cyan, light magenta (pink), or magenta, lift the appropriate latch in the center area. 1 Ink cartridge latch for the black ink cartridge 2 Ink cartridge latches for the color ink cartridges Use the HP Photosmart features 4.
Chapter 3 5. Remove the new ink cartridge from its packaging, and then, holding it by the handle, push the ink cartridge into the empty slot. Match the color and pattern of the ink cartridge to the color and pattern on the print carriage. 6. Close the latch and make sure it is secure. 7. Repeat steps 3 through 6 for each ink cartridge you are replacing. 8. Close the ink cartridge door.
Troubleshooting and support This chapter contains troubleshooting information for the HP Photosmart. Specific information is provided for installation and configuration issues, and some operational topics. For more troubleshooting information, see the onscreen Help that came with your software. Many issues are caused when the HP Photosmart is connected to the computer using a USB cable before the HP Photosmart software is installed on the computer.
Chapter 4 Troubleshooting and support Solution • Make sure the power cord is firmly connected to both the HP Photosmart and the power adapter. Plug the power cord into a power outlet, surge protector, or power strip. • • • 1 Power connection 2 Power cord and adapter 3 Power outlet If you are using a power strip, make sure the power strip is on. Or, try plugging the HP Photosmart directly into a power outlet. Test the power outlet to make sure it is working.
Troubleshooting and support For more information on installing the software and connecting the USB cable, see the Setup Guide that came with the HP Photosmart. The HP Photosmart does not print Cause: The HP Photosmart and computer are not communicating with each other. Solution: Check the connection between the HP Photosmart and computer. Cause: There might be a problem with one or more of the ink cartridges. Solution: Check that the ink cartridges are installed properly and have ink.
Chapter 4 4. 5. Make sure your card shows up under Network Adapters. Refer to the documentation that came with your card. Troubleshooting and support To check your LAN card (Windows Vista) 1. On the Windows taskbar, click Start, Computer, and then click Properties. 2. Click Device Manager. 3. Make sure your card shows up under Network Adapters. 4. Refer to the documentation that came with your card. Cause: You do not have an active network connection.
Cause: A firewall, anti-virus, or anti-spyware application is preventing the HP Photosmart from accessing your computer. Solution: Uninstall the HP Photosmart software, and then reboot your computer. Temporarily disable anti-virus or anti-spyware applications, and then reinstall the HP Photosmart software. You can re-enable your anti-virus or anti-spyware applications after installation is complete. If you see firewall pop-up messages, you must always accept or allow the pop-up messages.
Chapter 4 3. Gently pull the paper out of the rollers. Troubleshooting and support CAUTION: If the paper tears when you are removing it from the rollers, check the rollers and wheels for torn pieces of paper that might be remaining inside the device. If you do not remove all the pieces of paper from the HP Photosmart, more paper jams are likely to occur. 4. 5. Replace the rear door. Gently push the door forward until it snaps into place.
Troubleshooting and support 7. Turn on the HP Photosmart, and then touch OK to continue the current job. Information on ink cartridges and the print head The following tips help maintain HP ink cartridges and ensure consistent print quality. • Install the ink cartridge on or before the install by date, which is printed on the ink cartridge package. • Keep all ink cartridges in the original sealed packages until they are needed. • Turn off the HP Photosmart by pressing the On button located on the device.
5 Technical information The technical specifications and international regulatory information for the HP Photosmart are provided in this section. System requirements Software system requirements are located in the Readme file. Product specifications For product specifications, go to the HP Web site at www.hp.com/support. Paper specifications • Main input tray capacity: Plain paper sheets: Up to 100 (20 lb./75 gsm. paper) • Output tray capacity: Plain paper sheets: Up to 50 (20 lb./75 gsm.
Regulatory model identification number Technical information For regulatory identification purposes, your product is assigned a Regulatory Model Number. The Regulatory Model Number for your product is SDGOB-0710. This regulatory number should not be confused with the marketing name (HP Photosmart D7200 series, etc.) or product numbers (CC975A, etc.).
Chapter 5 Warranty Technical information 26 Technical information