
Basics of work


8 • HP Photosmart D7200 series
Mac: Windows:
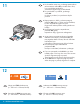
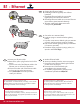
A1 - USB
Turn on your computer, login if necessary, and
then wait for the desktop to appear. Insert the
green CD and follow the onscreen instructions.
IMPORTANT: If the startup screen does not
appear, double-click My Computer , double-click
the CD-ROM icon with the HP logo, and then
double-click setup.exe .
Continue to Section A2 .
a.
b.
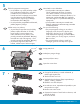
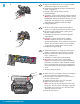
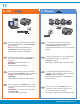
IMPORTANT: Purchase a USB cable separately
if it is not included.
Connect the USB cable to the port on the
back of the HP Photosmart, and then to any
USB port on the computer.
Continue to Section A2 .
a.
b.
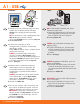
Ieslēdziet datoru, piesakieties sistēmā (ja
nepieciešams) un pēc tam pagaidiet, līdz
tiek parādīta darbvirsma. Ievietojiet zaļo
kompaktdisku un izpildiet ekrānā redzamos
norādījumus.
SVARĪGI! Ja startēšanas lodziņš netiek parādīts,
veiciet dubultklikšķi uz ikonas My Computer
(Mans dators), kompaktdiska ikonas, kurai ir
HP logotips, un pēc tam — uz setup.exe .
Pārejiet pie sadaļas A2 .
a.
b.
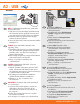
SVARĪGI! Iegādājieties USB kabeli, ja tas nav
iekļauts komplektācijā.
Pievienojiet USB kabeli portam, kas atrodas
ierīces HP Photosmart aizmugurē, un pēc
tam pievienojiet kabeli jebkuram datora USB
portam.
Pārejiet pie sadaļas A2 .
a.
b.
Įjunkite savo kompiuterį, jei reikia –
užsiregistruokite, ir palaukite, kol pasirodys
darbalaukio vaizdas.
Įdėkite žalią kompaktinį diską ir vykdykite ekrane
pateikiamas instrukcijas.
SVARBU: jei paleisties langas nepasirodo,
du kartus spustelėkite My Computer (mano
kompiuteris), du kartus spustelėkite piktogramą su
HP logotipu CD-ROM (kompaktinių diskų įtaisas)
ir du kartus spustelėkite rinkmeną setup.exe .
Eikite į A2 skyrių .
a.
b.
SVARBU: jeigu USB kabelio pakuotėje nėra,
įsigykite jį patys.
Prijunkite USB kabelį prie „HP Photosmart“
galinėje sienelėje esančio prievado, tada
– prie bet kurio kompiuteryje esančio USB
prievado.
Eikite į A2 skyrių .
a.
b.
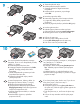
NB! Kui USB-kaablit komplektis pole, peate
selle eraldi juurde ostma.
Ühendage USB-kaabel sarja HP Photosmart
printeri tagaküljel asuvasse porti ning selle
teine ots mõnda oma arvuti USB-porti.
Jätkake jaotisest A2 .
a.
b.
Lülitage arvuti sisse, vajadusel logige sisse ning
oodake, kuni kuvatakse töölaud. Sisestage
roheline CD ja järgige ekraanil kuvatavaid
juhiseid.
NB! Kui käivituskuva ei ilmu, topeltklõpsake ikooni
Minu arvuti (My Computer), seejärel
HP logoga CD-ROM-i ikooni ja siis faili setup.exe .
Jätkake jaotisest A2 .
a.
b.
EN
EN
ET ET
LT
LT
LV
LV