HP Photosmart C6200 All-in-One series Basics Guide
Hewlett-Packard Company notices The information contained in this document is subject to change without notice. All rights reserved. Reproduction, adaptation, or translation of this material is prohibited without prior written permission of Hewlett-Packard, except as allowed under copyright laws. The only warranties for HP products and services are set forth in the express warranty statements accompanying such products and services. Nothing herein should be construed as constituting an additional warranty.
HP Photosmart C6200 All-in-One series English Basics Guide
Contents English 1 HP All-in-One overview The HP All-in-One at a glance....................................................................................................5 Control panel features................................................................................................................6 Find more information.................................................................................................................7 2 Network setup Wired network setup...........................
1 HP All-in-One overview Use the HP All-in-One to quickly and easily accomplish tasks such as making a copy, scanning documents, or printing photos. You can access many HP All-in-One functions directly from the control panel, without turning on your computer. NOTE: This guide introduces basic operations and troubleshooting, as well as provides information for contacting HP support and ordering supplies.
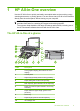
Chapter 1 (continued) English * Label Description 11 Memory card slots 12 Glass 13 Lid backing 14 Ethernet port 15 USB port 16 Power connection* 17 Two-sided printing accessory Use only with the power adapter supplied by HP. Control panel features The following diagram and related table provide a quick reference to the HP All-in-One control panel features. Label Icon Name and Description 1 Color graphics display (also referred to as the display): Displays menus, photos, and messages.
(continued) Icon Name and Description 6 Cancel: Stops the current operation. 7 Photo Menu: Launches the Photosmart Express menu for printing, saving, editing, and sharing photos. 8 Red Eye Removal: Turns the Red Eye Removal feature on or off. By default, this feature is turned off. When the feature is turned on, the HP All-in-One automatically corrects red eye coloring in the photo currently shown on the display. 9 Photo Reprints: Enables you to make a copy of an original photo placed on the glass.
Chapter 1 • • English • 8 Setup Guide The Setup Guide provides instructions for setting up the HP All-in-One and installing software. Make sure you follow the steps in the Setup Guide in order. If you have problems during setup, see Troubleshooting in the last section of the Setup Guide, or see “Troubleshooting and support” on page 25 in this guide.
2 Network setup If you want to: See this section: Connect to a wired (Ethernet) network. “Wired network setup” on page 9 Install the HP All-in-One software for use in a networked environment. “Install the software for a network connection” on page 11 Add connections to more computers on the network. “Connect to additional computers on a network” on page 12 Change the HP All-in-One from a USB connection to a network connection.
Chapter 2 What you need for a wired network Before you connect the HP All-in-One to a network, make sure you have all of the required materials. ❑ A functional Ethernet network that includes a router, switch, or hub with an Ethernet port. ❑ CAT-5 Ethernet cable. English Although standard Ethernet cables look similar to standard telephone cables, they are not interchangeable. There is a different number of wires in each one, and each has a different connector.
English 3. Connect the other end of the Ethernet cable to an available port on your Ethernet router, switch, or wireless router. 4. Once you have connected the HP All-in-One to the network, install the software as described in “Install the software for a network connection” on page 11. Install the software for a network connection Use this section to install the HP All-in-One software on a computer connected to a network.
Chapter 2 5. On the Printer Found screen, verify that the printer description is correct. If more than one printer is found on the network, the Printers Found screen appears. Select the HP All-in-One you want to connect. 6. Follow the prompts to install the software. When you have finished installing the software, the HP All-in-One is ready for use. 7. If you disabled any virus detection software on your computer, make sure to enable it again. 8.
English 1. On the control panel of the HP All-in-One, press Setup. 2. Press until Network is highlighted, and then press OK. The Network Menu appears. 3. Press until View Network Settings is highlighted, and then press OK. The View Network Settings Menu appears. 4. Do one of the following: • To display wired network settings, press until Display Wired Summary is highlighted, and then press OK. This displays a summary of the wired (Ethernet) network settings.
Chapter 2 NOTE: When manually entering an IP setting, you must already be connected to an active network, otherwise the setting will not stay when you exit from the menu. CAUTION: Be careful when manually assigning an IP address. If you enter an invalid IP address during the installation, your network components will not be able to connect with the HP All-in-One. English 1. Press Setup. 2. Press until Network is highlighted, then press OK. The Network Menu appears. 3.
3 Use the HP All-in-One features This chapter includes information about how to use the HP All-in-One for basic operations. In addition, it provides instructions about how to load paper and replace the ink cartridges. You can load many different types and sizes of paper in the HP All-in-One, including letter or A4 paper, legal paper, photo paper, transparencies, envelopes, and HP CD/DVD tattoo labels.
Chapter 3 To load full-size paper 1. Pull out the main input tray, and then slide the paper-width and paper-length guides to their outermost positions. English 2. Tap a stack of paper on a flat surface to align the edges, and then check the paper for the following: • Make sure it is free of rips, dust, wrinkles, and curled or bent edges. • Make sure all the paper in the stack is the same size and type. 3.
English 5. Push the main input tray back into the HP All-in-One. 6. Pull the output tray extender toward you, as far as it will go. Flip the paper catch at the end of the output tray extender to open the extender the rest of the way. NOTE: When you use legal-size paper, leave the tray extender closed. Load 10 x 15 cm (4 x 6 inch) photo paper You can load up to 10 x 15 cm (4 x 6 inch) photo paper into the photo tray of the HP All-in-One.
Chapter 3 4. Push in the photo tray, and then lower the output tray. Avoid paper jams To help avoid paper jams, follow these guidelines. • • • • English Remove printed papers from the output tray frequently. Prevent curled or wrinkled paper by storing all unused paper flat in a resealable bag. Ensure that paper loaded in the input tray lays flat and the edges are not bent or torn. If you are printing labels, ensure that the label sheets are no more than two years old.
xD-Picture Card To view, select, and print photos 1. Insert a memory card into the appropriate slot on the HP All-in-One. The Photosmart Express appears with the most recent photo shown on the display. 2. Load up to 10 x 15 cm (4 x 6 inch) photo paper in the photo tray or full-size photo paper in the main input tray. 3. Press until View is highlighted, and then press OK. The View Photos screen appears. 4. Press or to scroll through the thumbnails of your photos. 5.
Chapter 3 4. If the HP All-in-One is connected to one or more computers on a network, do the following: a. Press OK to select Select Computer. A list of the computers connected to the HP All-in-One appears on the display. NOTE: The Select Computer menu might list computers with a USB connection in addition to those connected through the network. English b. Press OK to select the default computer, or press to select a different computer, and then press OK.
NOTE: If you are installing ink cartridges in the HP All-in-One for the first time, be sure to use only the ink cartridges that came with the device. The ink in these cartridges is specially formulated to mix with the ink in the print head assembly at firsttime setup. If you do not already have replacement ink cartridges for the HP All-in-One, you can order them by clicking the Shop for HP Supplies icon on your computer. On a Windows computer this is located in the HP folder in the Start menu.
Chapter 3 4. Pull the ink cartridge toward you out of its slot to remove it. English 5. Remove the new ink cartridge from its packaging, and then, holding it by the handle, push the ink cartridge into the empty slot. Match the color and pattern of the ink cartridge to the color and pattern on the print carriage. 6. Close the latch and make sure it is secure. 7. Repeat steps 3 through 6 for each ink cartridge you are replacing. 8. Close the ink cartridge door.
To ensure that your copies and scans remain clear, you might need to clean the glass and lid backing. You might also want to dust the exterior of the HP All-in-One. TIP: You can purchase an HP Cleaning Kit for Inkjet Printers and All-in-Ones (Q6260A) that provides everything needed to safely clean your HP device. For more information, go to: www.shopping.hp.com/accessories-store/printer.
Chapter 3 3. Dry the backing with a dry, soft, lint-free cloth. CAUTION: Do not use paper-based wipes, as these might scratch the backing. 4. If further cleaning is needed, repeat the previous steps using isopropyl (rubbing) alcohol, and wipe the backing thoroughly with a damp cloth to remove any residual alcohol. CAUTION: Be careful not to spill alcohol on the glass or exterior of the HP All-in-One, as this might damage the device.
Troubleshooting and support This chapter contains troubleshooting information for the HP All-in-One. Specific information is provided for installation and configuration issues, and some operational topics. For more troubleshooting information, see the onscreen Help that came with your software. This chapter also provides warranty and support information. For support contact information, see the inside back cover of this guide.
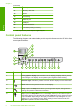
Chapter 4 Solution • Make sure the power cord is firmly connected to both the HP All-in-One and the power adapter. Plug the power cord into a grounded power outlet, surge protector, or power strip. English • • • 1 Power connection 2 Power cord and adapter 3 Grounded power outlet If you are using a power strip, make sure the power strip is on. Or, try plugging the HP All-in-One directly into a grounded power outlet. Test the power outlet to make sure it is working.
English For more information on installing the software and connecting the USB cable, see the Setup Guide that came with the HP All-in-One. The HP All-in-One does not print Solution: If the HP All-in-One and computer are not communicating with each other, try the following: • Look at the On light located on the front of the HP All-in-One. If it is not lit, the HP All-in-One is turned off. Make sure the power cord is firmly connected to the HP All-in-One and plugged into a power outlet.
Chapter 4 • If the HP All-in-One is offline, turn the HP All-in-One off and on again. Start a print job. • If necessary, remove and then install the software you installed with the HP All-in-One again. For more information on setting up the HP All-in-One and connecting it to your computer, see the Setup Guide that came with the HP All-in-One. Network troubleshooting This section addresses problems you might encounter setting up a wired network.
Solution: Turn off the HP All-in-One, the computer, and the router. Wait a few seconds. Turn on the router first, and then turn on the HP All-in-One and the computer. Cause: The HP All-in-One and computer are not connected to the same network. Solution: Try accessing the Embedded Web Server on the HP All-in-One. To find the IP address, print a network configuration page. The Printer not Found screen appears during installation English Cause: The HP All-in-One is not turned on.
Chapter 4 To clear a paper jam from the Two-sided printing accessory 1. Turn off the HP All-in-One. 2. Press in the tabs on the left and right side of the Two-sided printing accessory. Remove the accessory by pulling it away from the HP All-in-One. CAUTION: Trying to clear a paper jam from the front of the HP All-in-One can damage the print mechanism. Always access and clear paper jams from the Two-sided printing accessory of the HP All-in-One. English 3. Gently pull the paper out of the rollers.
If you have a problem, follow these steps: 1. Check the documentation that came with the HP All-in-One. 2. Visit the HP online support Web site at www.hp.com/support. HP online support is available to all HP customers.
5 Technical information The technical specifications and international regulatory information for the HP All-in-One are provided in this section. System requirements Software system requirements are located in the Readme file. English Product specifications For product specifications, go to the HP Web site at www.hp.com/support. Paper specifications • Input tray capacity: Plain paper sheets: Up to 125 (20 lb./75 gsm. paper) • Output tray capacity: Plain paper sheets: Up to 50 (20 lb./75 gsm.
Regulatory notices The HP All-in-One meets product requirements from regulatory agencies in your country/region. For a complete listing of regulatory notices, see the onscreen Help. English Regulatory model identification number For regulatory identification purposes, your product is assigned a Regulatory Model Number. The Regulatory Model Number for your product is SDGOB-0714. This regulatory number should not be confused with the marketing name (HP Photosmart C6200 All-in-One series, etc.
Chapter 5 Warranty English 34 HP Photosmart C6200 All-in-One series
HP Photosmart C6200 All-in-One series دﻟﻴﻞ اﻷﺳﺎﺳﻴﺎت ﻋﺮﺑﻲ
اﻟﻤﺤﺘﻮﻳﺎت ٢ إﻋﺪاد اﻟﺸﺒﻜﺔ إﻋﺪاد ﺷﺒﻜﺔ ﺳﻠﻜﻴﺔ٧................................................................................................................................ ﺕﺜﺒﻴﺖ اﻟﺒﺮﻧﺎﻡﺞ ﻡﻦ أﺟﻞ اﻟﺘﻮﺹﻴﻞ ﺏﺎﻟﺸﺒﻜﺔ٩...................................................................................................... ﺕﻮﺹﻴﻞ أﺟﻬﺰة آﻤﺒﻴﻮﺕﺮ إﺿﺎﻓﻴﺔ ﻋﻠﻰ اﻟﺸﺒﻜﺔ٩...................................................................................................
١ ﻓﻜﺮة ﻋﺎﻡﺔ ﻋﻦ HP All-in-One اﺳﺘﺨﺪم HP All-in-Oneﻟﺘﻨﻔﻴﺬ ﻡﻬﺎم ﻡﺜﻞ ﻋﻤﻞ ﻧﺴﺨﺔ ،ﻡﺴﺢ ﻡﺴﺘﻨﺪات ،أو ﻃﺒﺎﻋﺔ ﺹﻮر ﺏﺴﺮﻋﺔ وﺳﻬﻮﻟﺔ .یﻤﻜﻦ اﻟﻮﺹﻮل إﻟﻰ اﻟﻜﺜﻴﺮ ﻡﻦ وﻇﺎﺋﻒ HP All-in-Oneﻡﺒﺎﺷﺮ ًة ﻡﻦ ﻟﻮﺡﺔ اﻟﺘﺤﻜﻢ ,دون ﺕﺸﻐﻴﻞ اﻟﻜﻤﺒﻴﻮﺕﺮ. ﻡﻼﺡﻈﺔ یﻘﻮم هﺬا اﻟﺪﻟﻴﻞ ﺏﺘﻘﺪیﻢ ﻋﻤﻠﻴﺎت أﺳﺎﺳﻴﺔ وﻡﻌﻠﻮﻡﺎت ﺡﻮل ﺡﻞ اﻟﻤﺸﻜﻼت ,آﻤﺎ یﻮﻓﺮ ﻡﻌﻠﻮﻡﺎت ﺡﻮل اﻻﺕﺼﺎل ﺏﺪﻋﻢ HPوﻃﻠﺐ اﻟﻤﺴﺘﻠﺰﻡﺎت. ﺕﺼﻒ اﻟﺘﻌﻠﻴﻤﺎت اﻟﻈﺎهﺮة ﻋﻠﻰ اﻟﺸﺎﺷﺔ ﺏﺘﻔﺼﻴﻞ اﻟﻨﻄﺎق اﻟﻜﺎﻡﻞ ﻟﻠﻤﻴﺰات واﻟﻮﻇﺎﺋﻒ ,ﺏﻤﺎ ﻓﻲ ذﻟﻚ اﺳﺘﺨﺪام ﺏﺮﻧﺎﻡﺞ HP Photosmartاﻟﻤﺰود ﻡﻊ ﺟﻬﺎز .
)ﺕﺎﺏﻊ( * اﻟﺒﻄﺎﻗﺔ اﻟﻼﺻﻘﺔ اﻟﻮﺻﻒ 13 ﻇﻬﺮ اﻟﻐﻄﺎء 14 ﻡﻨﻔﺬ إیﺜﺮﻧﺖ 15 ﻡﻨﻔﺬ USB 16 * ﺕﻮﺹﻴﻞ اﻟﻄﺎﻗﺔ 17 ﻡﻠﺤﻖ اﻟﻄﺒﺎﻋﺔ ﻋﻠﻰ اﻟﻮﺟﻬﻴﻦ اﺳﺘﺨﺪم ﻓﻘﻂ ﻡﻊ ﻡﺤﻮل اﻟﻄﺎﻗﺔ اﻟﻤﺰود ﻡﻦ ﻗﺒﻞ .HP ﻡﻴﺰات ﻟﻮﺡﺔ اﻟﺘﺤﻜﻢ ﻋﺮﺑﻲ یﻮﻓﺮ اﻟﺮﺳﻢ اﻟﺘﺎﻟﻲ واﻟﺠﺪول اﻟﻤﺘﻌﻠﻖ ﺏﻪ ﻡﺮاﺟﻌﺔ ﺳﺮیﻌﺔ ﻟﻤﻴﺰات ﻟﻮﺡﺔ اﻟﺘﺤﻜﻢ ﻟﺠﻬﺎز .HP All-in-One اﻟﺒﻄﺎﻗﺔ اﻟﻼﺻﻘﺔ اﻟﺮﻡﺰ اﻻﺳﻢ واﻟﻮﺻﻒ 1 أیﻀﺎ آﺸﺎﺷﺔ اﻟﻌﺮض( :ﻟﻌﺮض اﻟﻘﻮاﺋﻢ ,اﻟﺼﻮر واﻟﺮﺳﺎﺋﻞ .
اﻟﻔﺼﻞ ١ )ﺕﺎﺏﻊ( 7 ﻗﺎﺋﻤﺔ اﻟﺼﻮر :ﻟﺘﺸﻐﻴﻞ ﻗﺎﺋﻤﺔ Photosmart Expressﻟﻄﺒﺎﻋﺔ اﻟﺼﻮر ,ﺡﻔﻈﻬﺎ ،ﺕﺤﺮیﺮهﺎ وﻡﺸﺎرآﺘﻬﺎ. 8 إزاﻟﺔ اﻟﻌﻴﻮن اﻟﺤﻤﺮاء :ﻟﺘﺸﻐﻴﻞ ﻡﻴﺰة ) Red eye removalإزاﻟﺔ اﻟﻌﻴﻮن اﻟﺤﻤﺮاء( أو إیﻘﺎف ﺕﺸﻐﻴﻠﻬﺎ .یﺘﻢ إیﻘﺎف ﺕﺸﻐﻴﻞ هﺬﻩ اﻟﻤﻴﺰة اﻓﺘﺮاﺿﻴًﺎ .ﻓﻲ ﺡﺎﻟﺔ ﺕﺸﻐﻴﻞ هﺬﻩ اﻟﻤﻴﺰة ,یﻘﻮم ﺟﻬﺎز HP All-in-Oneﺕﻠﻘﺎﺋﻴًﺎ ﺏﺘﺼﺤﻴﺢ ﻟﻮن اﻟﻌﻴﻮن اﻟﺤﻤﺮاء ﻓﻲ اﻟﺼﻮرة اﻟﻤﻌﺮوﺿﺔ ﺡﺎﻟﻴًﺎ ﻋﻠﻰ ﺷﺎﺷﺔ اﻟﻌﺮض. 9 ﻥُﺴﺦ ﻡﻄﺒﻮﻋﺔ ﻡﻦ ﺻﻮرة :ﺕﻤﻜﻨﻚ ﻡﻦ ﻋﻤﻞ ﻧﺴﺨﺔ ﻡﻦ اﻟﺼﻮرة اﻷﺹﻠﻴﺔ اﻟﻤﻮﺟﻮدة ﻋﻠﻰ اﻟﺴﻄﺢ اﻟﺰﺟﺎﺟﻲ.
• • • دﻟﻴﻞ اﻹﻋﺪاد یﻮﻓﺮ دﻟﻴﻞ اﻹﻋﺪاد إرﺷﺎدات ﺡﻮل إﻋﺪاد ﺟﻬﺎز HP All-in-Oneوﺕﺜﺒﻴﺖ اﻟﺒﺮﻧﺎﻡﺞ .ﺕﺄآﺪ ﻡﻦ اﺕﺒﺎع اﻟﺨﻄﻮات اﻟﻤﻮﺟﻮدة ﻓﻲ دﻟﻴﻞ اﻹﻋﺪاد ﺡﺴﺐ اﻟﺘﺮﺕﻴﺐ. ﻋﻨﺪ اﻟﺘﻌﺮض إﻟﻰ ﻡﺸﺎآﻞ أﺙﻨﺎء ﻋﻤﻠﻴﺔ اﻹﻋﺪاد ,ﻓﻘﻢ ﺏﻤﺮاﺟﻌﺔ ﺡﻞ اﻟﻤﺸﻜﻼت ﻓﻲ ﺁﺥﺮ ﻗﺴﻢ ﻡﻦ دﻟﻴﻞ اﻹﻋﺪاد ,أو راﺟﻊ ”اﺡﻞ اﻟﻤﺸﻜﻼت واﻟﺪﻋﻢ“ ﻓﻲ ﺹﻔﺤﺔ ٢١ﻓﻲ هﺬا اﻟﺪﻟﻴﻞ.
٢ إﻋﺪاد اﻟﺸﺒﻜﺔ إذا رﻏﺒﺖ ﻓﻲ: راﺟﻊ هﺬا اﻟﻘﺴﻢ: ﺕﻮﺹﻴﻞ ﺏﺸﺒﻜﺔ )إیﺜﺮﻧﺖ( ﺳﻠﻜﻴﺔ. ”إﻋﺪاد ﺷﺒﻜﺔ ﺳﻠﻜﻴﺔ“ ﻓﻲ ﺹﻔﺤﺔ ٧ ﺕﺜﺒﻴﺖ ﺏﺮﻧﺎﻡﺞ HP All-in-Oneﻟﻼﺳﺘﺨﺪام ﻓﻲ ﺏﻴﺌﺔ ﺷﺒﻜﺔ. ”ﺕﺜﺒﻴﺖ اﻟﺒﺮﻧﺎﻡﺞ ﻡﻦ أﺟﻞ اﻟﺘﻮﺹﻴﻞ ﺏﺎﻟﺸﺒﻜﺔ“ ﻓﻲ ﺹﻔﺤﺔ ٩ إﺿﺎﻓﺔ ﺕﻮﺹﻴﻼت إﻟﻰ أﺟﻬﺰة آﻤﺒﻴﻮﺕﺮ أﺥﺮى ﻡﻮﺟﻮدة ﻋﻠﻰ اﻟﺸﺒﻜﺔ. ”ﺕﻮﺹﻴﻞ أﺟﻬﺰة آﻤﺒﻴﻮﺕﺮ إﺿﺎﻓﻴﺔ ﻋﻠﻰ اﻟﺸﺒﻜﺔ“ ﻓﻲ ﺹﻔﺤﺔ ٩ ﺕﻐﻴﻴﺮ ﺟﻬﺎز HP All-in-Oneﻡﻦ ﺕﻮﺹﻴﻞ USBإﻟﻰ ﺕﻮﺹﻴﻞ اﻟﺸﺒﻜﺔ.
ورﻏﻢ ﺕﺸﺎﺏﻪ آﺒﻼت إیﺜﺮﻧﺖ اﻟﻘﻴﺎﺳﻴﺔ ﻡﻊ آﺒﻼت اﻟﻬﺎﺕﻒ اﻟﻘﻴﺎﺳﻴﺔ إﻻ أﻧﻪ ﻻ یﻤﻜﻦ أن یﺤﻞ أﺡﺪهﻤﺎ ﻡﻜﺎن اﻵﺥﺮ .یﻮﺟﺪ ﻋﺪد أیﻀﺎ ﻡﻮﺹﻞ ﻡﺨﺘﻠﻒ ﻡﻦ اﻷﺳﻼك ﻓﻲ آﻞ واﺡﺪ ،وﻟﻜﻞ واﺡﺪ ﻡﻮﺹﻞ ﻡﺨﺘﻠﻒ .إن ﻡﻮﺹﻞ آﺎﺏﻞ اﻹیﺜﺮﻧﺖ )یﺴﻤّﻰ ً َ (RJ-45أﻋﺮض وأﺳﻤﻚ وﻟﻪ ،داﺋ ًﻤﺎ 8 ،ﻧﻘﺎط ﺕﻼﻡﺲ ﻓﻲ ﻃﺮﻓﻪ .ﻡﻮﺹﻞ اﻟﻬﺎﺕﻒ ﻟﻪ ﻡﺎ ﺏﻴﻦ ﻧﻘﻄﺘﻲ ﺕﻼﻡﺲ اﻟﻰ 6ﻧﻘﺎط. ﻡﺰود ﺏﺎﺕﺼﺎل إیﺜﺮﻧﺖ. ❑ آﻤﺒﻴﻮﺕﺮ ﻡﻜﺘﺒﻲ أو آﻤﺒﻴﻮﺕﺮ ﻡﺤﻤﻮل ّ ﻋﺮﺑﻲ ﻡﻼﺡﻈﺔ یﺪﻋﻢ HP All-in-Oneﺷﺒﻜﺔ اﻹیﺜﺮﻧﺖ ذات Mbps 10وﺷﺒﻜﺔ اﻹﻧﺘﺮﻧﺖ ذات .
اﻟﻔﺼﻞ ٢ .٤ﺏﻤﺠﺮد ﺕﻮﺹﻴﻞ ﺟﻬﺎز HP All-in-Oneﺏﺎﻟﺸﺒﻜﺔ ,ﻗﻢ ﺏﺘﺜﺒﻴﺖ اﻟﺒﺮﻧﺎﻡﺞ آﻤﺎ هﻮ ﻡﻮﺿﺢ ﻓﻲ ”ﺕﺜﺒﻴﺖ اﻟﺒﺮﻧﺎﻡﺞ ﻡﻦ أﺟﻞ اﻟﺘﻮﺹﻴﻞ ﺏﺎﻟﺸﺒﻜﺔ“ ﻓﻲ ﺹﻔﺤﺔ .٩ ﻋﺮﺑﻲ ﺕﺜﺒﻴﺖ اﻟﺒﺮﻥﺎﻡﺞ ﻡﻦ أﺟﻞ اﻟﺘﻮﺻﻴﻞ ﺑﺎﻟﺸﺒﻜﺔ ﻗﻢ ﺏﺎﺳﺘﺨﺪام هﺬا اﻟﻘﺴﻢ ﻟﺘﺜﺒﻴﺖ ﺏﺮﻧﺎﻡﺞ HP All-in-Oneﻋﻠﻰ آﻤﺒﻴﻮﺕﺮ ﻡﺘﺼﻞ ﺏﺸﻜﺒﺔ .ﻗﺒﻞ ﺕﺜﺒﻴﺖ اﻟﺒﺮﻧﺎﻡﺞ ,ﺕﺄآﺪ ﻡﻦ ﺕﻮﺹﻴﻞ ﺟﻬﺎز ﺏﺸﺒﻜﺔ. ﻡﻼﺡﻈﺔ إذا ﺕﻢ ﺕﻜﻮیﻦ اﻟﻜﻤﺒﻴﻮﺕﺮ ﻟﻠﺘﻮﺹﻴﻞ ﺏﺴﻠﺴﻠﺔ ﻡﻦ ﻡﺸﻐﻼت اﻟﺸﺒﻜﺔ ،ﺕﺄآﺪ ﻡﻦ ﺕﻮﺹﻴﻞ اﻟﻜﻤﺒﻴﻮﺕﺮ ﺡﺎﻟﻴًﺎ ﺏﻬﺬﻩ اﻟﻤﺸﻐﻼت ﻗﺒﻞ ﺕﺜﺒﻴﺖ اﻟﺒﺮﻧﺎﻡﺞ .
ﺕﻐﻴﻴﺮ ﺟﻬﺎز HP All-in-Oneﻡﻦ ﺕﻮﺻﻴﻞ USBإﻟﻰ ﺕﻮﺻﻴﻞ اﻟﺸﺒﻜﺔ ﻻ ﻡﻊ ﺕﻮﺹﻴﻞ ,USBﻓﻴﻤﻜﻨﻚ اﻟﺘﺤﻮیﻞ إﻟﻰ ﺕﻮﺹﻴﻞ ﺷﺒﻜﺔ إیﺜﺮﻧﺖ ﻓﻲ وﻗﺖ ﻻﺡﻖ .إذا ﻋﻨﺪ ﺕﺜﺒﻴﺖ ﺟﻬﺎز HP All-in-Oneأو ً ﻋﺮﻓﺖ آﻴﻔﻴﺔ اﻟﺘﻮﺹﻴﻞ ﺏﺎﻟﺸﺒﻜﺔ ﻡﺴﺒﻘًﺎ ,ﻓﻴﻤﻜﻨﻚ اﺳﺘﺨﺪام اﻟﺘﻮﺟﻴﻬﺎت اﻟﻌﺎﻡﺔ اﻟﻤﻮﺟﻮدة أدﻧﺎﻩ. ﻋﺮﺑﻲ ﻟﺘﻐﻴﻴﺮ ﺕﻮﺻﻴﻞ USBإﻟﻰ ﺕﻮﺻﻴﻞ )إﻳﺜﺮﻥﺖ( ﺳﻠﻜﻲ .١ﻗﻢ ﺏﻔﺼﻞ ﺕﻮﺹﻴﻞ USBﻡﻦ اﻟﺠﺰء اﻟﺨﻠﻔﻲ ﻟﺠﻬﺎز .HP All-in-One .
اﻟﻔﺼﻞ ٢ ﺕﻐﻴﻴﺮ إﻋﺪادات ﻡﺘﻘﺪﻡﺔ ﻟﻠﺸﺒﻜﺔ ﻡﻦ ﻟﻮﺡﺔ اﻟﺘﺤﻜﻢ ﺕﺘﻮﻓﺮ اﻹﻋﺪادات اﻟﻤﺘﻘﺪﻡﺔ ﻟﻠﺸﺒﻜﺔ ﻡﻦ أﺟﻞ راﺡﺘﻚ .وﻡﻊ ذﻟﻚ ،یﺠﺐ ﻋﻠﻴﻚ أﻻ ﺕﻐﻴﺮ هﺬﻩ اﻹﻋﺪادات إﻻ إذا آﻨﺖ ﻡﺴﺘﺨﺪﻡًﺎ ﻡﺘﻘﺪﻡًﺎ. ﺿﺒﻂ ﺳﺮﻋﺔ اﻟﻮﺻﻠﺔ .١ .٢ .٣ .٤ اﺿﻐﻂ ﻋﻠﻰ إﻋﺪاد. اﺿﻐﻂ ﻋﻠﻰ ﺡﺘﻰ ﺕﻤﻴﻴﺰ ) Networkﺵﺒﻜﺔ( ,ﺙﻢ اﺿﻐﻂ ﻋﻠﻰ ﻡﻮاﻓﻖ. ﺳﺘﻈﻬﺮ ) Network Menuﻗﺎﺋﻤﺔ اﻟﺸﺒﻜﺔ(. اﺿﻐﻂ ﻋﻠﻰ ﺡﺘﻰ ﺕﻤﻴﻴﺰ ) Advanced Setupإﻋﺪاد ﻡﺘﻘﺪم( ,ﺙﻢ اﺿﻐﻂ ﻋﻠﻰ ﻡﻮاﻓﻖ. اﺿﻐﻂ ﻋﻠﻰ ﺡﺘﻰ ﺕﻤﻴﻴﺰ ) Set Link Speedﺿﺒﻂ ﺳﺮﻋﺔ اﻟﻮﺻﻠﺔ( ,ﺙﻢ اﺿﻐﻂ ﻋﻠﻰ ﻡﻮاﻓﻖ.
٣ اﺳﺘﺨﺪام ﻡﻴﺰات HP All-in-One یﺤﺘﻮي هﺬا اﻟﻔﺼﻞ ﻋﻠﻲ ﻡﻌﻠﻮﻡﺎت ﻋﻦ آﻴﻔﻴﺔ اﺳﺘﺨﺪام HP All-in-Oneﻟﻠﻌﻤﻠﻴﺎت اﻷﺳﺎﺳﻴﺔ ﺏﺎﻻﺿﺎﻓﺔ إﻟﻲ ذﻟﻚ ،ﻓﺈﻧﻪ یﻮﻓﺮ ﺕﻌﻠﻴﻤﺎت ﺡﻮل آﻴﻔﻴﺔ ﺕﺤﻤﻴﻞ اﻟﻮرق واﺳﺘﺒﺪال ﺥﺮﻃﻮﺷﺎت اﻟﺤﺒﺮ. ﺕﺤﻤﻴﻞ اﻟﻨُﺴﺦ اﻷﺻﻠﻴﺔ وﺕﺤﻤﻴﻞ اﻟﻮرق یﻤﻜﻦ ﺕﺤﻤﻴﻞ اﻟﻜﺜﻴﺮ ﻡﻦ أﻧﻮاع وأﺡﺠﺎم اﻟﻮرق اﻟﻤﺨﺘﻠﻔﺔ ﻓﻲ ﺟﻬﺎز ,HP All-in-Oneﺏﻤﺎ ﻓﻲ ذﻟﻚ ورق ﺏﺤﺠﻢ letterأو ،A4ورق ﺏﺤﺠﻢ ،legalورق اﻟﺼﻮر ،ورق ﺷﻔﺎف ،اﻷﻇﺮف وﻡﻠﺼﻘﺎت رﺳﻮﻡﺎت اﻟﻘﺮص اﻟﻤﻀﻐﻮط/ﻗﺮص اﻟﻔﻴﺪیﻮ اﻟﺮﻗﻤﻲ ﻡﻦ .
اﻟﻔﺼﻞ ٣ ﻡﺴﺘﻮ ﻟﻤﺤﺎذاة اﻟﺤﺎﻓﺎت ،ﺙﻢ اﻓﺤﺺ اﻟﻮرق ﻟﻤﻌﺮﻓﺔ ﻡﺎ یﻠﻲ: ٍ .٢ﻗﻢ ﺏﺎﻟﻀﺮب ﻋﻠﻰ اﻟﻮرق ﻋﻠﻰ ﺳﻄﺢ • ﺕﺄآﺪ ﻡﻦ ﺥﻠﻮﻩ ﻡﻦ اﻟﺘﺸﻘﻘﺎت واﻷﺕﺮﺏﺔ واﻟﺘﺠﻌﺪات واﻟﺤﺎﻓﺎت اﻟﻤﻨﺤﻨﻴﺔ أو اﻟﻤﻨﺜﻨﻴﺔ. • ﺕﺄآﺪ ﻡﻦ ﺕﻄﺎﺏﻖ ﺡﺠﻢ وﻧﻮع ﺟﻤﻴﻊ اﻟﻮرق اﻟﻤﻮﺟﻮد ﻓﻲ اﻟﺮزﻡﺔ. .٣أدﺥﻞ رزﻡﺔ اﻟﻮرق إﻟﻰ ﺡﺎویﺔ اﻹدﺥﺎل اﻟﺮﺋﻴﺴﻴﺔ ﻡﻊ ﺟﻌﻞ اﻟﺤﺎﻓﺔ اﻟﻘﺼﻴﺮة ﻟﻸﻡﺎم ووﺟﻪ اﻟﻄﺒﺎﻋﺔ ﻷﺳﻔﻞ .ﻗﻢ ﺏﺈﻡﺎﻟﺔ رزﻡﺔ اﻟﻮرق ﻟﻸﻡﺎم ﺡﺘﻰ ﺕﺘﻮﻗﻒ. ﻻ ﻡﻊ ﺟﻌﻞ وﺟﻪ اﻟﻄﺒﺎﻋﺔ ﺕﻠﻤﻴﺢ إذا آﻨﺖ ﺕﺴﺘﺨﺪم ورق ﻋﻠﻴﻪ ﻋﻨﻮان اﻟﺸﺮآﺔ ﺿﻊ اﻟﺠﺰء اﻟﻌﻠﻮي ﻡﻦ اﻟﺼﻔﺤﺔ أو ً ﻷﺳﻔﻞ .
ﻡﻼﺡﻈﺔ ﻋﻨﺪ اﺳﺘﺨﺪام ورق ﺏﺤﺠﻢ ,legalدع أداة إﻃﺎﻟﺔ اﻟﺤﺎویﺔ ﻡﻐﻠﻘ ًﺔ. ﺕﺤﻤﻴﻞ ورق ﺻﻮر ﺑﺤﺠﻢ ١٥ × ١٠ﺳﻢ ) ٦ × ٤ﺑﻮﺻﺎت( ﻋﺮﺑﻲ یﻤﻜﻦ ﺕﺤﻤﻴﻞ ورق اﻟﺼﻮر ﺡﺘﻰ ﺡﺠﻢ 15 ×10ﺳﻢ ﻓﻲ ﺡﺎویﺔ اﻟﺼﻮر ﻟـ .HP All-in-Oneﻟﻠﺤﺼﻮل ﻋﻠﻰ أﻓﻀﻞ اﻟﻨﺘﺎﺋﺞ، اﺳﺘﺨﺪم ورﻗًﺎ ﺏﺤﺠﻢ 15 × 10ﺳﻢ ﻡﻦ ﻧﻮع ) HP Premium Plus Photo Paperورق HPﻓﺎﺥﺮ ﺟﺪًا ﻟﻠﺼﻮر( أو ) HP Premium Photo Paperورق HPﻓﺎﺥﺮ ﻟﻠﺼﻮر(. ﻟﺘﺤﻤﻴﻞ ورق ﺻﻮر ﺑﺤﺠﻢ 15 × 10ﺳﻢ ﻓﻲ ﺡﺎوﻳﺔ اﻟﺼﻮر .١ارﻓﻊ ﺡﺎویﺔ اﻹﺥﺮاج ،ﺙﻢ اﺳﺤﺐ ﺡﺎویﺔ اﻟﺼﻮر ﻟﻠﺨﺎرج.
اﻟﻔﺼﻞ ٣ أﺥﺮج اﻟﻮرق اﻟﻤﻄﺒﻮع ﻡﻦ ﺡﺎویﺔ اﻹﺥﺮاج ﺏﺼﻮرة ﻡﺘﻜﺮرة. ﻡﺴﺘﻮ ﻓﻲ آﻴﺲ یﻤﻜﻦ إﻋﺎدة إﺡﻜﺎم إﻏﻼﻗﻪ. ٍ اﻡﻨﻊ ﺕﺠﻌﺪ اﻟﻮرق أو ﺙﻨﻴﻪ ﺏﺘﺨﺰیﻦ ﺟﻤﻴﻊ اﻟﻮرق ﻏﻴﺮ اﻟﻤﺴﺘﺨﺪم ﺏﺸﻜﻞ ﻡﺴﺘﻮ وأن اﻟﺤﻮاف ﻟﻢ یﺘﻢ ﺙﻨﻴﻬﺎ أو ﺕﻤﺰیﻘﻬﺎ. ٍ ﺕﺄآﺪ ﻡﻦ أن اﻷوراق اﻟﺘﻲ ﺕﻢ ﺕﺤﻤﻴﻠﻬﺎ ﻓﻲ ﺡﺎویﺔ اﻹدﺥﺎل ﻓﻲ وﺿﻊ إذا آﻨﺖ ﺕﻘﻮم ﺏﻄﺒﺎﻋﺔ ﻡﻠﺼﻘﺎت ،ﻓﺘﺄآﺪ ﻡﻦ أن ﻋﻤﺮ ورق اﻟﻤﻠﺼﻘﺎت ﻻ یﺘﺠﺎوز ﻋﺎﻡﻴﻦ .ﻗﺪ یﻘﺸﺮ ورق اﻟﻌﻨﺎویﻦ ﻋﻠﻰ اﻟﻮرق اﻟﻘﺪیﻢ ﻋﻨﺪﻡﺎ یﺘﻢ ﺳﺤﺐ اﻟﻮرق ﻡﻦ ﺥﻼل ،HP All-in-Oneﻡﻤﺎ ﻗﺪ یﺴﺒﺐ اﻧﺤﺸﺎر اﻟﻮرق.
ﻋﺮﺑﻲ .٣اﺿﻐﻂ ﻋﻠﻰ ﺡﺘﻰ ﺕﻤﻴﻴﺰ ) Viewﻋﺮض( ,ﺙﻢ اﺿﻐﻂ ﻋﻠﻰ ﻡﻮاﻓﻖ. ﺳﺘﻈﻬﺮ ﺷﺎﺷﺔ ) View Photosﻋﺮض ﺻﻮر(. .٤اﺿﻐﻂ ﻋﻠﻰ أو ﻋﻠﻰ ﻟﻠﺘﻤﺮیﺮ ﻋﺒﺮ اﻟﺼﻮر اﻟﻤﺼﻐﺮة اﻟﺨﺎﺹﺔ ﺏﺼﻮرك. .٥ﻋﻨﺪ ﺕﻤﻴﻴﺰ اﻟﺼﻮرة اﻟﻤﺼﻐﺮة ﻟﻠﺼﻮرة اﻟﺘﻲ ﺕﺮﻏﺐ ﻓﻲ ﻋﺮﺿﻬﺎ ،اﺿﻐﻂ ﻋﻠﻰ ﻡﻮاﻓﻖ. .٦ﻋﻨﺪ ﻇﻬﻮر اﻟﺼﻮرة ﻡﻦ ﺕﻠﻘﺎء ﻧﻔﺴﻬﺎ ﻋﻠﻰ اﻟﺸﺎﺷﺔ ،اﺿﻐﻂ ﻋﻠﻰ ﻡﻮاﻓﻖ ﻡﺮة أﺥﺮى. ﺳﺘﻈﻬﺮ ﺷﺎﺷﺔ ) Photo Optionsﺥﻴﺎرات اﻟﺼﻮرة(. .٧ﻡﻊ ﺕﻤﻴﻴﺰ ) Print Previewﻡﻌﺎﻳﻨﺔ اﻟﻄﺒﺎﻋﺔ( ،اﺿﻐﻂ ﻋﻠﻰ ﻡﻮاﻓﻖ.
اﻟﻔﺼﻞ ٣ .٥اﺿﻐﻂ ﻋﻠﻰ ﻡﻮاﻓﻖ ﻟﺘﺤﺪیﺪ ﺕﻄﺒﻴﻖ اﻓﺘﺮاﺿﻲ ﻡﻦ أﺟﻞ اﺳﺘﻘﺒﺎل اﻟﻤﺴﺢ ،أو اﺿﻐﻂ ﻋﻠﻰ ﻋﻠﻰ ﻡﻮاﻓﻖ. ﺳﺘﻈﻬﺮ ﺹﻮرة ﻡﻌﺎیﻨﺔ ﻟﻠﻤﺴﺢ ﻋﻠﻰ ﺷﺎﺷﺔ اﻟﻜﻤﺒﻴﻮﺕﺮ ,هﻨﺎك یﻤﻜﻦ ﺕﺤﺮیﺮهﺎ. .٦ﻗﻢ ﺏﻌﻤﻞ أیﺔ ﺕﺤﺮیﺮات ﻟﺼﻮرة اﻟﻤﻌﺎیﻨﺔ ,ﺙﻢ اﻧﻔﺮ ﻓﻮق ) Acceptﻗﺒﻮل( ﻋﻨﺪ اﻻﻧﺘﻬﺎء. ﻟﺘﺤﺪیﺪ ﺕﻄﺒﻴﻖ ﺁﺥﺮ ،ﺙﻢ اﺿﻐﻂ ﻡﺴﺢ ﻥﺴﺨﺔ أﺻﻠﻴﺔ إﻟﻰ ﺑﻄﺎﻗﺔ ذاآﺮة یﻤﻜﻨﻚ إرﺳﺎل اﻟﺼﻮرة اﻟﻤﻤﺴﻮﺡﺔ آﺼﻮرة JPEGإﻟﻰ ﺏﻄﺎﻗﺔ اﻟﺬاآﺮة اﻟﻤﺮآﺒﺔ ﺡﺎﻟﻴًّﺎ .یﻤﻜﻨﻚ ذﻟﻚ ﻡﻦ اﺳﺘﺨﺪم ﺥﻴﺎرات ﻃﺒﺎﻋﺔ اﻟﺼﻮر ﻟﻄﺒﺎﻋﺔ ﻡﻄﺒﻮﻋﺎت ﺏﺪون ﺡﺪود وﺹﻔﺤﺎت أﻟﺒﻮم ﻡﻦ اﻟﺼﻮرة اﻟﻤﻤﺴﻮﺡﺔ.
ﻻﺳﺘﺒﺪال ﺥﺮﻃﻮﺵﺎت اﻟﺤﺒﺮ .١ﺕﺄآﺪ ﻡﻦ ﺕﺸﻐﻴﻞ ﺟﻬﺎز .HP All-in-One .٢اﻓﺘﺢ ﺏﺎب ﺥﺮﻃﻮﺷﺔ اﻟﺤﺒﺮ ﻡﻦ ﺥﻼل رﻓﻌﻪ ﻡﻦ اﻟﻤﺮآﺰ اﻷﻡﺎﻡﻲ ﻟﻠﺠﻬﺎز ﺡﺘﻰ ﺕﺜﺒﻴﺘﻪ ﻓﻲ ﻡﻜﺎﻧﻪ ﺏﺈﺡﻜﺎم. ﻋﺮﺑﻲ .٣اﺿﻐﻂ ﻋﻠﻰ أﺳﻔﻞ اﻟﻤﺰﻻج اﻟﻤﻮﺟﻮد ﺏﺄﺳﻔﻞ ﺥﺮﻃﻮﺷﺔ اﻟﺤﺒﺮ اﻟﻤﺮاد اﺳﺘﺒﺪاﻟﻬﺎ ﺙﻢ ﻗﻢ ﺏﺮﻓﻊ اﻟﻤﺰﻻج. ﻓﻲ ﺡﺎﻟﺔ اﺳﺘﺒﺪال ﺥﺮﻃﻮﺷﺔ اﻟﺤﺒﺮ اﻷﺳﻮد ,ارﻓﻊ اﻟﻤﺰﻻج ﻓﻲ أﻗﺼﻰ اﻟﺠﺎﻧﺐ اﻷیﺴﺮ.
اﻟﻔﺼﻞ ٣ ﻋﺮﺑﻲ .٥ﻗﻢ ﺏﺈزاﻟﺔ ﺥﺮﻃﻮﺷﺔ اﻟﺤﺒﺮ اﻟﺠﺪیﺪة ﻡﻦ ﻋﺒﻮﺕﻬﺎ ,ﺙﻢ اﺡﻤﻠﻬﺎ ﻡﻦ ﻡﻘﺒﻀﻬﺎ ,وادﻓﻊ ﺥﺮﻃﻮﺷﺔ اﻟﺤﺒﺮ إﻟﻰ اﻟﻔﺘﺤﺔ اﻟﻔﺎرﻏﺔ. ﻗﻢ ﺏﺘﻮﻓﻴﻖ اﻟﻠﻮن وﻧﻤﻮذج ﺥﺮﻃﻮﺷﺔ اﻟﺤﺒﺮ ﻡﻊ اﻟﻠﻮن واﻟﻨﻤﻮذج اﻟﻤﻮﺟﻮدیﻦ ﻋﻠﻰ ﻋﺮﺏﺔ اﻟﻄﺒﺎﻋﺔ. .٦ﻗﻢ ﺏﺈﻏﻼق اﻟﻤﺰﻻج وﺕﺄآﺪ ﻡﻦ إﻏﻼﻗﻪ ﺏﺈﺡﻜﺎم. .٧آﺮر ﺥﻄﻮات 3إﻟﻰ 6ﻟﻜﻞ ﻡﻦ ﺥﺮﻃﻮﺷﺎت اﻟﺤﺒﺮ اﻟﺘﻲ ﺕﻘﻮم ﺏﺎﺳﺘﺒﺪاﻟﻬﺎ. .٨أﻏﻠﻖ ﺏﺎب ﺥﺮﻃﻮﺷﺔ اﻟﺤﺒﺮ.
ﺕﻨﻈﻴﻒ HP All-in-One ﻋﺮﺑﻲ ﻟﻠﺘﺄآﺪ ﻡﻦ ﺏﻘﺎء ﻧﺴﺨﻚ وﻡﺴﺘﻨﺪاﺕﻚ اﻟﻤﻤﺴﻮﺡﺔ واﺿﺤﺔ ،ﻗﺪ ﺕﺤﺘﺎج أﺡﻴﺎﻧًﺎ إﻟﻰ ﺕﻨﻈﻴﻒ اﻟﺴﻄﺢ اﻟﺰﺟﺎﺟﻲ واﻟﻐﻄﺎء .ﻗﺪ ﺕﺮﻏﺐ ﻓﻲ ﺕﻨﻈﻴﻒ اﻟﻐﺒﺎر ﻡﻦ اﻟﺠﺰء اﻟﺨﺎرﺟﻲ ﻟـ.HP All-in-One ﺕﻠﻤﻴﺢ یﻤﻜﻨﻚ ﺷﺮاء ﻡﺠﻤﻮﻋﺔ أدوات اﻟﺘﻨﻈﻴﻒ ﻟـ (HP Cleaning Kit) HPﻟﻄﺎﺏﻌﺎت Inkjet Printers و (Q6260A) All-in-Onesواﻟﺘﻲ ﺕﻮﻓﺮ آﻞ اﻷدوات اﻟﻤﻄﻠﻮﺏﺔ ﻟﺘﻨﻈﻴﻒ ﺟﻬﺎز HPﺏﺄﻡﺎن .ﻟﻤﺰیﺪ ﻡﻦ اﻟﻤﻌﻠﻮﻡﺎت، اﻧﺘﻘﻞ إﻟﻰ.www.shopping.hp.
٤ اﺡﻞ اﻟﻤﺸﻜﻼت واﻟﺪﻋﻢ یﺤﺘﻮي هﺬا اﻟﻔﺼﻞ ﻋﻠﻰ ﻡﻌﻠﻮﻡﺎت ﺡﻞ اﻟﻤﺸﻜﻼت ﺏﺎﻟﻨﺴﺒﺔ ﻟﺠﻬﺎز .HP All-in-Oneﺕﺘﻮﻓﺮ ﻡﻌﻠﻮﻡﺎت ﻡﺤﺪدة ﺡﻮل ﻗﻀﺎیﺎ اﻟﺘﺜﺒﻴﺖ واﻟﺘﻜﻮیﻦ وﺏﻌﺾ ﻡﻮاﺿﻴﻊ اﻟﺘﺸﻐﻴﻞ .ﻟﻠﻤﺰیﺪ ﻡﻦ اﻟﻤﻌﻠﻮﻡﺎت ﺡﻮل ﺡﻞ اﻟﻤﺸﻜﻼت ،راﺟﻊ اﻟﺘﻌﻠﻴﻤﺎت اﻟﻈﺎهﺮة ﻋﻠﻰ اﻟﺸﺎﺷﺔ اﻟﻤﺰودة ﻡﻊ اﻟﺒﺮﻧﺎﻡﺞ اﻟﺨﺎص ﺏﻚ. أیﻀﺎ ﻡﻌﻠﻮﻡﺎت اﻟﻀﻤﺎن واﻟﺪﻋﻢ .ﻟﻠﺤﺼﻮل ﻋﻠﻰ ﻡﻌﻠﻮﻡﺎت ﺡﻮل ﻡﺮاﺟﻌﺔ اﻟﺪﻋﻢ ,راﺟﻊ اﻟﺠﺰء اﻟﺪاﺥﻠﻲ ﻟﻠﻐﻄﺎء اﻟﺨﻠﻔﻲ ﻡﻦ یﻮﺿﺢ هﺬا اﻟﻔﺼﻞ ً هﺬا اﻟﺪﻟﻴﻞ.
ﻋﺮﺑﻲ • • • ١ ﺕﻮﺹﻴﻞ اﻟﻄﺎﻗﺔ ٢ ﺳﻠﻚ اﻟﻄﺎﻗﺔ واﻟﻤﺤﻮل ٣ ﻡﺄﺥﺬ ﻃﺎﻗﺔ ﻡﺆرض إذا آﻨﺖ ﺕﺴﺘﺨﺪم ﻗﻄﺎع آﻬﺮﺏﺎء ،ﻓﺘﺄآﺪ ﻡﻦ أﻧﻪ ﻗﻴﺪ اﻟﺘﺸﻐﻴﻞ .أو ,ﺡﺎول ﺕﻮﺹﻴﻞ HP All-in-Oneﻡﺒﺎﺷﺮ ًة ﺏﻤﺄﺥﺬ ﻃﺎﻗﺔ ﻡﺆرض. ﻼ ﺏﺎﻟﻄﺎﻗﺔ أم ﻻ .إذا اﺥﺘﺒﺮ ﻡﺄﺥﺬ اﻟﻄﺎﻗﺔ ﺡﺘﻰ ﺕﺘﺄآﺪ أﻧﻪ یﻌﻤﻞ .ﻗﻢ ﺏﺘﻮﺹﻴﻞ ﺟﻬﺎز ﺕﻌﺮف أﻧﻪ یﻌﻤﻞ ،وﺕﺤﻘﻖ ﻡﻤﺎ إذا آﺎن اﻟﺠﻬﺎز ﻡﺘﺼ ً ﻼ ﺏﺎﻟﻄﺎﻗﺔ ،ﻓﺮﺏﻤﺎ ﺕﻜﻮن هﻨﺎك ﻡﺸﻜﻠﺔ ﻡﺘﻌﻠﻘﺔ ﺏﻤﺄﺥﺬ اﻟﻄﺎﻗﺔ. ﻟﻢ یﻜﻦ ﻡﺘﺼ ً إذا ﻗﻤﺖ ﺏﺘﻮﺹﻴﻞ HP All-in-Oneﺏﻤﺄﺥﺬ ﻡﺒﺪّل ،ﻓﺘﺄآﺪ ﻡﻦ ﺕﺸﻐﻴﻞ اﻟﻤﻔﺘﺎح .
ﻋﺮﺑﻲ اﻟﻔﺼﻞ ٤ ﻟﻠﻤﺰیﺪ ﻡﻦ اﻟﻤﻌﻠﻮﻡﺎت ﺡﻮل ﺕﺜﺒﻴﺖ اﻟﺒﺮﻧﺎﻡﺞ وﺕﻮﺹﻴﻞ آﺎﺏﻞ ,USBراﺟﻊ دﻟﻴﻞ اﻹﻋﺪاد اﻟﻤﺰود ﻡﻊ ﺟﻬﺎز .HP All-in-One ﺟﻬﺎز HP All-in-Oneﻻ ﻳﻘﻮم ﺑﻌﻤﻠﻴﺔ اﻟﻄﺒﺎﻋﺔ اﻟﺤﻞ :إذا آﺎن ﺟﻬﺎز HP All-in-Oneواﻟﻜﻤﺒﻴﻮﺕﺮ ﻏﻴﺮ ﻡﺘﺼﻠﻴﻦ ﻡﻊ ﺏﻌﻀﻬﻤﺎ اﻟﺒﻌﺾ ،ﻓﺤﺎول اﻟﻘﻴﺎم ﺏﻤﺎ یﻠﻲ: اﻧﻈﺮ إﻟﻰ ﻡﺼﺒﺎح ) Onﺕﺸﻐﻴﻞ( اﻟﻤﻮﺟﻮد ﻓﻲ اﻟﺠﺰء اﻷﻡﺎﻡﻲ ﻡﻦ .HP All-in-Oneإذا آﺎن ﻏﻴﺮ ﻡﻀﺎء ,ﻓﻴﺸﻴﺮ ذﻟﻚ إﻟﻰ • إیﻘﺎف ﺕﺸﻐﻴﻞ ﺟﻬﺎز .HP All-in-Oneﺕﺄآﺪ ﻡﻦ ﺕﻮﺹﻴﻞ ﺳﻠﻚ اﻟﻄﺎﻗﺔ ﺏﺸﻜﻞ ﺙﺎﺏﺖ ﺏﺠﻬﺎز HP All-in-Oneوﺏﻤﻘﺒﺲ اﻟﻄﺎﻗﺔ.
ﺕﻌﺬر اﻟﻜﻤﺒﻴﻮﺕﺮ اﻟﻌﺜﻮر ﻋﻠﻰ HP All-in-One اﻟﺴﺒﺐ :اﻟﻜﺎﺏﻼت ﻟﻴﺴﺖ ﻡﺘّﺼﻠﺔ ﺏﺸﻜﻞ ﺹﺤﻴﺢ. اﻟﺤﻞ :ﻗﻢ ﺏﻔﺤﺺ اﻟﻜﺎﺏﻼت ﻟﻀﻤﺎن أﻧﻬﺎ ﻡﺘّﺼﻠﺔ ﺏﻄﺮیﻘﺔ ﺳﻠﻴﻤﺔ. اﻟﻜﺎﺏﻼت ﺏﻴﻦ HP All-in-Oneوﺏﻴﻦ اﻟﻤﺤﻮر أو اﻟﻤﻮﺟﻪ. • اﻟﻤﻮﺟﻪ وﺏﻴﻦ اﻟﻜﻤﺒﻴﻮﺕﺮ ّ اﻟﻜﺎﺏﻼت ﺏﻴﻦ اﻟﻤﺤﻮر أو • اﻟﻜﺎﺏﻼت ﻡﻦ اﻟﻤﻮدم وإﻟﻴﻪ أو اﺕﺼﺎل HP All-in-Oneﺏﺎﻹﻧﺘﺮﻧﺖ )إذا وﺟﺪ( • اﻟﺴﺒﺐ :ﻟﻢ یﺘﻢ إﻋﺪاد ﺏﻄﺎﻗﺔ ) Local Area Networkاﻟﺸﺒﻜﺔ اﻟﻤﺤﻠﻴﺔ( اﻟﺨﺎﺹﺔ ﺏﺠﻬﺎز اﻟﻜﻤﺒﻴﻮﺕﺮ ﺏﻄﺮیﻘﺔ ﺹﺤﻴﺤﺔ. ﺕﻢ إﻋﺪاد ﺏﻄﺎﻗﺔ LANﺏﺸﻜﻞ ﺹﺤﻴﺢ.
اﻟﻔﺼﻞ ٤ اﻟﺤﻞ: ﺕﺄآّﺪ ﻡﻦ وﺟﻮد اﺕﺼﺎل ﺷﺒﻜﺔ ﻧﺸﻂ. اﻟﺸﺒﻜﺔ ﻥﺸﻂ أن اﺕّﺼﺎل ّ ﻟﻠﺘﺄآّﺪ ﻡﻦ ّ .١إذا آﺎﻧﺖ اﻻﺕّﺼﺎﻻت ﺁﻡﻨﺔ ،ﻓﻘﻢ ﺏﻔﺼﻞ اﻟﻄﺎﻗﺔ ﻋﻦ ﺟﻬﺎز ،HP All-in-Oneﺙﻢ أﻋﺪ اﻟﺘﻮﺹﻴﻞ ﺙﺎﻧﻴ ًﺔ .اﺿﻐﻂ ﻋﻠﻰ اﻟﺰر On )ﺕﺸﻐﻴﻞ( اﻟﻤﻮﺟﻮد ﻋﻠﻰ ﻟﻮﺡﺔ اﻟﺘﺤﻜﻢ ﻹیﻘﺎف ﺕﺸﻐﻴﻞ ﺟﻬﺎز ,HP All-in-Oneﺙﻢ اﺿﻐﻂ ﻋﻠﻴﻪ ﻡﺮة أﺥﺮى ﻟﺘﺸﻐﻴﻞ اﻟﺠﻬﺎز. آﺬﻟﻚ ،ﻗﻢ ﺏﻔﺼﻞ اﻟﻄﺎﻗﺔ ﻋﻦ اﻟﻤﻮﺟﻪ أو اﻟﻤﺤﻮر ﺙﻢ أﻋﺪ ﺕﻮﺹﻴﻠﻬﺎ ﺙﺎﻧﻴ ًﺔ. .٢ﻗﻢ ﺏﻔﺤﺺ اﺕﺼﺎﻻت اﻟﻜﺎﺏﻞ ﻡﻦ ﺟﻬﺎز HP All-in-Oneوإﻟﻰ اﻟﻌﺒﺎرة ,اﻟﻤﻮﺟﻪ أو اﻟﻤﺤﻮر ﻟﻀﻤﺎن آﻮن اﻻﺕﺼﺎﻻت ﺁﻡﻨﺔ.
.٣ ﻗﻢ ﺏﺴﺤﺐ اﻟﻮرق ﻡﻦ اﻻﺳﻄﻮاﻧﺎت ﺏﻠﻄﻒ. ﺕﻨﺒﻴﻪ إذا ﺕﻤﺰق اﻟﻮرق ﻋﻨﺪ إزاﻟﺘﻪ ﻡﻦ اﻻﺳﻄﻮاﻧﺎت ،ﻓﻘﻢ ﺏﺒﺤﺚ اﻻﺳﻄﻮاﻧﺎت واﻟﻌﺠﻼت ﻋﻦ ﻗﻄﻊ اﻟﻮرق اﻟﺘﻲ ﻗﺪ ﺕﻜﻮن ﻗﺪ ﺏﻘﻴﺖ داﺥﻞ اﻟﺠﻬﺎز .إذا ﻟﻢ ﺕﻘﻢ ﺏﺈزاﻟﺔ ﺟﻤﻴﻊ ﻗﻄﻊ اﻟﻮرق ﻡﻦ ،HP All-in-Oneﺳﻴﺤﺪث ،ﻋﻠﻰ اﻷرﺟﺢ ،اﻟﻤﺰیﺪ ﻡﻦ اﻧﺤﺸﺎرات اﻟﻮرق. .٤ .٥ .٦ ﻓﻲ ﺡﺎﻟﺔ ﺕﺤﺮیﺮ اﻧﺤﺸﺎر اﻟﻮرق ،اﻧﺘﻘﻞ إﻟﻰ اﻟﺨﻄﻮة رﻗﻢ .5 إذا ﺕﻌﺬر ﺕﺤﺮیﺮ اﻧﺤﺸﺎر اﻟﻮرق ،ﻗﻢ ﺏﻤﺎ یﻠﻲ: أ .اﻓﺘﺢ ﻡﻠﺤﻖ اﻟﻄﺒﺎﻋﺔ ﻋﻠﻰ اﻟﻮﺟﻬﻴﻦ ﺏﻮاﺳﻄﺔ ﺳﺤﺐ اﻟﻌﻼﻡﺎت ﻷﻋﻠﻰ. ب .أﺥﺮج اﻟﻮرق ﻡﻦ داﺥﻞ اﻟﻤﻠﺤﻖ. ج .
٥ اﻟﻤﻌﻠﻮﻡﺎت اﻟﻔﻨﻴﺔ یﺘﻨﺎول هﺬا اﻟﻘﺴﻢ اﻟﻤﻮاﺹﻔﺎت اﻟﻔﻨﻴﺔ واﻟﻤﻌﻠﻮﻡﺎت اﻟﺘﻨﻈﻴﻤﻴﺔ اﻟﺪوﻟﻴﺔ ﻟﺠﻬﺎز .HP All-in-One ﻡﺘﻄﻠﺒﺎت اﻟﻨﻈﺎم ﻡﺘﻄﻠﺒﺎت ﺏﺮﻧﺎﻡﺞ اﻟﻨﻈﺎم ﻡﻮﺟﻮدة ﻓﻲ ﻡﻠﻒ .Readme ﻡﻮاﺻﻔﺎت اﻟﻤﻨﺘﺞ ﻟﻠﺤﺼﻮل ﻋﻠﻰ ﻡﻮاﺹﻔﺎت اﻟﻤﻨﺘﺞ ,زر ﻡﻮﻗﻊ اﻟﻮیﺐ ﻟـ HPﻋﻠﻰ .www.hp.
اﻹﺵﻌﺎرات اﻟﺘﻨﻈﻴﻤﻴﺔ یﻔﻲ ﺟﻬﺎز HP All&nbhy;in&nbhy;Oneﺏﻤﺘﻄﻠﺒﺎت اﻟﻤﻨﺘﺞ ﻡﻦ اﻟﻮآﺎﻻت اﻟﺘﻨﻈﻴﻤﻴﺔ ﻓﻲ اﻟﺒﻠﺪ/اﻟﻤﻨﻄﻘﺔ اﻟﺘﻲ ﺕﻘﻴﻢ ﻓﻴﻬﺎ .ﻟﻠﺤﺼﻮل ﻋﻠﻰ ﻗﺎﺋﻤﺔ آﺎﻡﻠﺔ ﻟﻺﺷﻌﺎرات اﻟﺘﻨﻈﻴﻤﻴﺔ ,راﺟﻊ اﻟﺘﻌﻠﻴﻤﺎت اﻟﻈﺎهﺮة ﻋﻠﻰ اﻟﺸﺎﺷﺔ. رﻗﻢ ﺕﻌﺮﻳﻒ ﻃﺮاز ﺕﻨﻈﻴﻤﻲ ﻷﻏﺮاض اﻟﺘﻌﺮیﻒ اﻟﺘﻨﻈﻴﻤﻲ ,ﺕﻢ ﺕﻌﻴﻴﻦ رﻗﻢ ﺕﻨﻈﻴﻤﻲ ﻟﻠﻄﺮاز .اﻟﺮﻗﻢ اﻟﺘﻨﻈﻴﻤﻲ ﻟﻠﻄﺮاز اﻟﺬي یﺨﺺ ﺏﻤﻨﺘﺠﻚ هﻮ .SDGOB-0714ﺟﺐ ﻋﺪم اﻟﺨﻠﻂ ﺏﻴﻦ هﺬا اﻟﺮﻗﻢ اﻟﺘﻨﻈﻴﻤﻲ واﺳﻢ اﻟﺘﺴﻮیﻖ ) ,HP Photosmart C6200 All-in-One seriesإﻟﺦ( أو أرﻗﺎم اﻟﻤﻨﺘﺞ ),CC985A إﻟﺦ(.
اﻟﻔﺼﻞ ٥ اﻟﻀﻤﺎن ﻣﺪﺓ ﺍﻟﻀﻤﺎﻥ ﻣﺤﺪﻭﺩ ﻣﻨﺘﺞ HP ًﺎ ﺝﻡﺍﺭﺏﻝﺍ ﻁﺉﺍﺱﻭ ً. ُ ﺍﻟﻤﻠﺤﻘﺎﺕ ﻋﺎﻡ ﻭﺍﺣﺪ ﺃ -ﺣﺪﻭﺩ ﺍﻟﻀﻤﺎﻥ ﺍﻟﻤﺤﺪﻭﺩ ُ HP HP HP ﻋﺮﺑﻲ -١ﺗﻀﻤﻦ ﺷﺮﻛﺔ Hewlett-Packard HP ً ً ﻓﻲ ﺍﻟﺨﺎﻣﺔ ﺃﻭ ﻓﻲ ًﺎ ﻣﻦ ﺍﻷﺧﻄﺎء. HP HP؛ ﺃﻭ -٤ﺑﺎﻟﻨﺴﺒﺔ ﻟﻤﻨﺘﺠﺎﺕ HP HP ﺍ HP HP HPﺑﺘﺤ -٥ﺇﺫﺍ ﺗﻠﻘﺖ ﺷﺮﻛﺔ HP ً HP -٦ﺇﺫﺍ ﺗﻌﺬﺭ ﻋﻠﻰ ﺷﺮﻛﺔ HP HP .
ﻋﺮﺑﻲ ٣٠ اﻟﻀﻤﺎن