English HP SureStore CDWriter Plus User’s Guide Hewlett-Packard Company, 800 S. Taft Ave., Loveland, CO 80537 C4415-XXXX Copyright 1999. Hewlett-Packard Company. All rights reserved. Hewlett-Packard is a registered trademark of the Hewlett-Packard Company. Microsoft and Windows are U.S. registered trademarks of Microsoft Corporation. Pentium is a U.S. registered trademark of Intel Corp.
English-2 Product Certifications UL, cUL, TÜV, CE, C-Tick, meets or exceeds FCC Class B Requirements Laser: CDRH Laser Safety This unit employs a laser. Do not remove the cover or attempt to service this device when connected due to the possibility of eye damage. Laser-Sicherheit In das Gerät ist ein Laser eingebaut. Nehmen Sie die Abdeckung nicht ab und versuchen Sie nicht, das Gerät zu reparieren, solange es angeschlossen ist. Es besteht die Gefahr einer Augenverletzung.
English-3 WARNING: This equipment has been tested and found to comply with the limits for a Class B digital device, pursuant to Part 15 of the FCC Rules. These limits are designed to provide reasonable protection against harmful interference in a residential installation. This equipment generates, uses and can radiate radio frequency energy and, if not installed and used in accordance with the instructions, may cause harmful interference to radio communications.
English-4 FCC Declaration of Conformity According to 47CFR, Parts 2 and 15, Class B Computer Peripherals: This device complies with Part 15 of the FCC Rules. Operation is subject to the following two conditions: (1) this device may not cause harmful interference (2) this device must accept any interference received including interference that may cause undesired operations. This applies to all product options. Hewlett-Packard Company Colorado Memory Systems Division 800 S. Taft Ave.
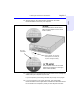
Installing CD-Writer Plus and Software English-5 1. Insert the CD labeled Software Disc 1 into your CD-ROM drive (not the CD-Writer Plus drive). The main menu appears. If it does not appear automatically run SETUP from the installation disc. 2. Watch the installation video (about 6 minutes) by clicking on the Watch Installation Video icon. 3. Get installation recommendations using the Install Assistant that came on your installation disc.
English-6 Installing CD-Writer Plus and Software 5. When the CD-Writer Plus Install Recommendation screen appears, click Print. Or, if you don’t have a printer, copy the information by hand. You’ll need this information in the next section. 6. If you are replacing the CD-ROM drive, remove Software Disc 1 from your CD-ROM drive. 7. After getting the Install Recommendation, you must shut down your computer when prompted, and turn off your computer, monitor, and connected devices.
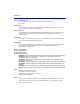
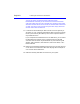
Installing CD-Writer Plus and Software English-7 Slave Check the back of the new drive and make sure the jumper is on the center location (Slave). Don’t use Cable Select This is a jumper. You can pull it off and place it on another pair of pins to change the setting. or Master Check the back of the new drive and make sure the jumper is on the righthand location (Master). 15. Insert the drive into the selected drive bay. Be careful not to dislodge any cables inside your computer as you do this.
English-8 Installing CD-Writer Plus and Software TIP: (For two devices connected to the data cable) If the Install Recommendation states that your CD-Writer Plus drive will share the data cable with another device (such as a CD-ROM drive), follow the cable already attached to the other device to the circuit board to locate the IDE controller that you need. If you find an extra connector along that cable, simply attach that connector to the CD-Writer Plus drive. 17.
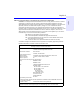
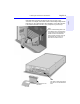
Installing CD-Writer Plus and Software English-9 PIN-1 Look for a label identifying PIN-1 next to the IDE connector. The data cable’s colored edge is aligned with PIN-1 of the IDE connector. This illustration shows a specific computer. Yours may look different. PIN-1 could be on either side of the IDE connector. colored stripe on the data cable Colored stripe on the data cable PIN-1 The cable’s colored edge is aligne with PIN-1 on the CD-Writer Plus drive.
English-10 Installing CD-Writer Plus and Software Two Devices One Device The OPTIONAL data cable that came with the CD-Writer Plus drive is only used if there is no cable already attached to the recommended IDE controller in your computer, or the cable supplied with your computer is not long enough. Use the connectors at the two ends of the cable. Attach the CD-Writer Plus to whichever connector is not in use (center or end) on the data cable already installed in your computer (DO NOT swap connectors).
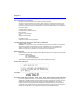
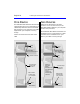
English-11 Installing CD-Writer Plus and Software Power cable Red, yellow, and black wires Beveled edge 21. Plug the power cable into the back of the drive, with the beveled edge up. Beveled edge up 22. To listen to music through computer speakers, attach an audio cable with an MPC-2 connector. You do not need an audio cable to record music. The audio cable is used only for listening to music CDs through your computer’s sound system.
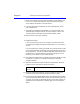
English-12 Installing CD-Writer Plus and Software If your computer uses rails or mounting brackets you may not need screws to secure the rails in the bay. 3 Use all four screws 4 1 2 24. Replace your computer's cover. 25. Plug your computer, monitor, and other devices into a wall outlet or power strip, and turn ON your computer. 26. Insert Disc 1 into either the CD-ROM drive or the CD-Writer Plus. The CD-Writer Plus software will make sure that it is communicating properly. 27.
Installing CD-Writer Plus and Software ■ Turn off and unplug your computer. Double-check each connector on the data cable and power cables. Straighten bent pins. Make sure all pins are covered and the cable’s colored stripe lines up with PIN-1 of each connector. If you changed the order of the data cable’s connectors on an IDE device to make make room for your CD Writer, replace the connector that was originally on the device and attach the CD-Write to a free connector.
English-14 Installing CD-Writer Plus and Software ■ connector. The other device may be jumpered to Cable-select rather than Master or Slave. If this is true, the location of the data-cable connector (middle/end) is very important. Did you follow the Install Recommendation’s instructions for determining the jumper setting on page 5? For Sony and Goldstar CD-ROMs, try configuring the CD-Writer Plus as Master and the CD-ROM as Slave. Error message when I double-click on the CD-Writer Plus icon.
Installing CD-Writer Plus and Software English-15 The following table is a brief summary of which CD drives can read discs created with certain application/media combinations. Application used to make a CD DirectCD Type of CD used Drives that can read the CD CD-RW MultiRead CD-ROM with UDF reader Windows 95, 98, and NT 4.0 CD-R (closed) *Most CD-ROMs Windows 95, 98, and NT 4.
English-16 Installing CD-Writer Plus and Software HP Customer Support Your local reseller has the latest information regarding HP products and services. If your reseller is not able to help, you can obtain support from HP directly either through free 24-hours/day interactive electronic services or by telephone (free during warranty). To get help with the software that came with CD-Writer Plus, call the appropriate number listed below (free during warranty). America Online . . . . . . . . . . . . . . . .
Installing CD-Writer Plus and Software English-17 HP SureStore CD-Writer Plus Drive DURATION OF LIMITED WARRANTY Hardware - 1 year Software - 90 days 1. HP warrants to you, the end-user customer, that HP hardware, accessories and supplies will be free from defects in materials and workmanship after the date of purchase, for the period specified above. If HP receives notice of such defects during the warranty period, HP will, at its option, either repair or replace products which prove to be defective.
English-18 Installing CD-Writer Plus and Software