
HP Color LaserJet CP5220 Series - Software Technical Reference
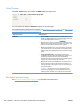
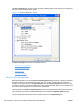
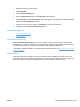

Figure 4-32 HP Font Installer dialog box
Topics:
●
Installing external fonts
●
Removing external fonts
Installing external fonts
Follow these steps to install external fonts.
1. Click Start.
2. Select Settings.
3. Click Printers (Microsoft Windows 2000) or Printers and Faxes (Microsoft Windows XP
Professional and Windows Server 2003) or Printers and Other Hardware Devices (Microsoft
Windows XP Home) or Hardware and Sound (Windows Vista).
4. Right-click the name of the product.
5. Click Properties.
6. Click the Device Settings tab.
7. Click the External Fonts option. The Properties button appears.
8. Click Properties. The HP Font Installer dialog box appears.
9. Type the name and path of the font metric file in the Printer Font File Location text box, or click
Browse to locate the file on the computer. The font file names appear in the Font(s) to be
Added window.
10. Select the fonts to add, and then click Add. The fonts are installed and the file names appear in
the Installed Font(s) window.
11. Click OK to close the HP Font Installer dialog box.
Removing external fonts
1. Click Start.
2. Select Settings.
3. Click Printers (Microsoft Windows 2000) or Printers and Faxes (Microsoft Windows XP
Professional and Windows Server 2003) or Printers and Other Hardware Devices (Microsoft
Windows XP Home) or Hardware and Sound (Windows Vista).
208 Chapter 4 HP PCL 6 print driver and HP UPD PS for Windows ENWW