
HP Color LaserJet CP5220 Series - Software Technical Reference

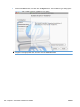


If you are using the IP Printing method, carry out the following steps:
a. Click the IP Printer tab.
b. Choose HP Jet Direct – Socket from the Protocol pull-down menu. This is the recommended
setting for HP products.
c. Follow these steps to print the configuration pages.
Print a configuration page
i. Press the OK button to open the menus.
ii. Use the arrow buttons to select the Reports menu, and then press the OK button.
iii. Use the arrow buttons to navigate the Configuration Report menu item, and then press
the OK button to print a report.
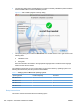
d. On the first configuration page, under IPv4, find the IP Address. Type this address into the
Address field on the add printer screen.
e. The Name, Location, and Print Using information will automatically be filled in. If the product
PPD does not appear in the Print Using field, turn the computer off and then on again and
restart the setup process.
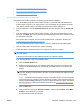
6. Select the product and click Add. The Installable Options screen appears.
7. In the Optional Trays: drop-down menu, select the trays that are installed on the product.
8. In the Collation in Printer: drop-down menu, select the amount of memory and hard disk
combination that is installed in the product:
9. If the product has a hard disk, select Installed from the Printer Hard Disk drop-down menu.
10. If the product has a duplex unit, select the Duplex Unit check box.
11. In the Accessory Output Bins: drop-down menu, select the output bins that are installed on the
product.
12. In the Paper Matching: drop-down menu, select one of the following options:
●
Prompt User for correct size
●
Nearest Size & Scale
●
Nearest Size & Crop
13. After you have selected the settings in the Installable Options screen, click Continue. The product
name appears in the Printer List and the setup is complete.
Set up the product with Mac OS X v10.3 and v10.4
Complete these steps after completing the printing-system software installation.
1. If you are installing the product using a USB connection, connect the USB cable between the
product and the computer. Turn on the product. If you are installing using a network connection,
verify that the network cable is connected to the product and that the product is on.
2. In the Applications folder, open the Utilities folder, and then run the Printer Setup Utility.
226 Chapter 5 Macintosh software and utilities ENWW