LASERJET PROFESSIONAL P1560 and P1600 PRINTER SERIES/SERIE D'IMPRIMANTES PT Getting Started Guide Guide de mise en route Guía básica de instalación Guia de primeiros passos ES Lea esto primero EN FR ES www.hp.com/support/ljp1560series www.hp.
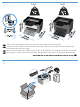
1 P1560 EN Select a sturdy, well-ventilated, dust-free area, away from direct sunlight to position the product. FR Choisissez un endroit solide, bien ventilé, dépourvu de poussière et qui ne soit pas exposé à lumière directe du soleil comme emplacement pour votre produit. ES Seleccione un área sólida, bien ventilada, sin polvo y que no esté expuesta a la luz solar directa para ubicar el producto.
2 1 2 EN Product Requirements • Power outlet • USB cable (A-to-B type USB cable that is no longer than 2 m (6.56 ft)) FR Configurations du produit • Prise d’alimentation • Câble USB (câble USB de type A à B mesurant moins de 2 m).
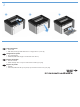
3 1 2 3 4 5 6 7 9 10 12 14 8 11 13 15 16
4 1 2 EN Connect the power cord between the product and a grounded AC outlet, and then turn on the product. Make sure your power source is adequate for the product voltage rating. The voltage rating is on the product label. The product uses either 110-127 VAC or 220-240 VAC and 50/60 Hz. Caution: To prevent damage to the product, use only the power cord that is provided with the product. FR Raccordez le cordon d’alimentation entre l’imprimante et une prise de terre, puis allumez l’imprimante.
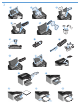
EN FR ES HP Smart Install Windows USB installation 1. Connect the USB cable between the computer and the product. The HP Smart Install program (see picture above) should start automatically within 30 seconds. Note: If HP Smart Install does not start automatically, AutoPlay might be disabled on your computer. Browse My Computer and double-click the HP Smart Install CD drive. Double-click the SISetup.exe file to run the program to install the product.
HP Smart Install 1 EN Windows network installation 1. Connect the network cable to the product, and then wait about 2 minutes for the network to assign an IP address for the product. 2. From the product control panel, press and hold the Go button , and then release it when the ready light begins blinking to print a configuration page (callout 1). This page will have an IP address in the Network Information section. 3.
HP Smart Install 1
8 EN Mac installation 1. Insert the software installation CD into the computer CD drive. Note: Connect the USB cable and turn the product on before installation. 2. In the pop-up dialog box, click the installer program. 3. Follow the onscreen instructions to install the printer driver. FR Installation Mac 1. Introduisez le CD d’installation du logiciel dans le lecteur de CD de l’ordinateur. Remarque : Raccordez le câble USB et mettez l’imprimante sous tension avant de procéder à l’installation. 2.
EN Control panel The product control panel alerts you when problems occur. If a light is blinking, check the following: • Print cartridge is installed correctly. • Paper is not jammed inside the product. • Paper is in at least one tray. • The print cartridge door is completely closed. See the electronic user guide or control panel simulator on the CD-ROM for complete information about solving problems. FR ES Panneau de commande Le panneau de commande de l’imprimante vous avertit en cas de problèmes.
www.hp.com Copyright et licence © 2010 Copyright Hewlett-Packard Development Company, L.P. La reproduction, l’adaptation ou la traduction, sans autorisation écrite préalable, sont interdites sauf dans le cadre des lois sur le copyright. Copyright and License © 2010 Copyright Hewlett-Packard Development Company, L.P. Reproduction, adaptation or translation without prior written permission is prohibited, except as allowed under the copyright laws.