LASERJET ENTERPRISE FLOW MFP M830 EL Installation Guide Guide d'installation Installationshandbuch Guida all’installazione Guía de instalación Guia d’instal·lació Vodič kroz instalaciju Průvodce instalací Installationsvejledning Installatiehandleiding Asennusopas Οδηγός εγκατάστασης ES Lea esto primero EN FR DE IT ES CA HR CS DA NL FI HU KK NO PL PT RO RU SK SL SV TR UK Telepítési útmutató Орнату нұсқаулығы Installeringsveiledning Podręcznik instalacji Guia de instalação Ghid de instalare Руководство
1 & ) EN Select a sturdy, well-ventilated, dust-free area, away from direct sunlight to position the product. FR Choisissez un support solide et un endroit propre, bien aéré et à l'abri du rayonnement direct du soleil pour placer votre produit. DE Stellen Sie das Gerät an einem stabilen, gut durchlüfteten und staubfreien Ort auf, der nicht direktem Sonnenlicht ausgesetzt ist.
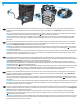
2 PP Q L PP LQ NJ OEV PP LQ CZ994A P P Q L &= $ &= $ &= $ /HD HVWR SULPH UR ZZZ KS FRP V XSSRUW PP LQ NJ OEV PP LQ 2
CZ995A CZ996A P P Q L &= $ &= $ &= $ /HD HVWR SULPH UR ZZZ KS FRP V XSSRUW PP LQ NJ OEV PP LQ CZ285A P P Q L &= $ /HD HVWR SUL PHUR ZZZ KS FRP VXSSRUW PP LQ NJ OEV PP LQ 3
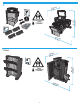
3 EN Remove all tape and packing material from outside the product. Open all doors and paper trays, and remove all tape, orange plastic tray inserts, and other packing material from inside the product. FR Retirez le ruban adhésif et les matériaux d'emballage présents à l'extérieur du produit. Ouvrez toutes les portes d'accès, ôtez tout le ruban adhésif, les inserts en plastique orange dans les bacs et tout autre matériau d'emballage à l'intérieur de l'appareil.
NO Fjern all tape og emballasje fra utsiden av produktet. Åpne alle deksler og papirskuffer, og fjern all tape, oransje plastskuffeinnsatser og annnen emballasje fra innsiden av produktet. PL Usuń wszelkie taśmy i materiały zabezpieczające z obudowy urządzenia. Otwórz wszystkie pokrywy i podajniki, usuń taśmę, pomarańczowe plastikowe wkładki w podajnikach i pozostały materiał pakunkowe z wnętrza produktu. PT Remova todas as fitas e material de embalagem de fora do produto.
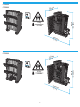
3 4 5 6 5 EN Attach the finishing accessory to the left side of the product. Follow the instructions inside the box for the finishing accessory. FR Attachez l'accessoire de finition sur le côté gauche du produit. Les instructions contenues dans la boîte vous apporteront tous les détails. DE Schließen Sie den Finisher an der linken Seite des Geräts an. Befolgen Sie die Anweisungen in der Verpackung für den Finisher. IT Collegare l'accessorio di finitura sulla parte sinistra del prodotto.
KK Түпкі өңдеу қосалқы құралын өнімнің сол жағына орнатыңыз. Түпкі өңдеу қосалқы құралы бойынша қораптың ішіндегі нұсқауларды орындаңыз. NO Fest etterbehandlingsenheten til venstre side av produktet. Følg instruksjonene i esken til etterbehandlingsenheten. PL Do lewej strony produktu podłącz akcesorium wykończeniowe. Postępuj zgodnie z instrukcjami w pudełku, aby zamontować akcesorium wykończeniowe. PT Prenda o acessório de acabamento no lado esquerdo do produto.
7 EN Connect the phone cord for fax. A country/region specific adapter for the RJ11 telephone cord may be required to connect to the telephone jack. FR Connectez le cordon de téléphone au télécopieur. Un adaptateur spécifique à votre pays/région pour le cordon de téléphone RJ11 peut être requis pour la connexion à la prise téléphonique. DE Schließen Sie das Telefonkabel für das Fax an.
8 EN Connect the power cable between the product and a grounded ac outlet. Turn on the product. On the control panel, set the language, the keyboard layout, the date/time format, and the time zone. When the Home screen appears, touch Initial Setup, and enable basic product functions. NOTE: For advanced setup for network-connected products, enter the product IP address in the address bar of a Web browser after software installation is complete.
CA Endolleu el cable d’alimentació al producte i a una presa de CA connectada a terra. Engegueu el producte. Al tauler de control, configureu l’idioma, la disposició del teclat, el format de data/hora i la zona horària. Quan aparegui la pantalla d’inici, toqueu Configuració inicial i activeu les funcions bàsiques del producte.
FI Liitä virtajohto laitteeseen ja maadoitettuun pistorasiaan. Kytke laitteeseen virta. Määritä ohjauspaneelissa kieli, näppäimistön asettelu, päivämäärän ja ajan muoto ja aikavyöhyke. Kun näyttöön tulee aloitusnäyttö, valitse Alkuasetukset ja ota käyttöön tuotteen perustoiminnot. HUOMAUTUS: Kirjoita verkkoon liitetyiden laitteiden lisäasetuksia varten laitteen IP-osoite verkkoselaimen osoitekenttään ohjelmiston asennuksen jälkeen.
PL Podłącz przewód zasilający urządzenia do uziemionego gniazdka prądu zmiennego. Włącz zasilanie urządzenia. W panelu sterowania wybierz język, układ klawiatury, format daty/godziny oraz strefę czasową. Gdy wyświetlony zostanie ekran główny dotknij opcji Konfiguracja wstępna i włącz podstawowe funkcje produktu. UWAGA: Aby uzyskać dostęp do zaawansowanych ustawień produktu związanych z siecią, po zakończeniu instalacji oprogramowania w pasku adresu przeglądarki wpisz adres IP produktu.
SL Z napajalnim kablom povežite izdelek in ozemljeno vtičnico. Vklopite izdelek. Na nadzorni plošči nastavite jezik, postavitev tipkovnice in obliko zapisa datuma/ure in časovnega pasu. Ko se prikaže začetni zaslon, se dotaknite možnosti Začetna namestitev in omogočite osnovne funkcije izdelka. OPOMBA: Za napredno nastavitev omrežnih izdelkov po končani namestitvi programske opreme vnesite naslov IP izdelka v vrstico naslova spletnega brskalnika.
9 1 2 3 4 5 6 14
7 8 9 10 EN Windows: Do not connect the USB cable until prompted during the software installation in the next step. Mac: Connect the USB cable now. FR Windows : Ne branchez pas le câble USB tant que vous n'y êtes pas invité durant l'installation du logiciel à l'étape suivante. Mac : Connectez le câble USB maintenant. DE Windows: Schließen Sie das USB-Kabel erst an, wenn Sie während der Softwareinstallation im nächsten Schritt dazu aufgefordert werden. Mac: Schließen Sie das USB-Kabel jetzt an.
CS Systém Windows: Nezapojujte kabel USB, dokud k tomu nebudete vyzváni v dalším kroku při instalaci softwaru. Systém Mac: Připojte kabel USB. DA Windows: Tilslut ikke USB-kablet, før du bliver bedt om det under softwareinstallationen i næste trin. Mac: Tilslut USB-kablet nu. NL Windows: Sluit de USB-kabel pas aan wanneer hier tijdens de software-installatie in de volgende stap om wordt gevraagd. Mac: Sluit de USB-kabel aan.
11 EN Install the product software from the CD. Follow the on-screen instructions. See the Install Notes file on the product CD for more specific software installation instructions. NOTE: For advanced setup for network-connected products, enter the product IP address in the address bar of a Web browser after software installation is complete. To find the IP address, touch the Network button on the product control panel.
CA Instal·leu el programari del producte des del CD. Seguiu les instruccions de la pantalla. Consulteu el fitxer Notes d’instal·lació que s’inclou al CD del producte per trobar instruccions de la instal·lació del programari més específiques. NOTA: Per fer la configuració avançada dels productes que es connecten a la xarxa, escriviu l’adreça IP del producte a la barra d’adreces d’un navegador web un cop hagi finalitzat la instal·lació del programari.
EL Εγκαταστήστε το λογισμικό της συσκευής από το CD. Ακολουθήστε τις οδηγίες που εμφανίζονται στην οθόνη. Για οδηγίες σχετικά με τη διαδικασία εγκατάστασης λογισμικού, ανατρέξτε στο αρχείο «Σημειώσεις εγκατάστασης» στο CD της συσκευής. ΣΗΜΕΙΩΣΗ: Για τη σύνθεση ρύθμιση συσκευών που συνδέονται σε δίκτυο, πληκτρολογήστε τη διεύθυνση IP της συσκευής στη γραμμή διεύθυνσης ενός προγράμματος περιήγησης στο web μετά την εγκατάσταση του λογισμικού.
RU Установите ПО устройства с компакт-диска. Следуйте инструкциям на экране. Более подробные инструкции по установке ПО см. на компакт-диске устройства. ПРИМЕЧАНИЕ. Для расширенной настройки подключенных к сети устройств введите IP-адрес устройства в адресную строку веббраузера после завершения установки ПО. Чтобы найти IP-адрес, коснетесь кнопки сети на панели управления устройства. Дополнительные сведения об устройстве и способах устранения неполадок см.
© Copyright 2015 HP Development Company, L.P. Copyright and License Copyright et licence Reproduction, adaptation or translation without prior written permission is prohibited, except as allowed under the copyright laws. La reproduction, l'adaptation ou la traduction de ce document sans l'autorisation écrite préalable de HP est interdite, sauf dans des conditions conformes aux lois relatives au copyright. © Copyright 2015 HP Development Company, L.P.