Technical white paper HP LaserJet Pro Devices – Installing 2048 bit SSL certificates Table of Contents Disclaimer 2 Introduction 2 Generating a Certificate Signing Request 2 The normal process 2 HP LaserJet Pro devices that support generating a 2048 bit certificate request 4 When the printer cannot generate a Certificate Request for 2048 bit certificates 5 Method 1 – Software supplied by the CA 5 Method 2 – OpenSSL 10 Obtaining a certificate from the CA 12 Installing the Certificate into the Printer
Disclaimer This document makes reference to certain products and/or services provided by third parties. These references are provided for example and demonstration purposes only and are not intended as an endorsement of any products, services, or companies.
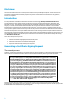
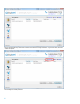
When the data is entered and the “Next” button is pressed, the printer proceeds to generate the CSR (which contains encoded versions of the information above and a “public” key). A “private key” is also generated at this time and stored away in a safe place on the user’s computer.
At this point the CRS can be saved as a file or copied directly into the online form provided by a CA. This is the best (and easiest) method to use if the printer can generate a CSR for a 2048 bit certificate. The next section will outline procedures to use when the printer can only generate a CSR for a 1024 bit certificate.
HP LaserJet Pro M401dne (firmware date code 20140521 or later required) HP LaserJet Pro M401dw (firmware date code 20140521 or later required) HP LaserJet Pro M401n (firmware date code 20140521 or later required) HP LaserJet Pro M425dn (firmware date code 20140521 or later required) HP LaserJet Pro M425dw (firmware date code 20140521 or later required) HP LaserJet Pro M435nw MFP HP Color LaserJet Pro MFP M476dn HP Color LaserJet Pro MFP M476dw HP Color LaserJet Pro MFP M47
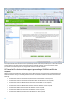
The user friendly interface provides most of the functions needed to manage certificates.
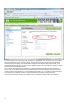
Detailed help for each topic is provided on the right hand side of the window. For a printer, choose the “SSL” certificate type and “2048” for the “Key Size”. The “Common Name” is the name that will be used to access the printer. Most often, this will be the Fully Qualified Domain Name (FQDN). This is a combination of the Host Name followed by the Domain Name. In the following example, the FQDN would be: “NPI90D02B.americas.hpqcorp.
Less often, printers are accessed using just the Host Name (e.g.: “NPI90D02B”). And, sometimes printers are accessed using the IP address (16.88.181.170 in this example). The most important factor in setting the Common Name is to make sure that it doesn’t change. If the Common Name changes, then the certificate will no longer be valid. A new certificate will need to be obtained.
The utility also stores away the private key for future reference (it will be needed after the certificate is issued). If you use this method, be sure that the program has a valid code signature and is from a reputable source. This can be done by examining the “Digital Signatures” tab of the “Properties” dialog (accessed by right-clicking the file name and selecting “Properties”).
Here are some other examples of software that can be used to generate a 2048 bit CSR http://www.trustico.com/ssltools/create/csr-pem/create-a-new-csr-instantly.php http://www.gogetssl.com/online-csr-generator/ https://certificatesssl.com/ssl-tools/csr-generator.
It can be complicated and confusing to try and figure out all the details of the command line for OpenSSL. So, DigiCert has created the ”OpenSSL CSR Wizard” which will generate the proper command line from the input provided: The command shows up in the box on the right. It can be copied and pasted into the command line. In this example, the CSR will be put into a file named: NPI90D02B_yourdomain_com.csr. The private key will be put into a file named: NPI90D02B_yourdomain_com.key.
Obtaining a certificate from the CA This step of the process the same no matter how the CSR is generated. All of the top CAs will have a page on their web site which facilitates submission.
In both cases, the CSR is copied directly to the text box provided on the page. Assuming everything goes well, the certificate will be provided by email or available for download. It will be a text file with encrypted data that the printer will use once the certificate is installed. It can take one of these three formats: 1. Cryptographic Message Syntax Standard ((.P7B, .P7R or .SPC) The PKCS #7 format supports storage of certificates and all certificates in the certification path. 2. DER-encoded binary X.
-----BEGIN CERTIFICATE----MIIGoTCCBYmgAwIBAgIQQJjbe4McCet2VULWFkhhfzANBgkqhkiG9w0BAQUFADCB njEPMA0GA1UEChMGaHAuY29tMRowGAYDVQQLExFJVCBJbmZyYXN0cnVjdHVyZTEL MAkGA1UEBhMCVVMxIDAeBgNVBAoTF0hld2xldHQtUGFja2FyZCBDb21wYW55MUAw PgYDVQQDEzdIZXdsZXR0LVBhY2thcmQgUHJpdmF0ZSBDbGFzcyAyIENlcnRpZmlj YXRpb24gQXV0aG9yaXR5MB4XDTEzMDcyNTAwMDAwMFoXDTE0MDcyNTIzNTk1OVow XTEgMB4GA1UEChQXSGV3bGV0dC1QYWNrYXJkIENvbXBhbnkxEDAOBgNVBAsUB1Nl cnZlcnMxJzAlBgNVBAMTHm5waTkwZDAyYi5hbWVypqrhcy5ocHFjb3JwLm5ldDCC ASIwDQYJKoZIhvcNAQEBBQADggEPADC
This option will not appear if the CSR was generated by one of the alternate methods. If it is visible (from a previous attempt to generate a CSR), then it will only work with the certificate which resulted from the most recent printergenerated CSR. It will not work with certificates generated by one of these alternate methods. Instead, the certificate must be converted to the “Personal Information Exchange” format (PKCS #12 , .PFX, or .
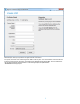
Next, provide the name of the file that contains the certificate: Select the “Finish” button when ready to import the certificate: 16
The main screen of the utility will now include the new certificate: Next, select the “Export Certificate” button on the main window of the Certificate Utility: 17
and choose “pfx file” option as shown here: The PFX format is required by the LaserJet printer.
Certificate Public key Private key These are also the three vital components that a hacker needs to circumvent the printer security. So, treat this file with great care. Always store it in a safe and secure location. A password is required to help prevent unauthorized access. Do not share this password with anyone. Provide a name and location for the .
Here are some examples of other software than can be used to create the PFX file: http://www.trustico.com/ssltools/convert/pem-to-pkcs12/convert-pem-to-pkcs12.php https://certificatesssl.com/ssl-tools/convert-certificate.html Method 2 - OpenSSL OpenSSL can also be used to create the PFX file that can be imported into the printer. Use the following command: openssl pkcs12 -export -in -inkey -out .
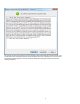
Installing the new certificate The certificate is now in a format that can be accepted by the printer.
Provide the filename for the .PFX file and the password that was used when the file was originally created. Select “Finish”.
Select “OK” to return to the main Certificates screen.
Applicable Products HP LaserJet Pro 200 color Printer M251n – CF146A HP LaserJet Pro 200 color Printer M251nw – CF147A HP TopShot LaserJet Pro M275 MFP – CF040A HP LaserJet Pro 200 color MFP M276n – CF144A HP LaserJet Pro 200 color MFP M276nw – CF145A HP LaserJet Pro 400 color Printer M451dn – CE957A HP LaserJet Pro 400 color Printer M451dn – CE957A HP LaserJet Pro 400 color Printer M451dn – CE957A HP LaserJet Pro 400 color Printer M451dw – CE958A HP LaserJet Pro 400 color Printer M451nw – CE956A HP LaserJe
HP LaserJet Pro 400 Printer M401n – CZ195A HP LaserJet Pro 400 MFP M425dn – CF286A HP LaserJet Pro 400 MFP M425dw – CF288A For more information To read more about this issue, go to: hp.com/support Call to action Please contact your HP representative or visit: hp.com/go/product hp.com/go/support Current HP driver, support, and security alerts delivered directly to your desktop © 2016 Copyright HP Development Company, L.P. The information contained herein is subject to change without notice.