
Cisco Gigabit Ethernet Switch Module for HP BladeSystem p-Class Hardware Installation Guide


Switch Installation
Cisco Gigabit Ethernet Switch Module for HP BladeSystem p-Class Hardware Installation Guide 2-13
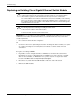
Connecting to the Console Port
NOTE: The PC or terminal must support VT100 terminal emulation. The terminal-emulation software—
frequently a PC application such as HyperTerminal or ProComm Plus—makes communication between
the switch and your PC or terminal possible.
Follow these steps to connect the PC or terminal to the switch:
1. Configure the baud rate and character format of the PC or terminal to match these
console port default characteristics:
— 9600 baud
— 8 data bits
— 1 stop bit
— No parity
— None (flow control)
After you have gained access to the switch, you can change the console baud rate through
the Administration > Console Baud Rate window in the Device Manager or CiscoWorks.
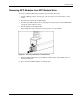
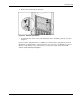
2. Using the supplied RJ-45-to-DB-9 adapter cable, insert the RJ-45 connector into the
console port.
3. Attach the DB-9 female DTE adapter of the RJ-45-to-DB-9 adapter cable to a PC, or
attach an appropriate adapter to the terminal.
4. Start the terminal-emulation program if you are using a PC or terminal.
Running POST
To run POST, follow these steps:
1. Make sure that you have started the terminal emulation software program (such as
ProComm, HyperTerminal, tip, or minicom) from your management station. See the
“Connecting to the Console Port” section for information on connecting to the switch
console port.
2. Press the Pwr/Rst button.
As the switch boots, it begins POST, a series of tests that runs automatically to ensure that the
switch functions properly. When the switch begins POST, the System, Status, Duplex, and
Speed LEDs turn green. The System LED blinks green, and the other LEDs remain solid
green.
When the POST completes successfully, the System LED remains green. The other LEDs
turn off and then reflect the switch operating status.
If a switch fails POST, the System LED turns solid amber. Contact HP. Refer to the “Where
to Go for Additional Help” section in this guide for contact information.