
Cisco Gigabit Ethernet Switch Module for HP BladeSystem p-Class Hardware Installation Guide


Configuring the Switch Using Express Setup
Running Express Setup
CAUTION: Do not connect the switch to any device other than the PC or workstation being
used to configure it. During Express Setup, the switch acts as a DHCP server and responds to
DHCP requests from the devices attached to it.
When you first set up the switch, you can use Express Setup to enter the initial IP
information. Then the switch can connect to local routers and the Internet, and you can access
the switch through the IP address for further configuration.
To run Express Setup:
1. Verify that no devices are connected to the switch. This is because during Express Setup,
the switch acts as a DHCP server. If your PC has a static IP address, then before you
begin you should change your PC settings to temporarily use DHCP.
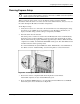
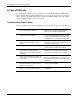
2. Insert the switch into the enclosure.
The switch powers on when it is inserted into the BladeSystem chassis and immediately
begins the power-on self-test (POST), a series of tests that runs automatically to ensure
that the switch functions properly. POST lasts approximately 2 minutes. When the POST
completes successfully, the SYST and STAT LED remain green. The other LEDs turn off
and then reflect the switch operating status.
If a switch fails POST, the System LED turns amber. If POST fails, contact HP. Refer to
the “Where to Go for Additional Help” section in this guide for contact information.
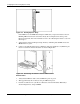
Figure E-2: Installing the Switch
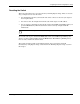
3. Wait for the switch to complete POST, which might take several minutes.
After POST completes, the Sys and Stat LEDs turn green.
4. Press and hold the Mode button for 3 seconds. When all of the LEDs next to the Mode
button turn green, release the button. See Figure E-3.
Cisco Gigabit Ethernet Switch Module for HP BladeSystem p-Class Hardware Installation Guide E-3