
Cisco Gigabit Ethernet Switch Module for HP BladeSystem p-Class Hardware Installation Guide


Configuring the Switch Using Express Setup
Managing the Switch
After completing Express Setup and installing the switch in your network, use the Device
Manager or the CLI to further configure the switch.
Using the Device Manager
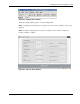
The simplest way to manage the switch is by using the Device Manager that is in the switch
memory. This is an easy-to-use web interface that offers quick configuration and monitoring.
You can access the Device Manager from anywhere in your network through a web browser.
Follow these steps:
1. Launch a web browser on your PC or workstation.
2. Enter the switch IP address in the web browser, and press Enter. The Device Manager
page appears.
3. Use the Device Manager to perform basic switch configuration and monitoring. Refer to
the Device Manager online help for more information.
Using Command-Line Interface
You can enter Cisco IOS commands and parameters through the CLI. Access the CLI either
by connecting your PC directly to the switch console port or through a Telnet session from a
remote PC or workstation.
Follow these steps for the console port connections:
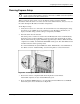
1. Connect the supplied RJ-45-to DB-9 adapter cable to the standard 9-pin serial port on the
PC. Connect the other end of the cable to the console port on the switch.
2. Start a terminal-emulation program on the PC.
3. Configure the PC terminal emulation software for 9600 baud, 8 data bits, no parity, 1 stop
bit, and no flow control.
4. Use the CLI to enter commands to configure the switch. Refer to the software
configuration guide and the command reference guide for more information.
Cisco Gigabit Ethernet Switch Module for HP BladeSystem p-Class Hardware Installation Guide E-9