
Cisco Gigabit Ethernet Switch Module for HP p-Class BladeSystem Software Configuration Guide


6-24
Cisco Gigabit Ethernet Switch Module for HP p-Class BladeSystem Software Configuration Guide
380261-003
Chapter 6 Configuring IEEE 802.1x Port-Based Authentication
Configuring IEEE 802.1x Authentication
Configuring the Switch-to-RADIUS-Server Communication
RADIUS security servers are identified by their hostname or IP address, hostname and specific UDP port
numbers, or IP address and specific UDP port numbers. The combination of the IP address and UDP port
number creates a unique identifier, which enables RADIUS requests to be sent to multiple UDP ports on
a server at the same IP address. If two different host entries on the same RADIUS server are configured
for the same service—for example, authentication—the second host entry configured acts as the
fail-over backup to the first one. The RADIUS host entries are tried in the order that they were
configured.
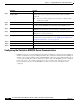
Step 5
aaa authorization network {default}
group radius
(Optional) Configure the switch to use user-RADIUS authorization for all
network-related service requests, such as per-user ACLs or VLAN
assignment.
Note For per-user ACLs, single-host mode must be configured. This
setting is the default.
Step 6
radius-server host ip-address (Optional) Specify the IP address of the RADIUS server.
Step 7
radius-server key string (Optional) Specify the authentication and encryption key used between
the switch and the RADIUS daemon running on the RADIUS server.
Step 8
interface interface-id Specify the port connected to the client that is to be enabled for
IEEE 802.1x authentication, and enter interface configuration mode.
Step 9
switchport mode access (Optional) Set the port to access mode only if you configured the
RADIUS server in Step 6 and Step 7.
Step 10
dot1x port-control auto Enable IEEE 802.1x authentication on the port.
For feature interaction information, see the “IEEE 802.1x Authentication
Configuration Guidelines” section on page 6-21.
Step 11
end Return to privileged EXEC mode.
Step 12
show dot1x Verify your entries.
Step 13
copy running-config startup-config (Optional) Save your entries in the configuration file.
Command Purpose