
Cisco Small Form-Factor Pluggable (SFP) Modules Installation Instructions


Installing and Removing SFP
Modules
The SFP module installation and removal procedures are described
in these sections:
• Installing SFP Modules
• Removing SFP Modules
CAUTION: Do not install or remove fiber-optic SFP modules with
cables attached because of the potential damage to the cables, the
cable connector, or the optical interfaces in the SFP module.
Disconnect all cables before removi
ng or installing an SFP module.
Removing and installing an SFP modul
e can shorten its useful life.
Do not remove and insert SFP modules more often than is
absolutely necessary.
Installing SFP Modules
To insert an SFP module into the module slot:
1. Attach an ESD-preventive wris
t strap to your wrist and to a
bare metal surface on the chassis.
2. Remove the dust cap and save for future use.
3. Insert the SFP module into the left or right SFP module slot and
close the SFP latch.
The orientation of an SFP module
within a switch varies according
to the SFP module port. Be sure that the SFP module is in the right
position before inserting. Refer to the diagrams below.
CAUTION: Do not remove the dust plugs
from the fiber-optic SFP
module port or the rubber caps from the fiber-optic cable until you
are ready to connect the cable. The plugs and caps protect the SFP
module ports and cables from contamination and ambient light.
Removing SFP Modules
To remove an SFP module from a module receptacle:
1. Attach an ESD-preventive wris
t strap to your wrist and to a
bare metal surface on the chassis.
2. Disconnect the cable from the SFP module.
3. For fiber-optic SFP modules, inse
rt a dust plug into the optical
ports of the SFP module to ke
ep the optical interfaces clean.
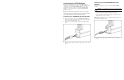
4. Unlock (1) and remove (2) the SFP module.
If the module has a bale-clasp latch, open the latch to eject the
module.
5. Grasp the SFP module between your thumb and index finger,
and carefully remove it from the module slot.
6. Place the removed SFP module
in an antistatic bag.