
Instruction Manual


• Avoid bringing synthetic m aterials such as polyester, plastic, vinyl, or styrofoam into the area
where installation is being performed because these materials carry static electricity that may
damage sensitive components.
Mounting the equipment in a rack
The H P CW DM 2-slot chassis can be mounted in a standard 19-inch cabinet or rack.
To attach the c
hassis to a standard 19-inch rack:
1. Insert t wo cage nuts on each rail.
2. Support the chassis so that all of the mounting holes in the HP CWDM 2-slot chassis are aligned with
the corresponding holes in the rack.
3. Attach two rack-mounting screws to each side of the rack.
4. Tighten all of the screws in rotation.
Inserting an d removing HP CWDM MUX modules
To insert a module:
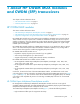
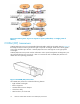
1. Align the module with the chassis shelf (Figure 11).
2. Gently push the module into the shelf cavity.
3. Tighten the captive scre ws.
Figure11InsertinganHPCWDMMUXmodule
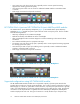
To remov
eamodule:
1. Loosen the captive screws at both sides of the m o dule.
2. Gently pull on both screws at the same time to release the module.
3. Once th
e module releases, it should slide out easily from the shelf.
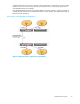
Inserting and removing CWDM (SFP) transceivers
Before inserting the CWDM (SFP) transceivers, read the following handling, safety, and environmental
guidelines:
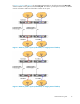
• CWDM (SFP) transceivers are static sensitive. To prevent damage from electrostatic discharge
(ESD), follow your normal board and component-handling procedures.
• CWDM (SFP) transceivers are dust sensitive. When storing a CWDM (SFP) transceiver, or when a
CWDM (SFP) transceiver is disconnected from a fiber optic cable, always keep the dust cover
over a CWDM (SFP) transceiver’s optical bores.
20
Installing HP CWDM MUX mod ules