
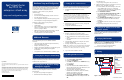
HP Proliant Cluster HA/F500 for Enterprise Virtual Array Setup and Configuration Poster

Legal Notices
© 2003 Hewlett-Packard Development Company, L.P.
Microsoft®, Windows®, and Windows NT® are U.S. registered trademarks of Microsoft
Corporation.
Hewlett-Packard Company shall not be liable for technical or editorial errors or omissions
contained herein. The information in this document is provided "as is" without warranty of
any kind and is subject to change without notice. The warranties for HP products are set
forth in the express limited warranty statements accompanying such products. Nothing
herein should be construed as constituting an additional warranty.
First Edition (May 2003)
Part Number 323455-001
hp ProLiant cluster
ha/f500 for
enterprise virtual array
setup and configuration poster
323455- 001
Hardware Setup and Configuration
This poster provides quick installation steps for the HP ProLiant
Cluster HA/F500 for Enterprise Virtual Array. Refer to the HP
ProLiant Cluster HA/F500 for Enterprise Virtual Array Setup
and Installation Guide for detailed instructions.
Verify that you have all the necessary hardware
(minimum setup):
• Two ProLiant servers
• Two Fibre Channel Adapter (FCA) cards for each server
• Two NIC cards for each server
• One StorageWorks Enterprise Virtual Array storage system
• One HP OpenView Storage Management Appliance
Verify that you have all the necessary software:
• HSV Element Manager
• SmartStart CD
• Microsoft
®
Windows
®
Server 2003, Enterprise Edition;
Windows 2000 Advanced Server; or Windows NT
®
Server 4.0, Enterprise Edition
• KGPSA NT Device Driver and Download Utility or the CD
that came with the kit for Enterprise Virtual Array
• HP StorageWorks Secure Path for Windows
Additional Resources
Refer to the following resources for detailed installation
instructions:
• HP ProLiant Cluster HA/F500 for Enterprise Virtual Array
Setup and Installation Guide
• Enterprise Virtual Array user guide
• Enterprise Virtual Array installation and configuration guide
• HP OpenView Storage Management Appliance
documentation
• StorageWorks Secure Path for Windows installation guide
1 Setting Up the Enterprise Virtual Array
Set up the Enterprise Virtual Array storage system. Refer to the
Enterprise Virtual Array hardware documentation for detailed
installation and setup instructions.
2 Setting Up the HP OpenView Storage
Management Appliance
Refer to the management appliance documentation for
detailed setup and configuration instructions. Perform the
following tasks:
1. Set up the storage management appliance.
2. Install the HSV Element Manager software.
3 Setting Up the ProLiant Servers
Refer to the server documentation and FCA documentation for
detailed installation instructions. Perform the following tasks:
1. Install the following hardware in the servers:
a. FCAs
IMPORTANT: Record the FCA ID (12-digit IEEE address) and the
server and adapter slot where the adapter is installed. This
information will be needed when configuring switch zoning and
when creating the storage system and virtual disks. Use the
worksheet in Appendix A of the HP ProLiant Cluster HA/F500 for
Enterprise Virtual Array Setup and Installation Guide to record the
information.
b. Network cards
2. Cable the fibre connections to the servers, storage, and
management appliance.
3. Set up and cable the Ethernet network.
IMPORTANT: You must have a working network to configure the
storage with the management appliance.
4. Configure the servers using the SmartStart CD.
5. Install one of the following operating systems:
a. Microsoft Windows Server 2003, Enterprise Edition
b. Microsoft Windows 2000 Advanced Server with SP2
or later
c. Microsoft Windows NT Server 4.0, Enterprise Edition
with SP6a
6. Verify that all the latest drivers and agents are loaded
using the SmartStart CD.
7. Configure the public and private network cards.
NOTE: Refer to Chapter 4 of the HP ProLiant Cluster HA/F500 for
Enterprise Virtual Array Setup and Installation Guide for detailed
information on the Microsoft Q articles on networking.
8. Log on to the network domain controller.
4 Installing FCA Device Drivers
1. Install a Generic Driver for Windows NT 4.0:
a. Select Start, Settings, Control Panel.
b. Double-click SCSI Adapters.
c. Click Add on the Drivers tab. The Add Drivers dialog
box is displayed.
d. Click Have Disk.
e. Insert either the diskette labeled KGPSA NT Device
Driver and Download Utility or the CD that came with
the kit for Enterprise Virtual Array.
f. Specify the path to the Windows NT driver:
- Diskette method—Install from \I386 on the diskette.
- CD method—Install from \driver and
firmware\driver\NT on the CD root.
g. Select Emulex LP6000/LP7000/LP8000, PCI-Fibre
Channel Adapter from the SCSI adapter list and click
OK.
h. Restart the server.
i. Repeat steps a through h for the second server.
2. Update the FCA Device Driver for Windows Server 2003,
Windows 2000, and Windows NT, and:
a. Insert the CD that came with the Enterprise kit into the
server CD-ROM drive. If autorun is enabled, the
installation program starts. Otherwise, navigate to the
root of the CD and double-click install.bat.
b. Click Install Solution Software.
c. Click Perform Fibre Channel Adapter Driver Update to
start the Driver Update Utility.When the driver
installation finishes, a menu is displayed for additional
software installation.
d. Click Install Fibre Channel Software to start the Fibre
Channel setup wizard for the additional software
installation.
e. Click Finish to restart the server when the setup wizard
completes.
f. Repeat steps a through e for the second server.
5 Setting the IP Addresses for the Fibre
Channel Switches
The IP address setting procedures must be performed on every
switch in the fabric. Refer to the switch documentation for
detailed instructions.
6 Verifying FCA Firmware
Verify that the FCA cards have the correct firmware. Run
lputilnt, which is found in WINNT\System32\, and refer to the
HA/F500 Order and Configuration Guide at
www.hp.com/servers/proliant/highavailability
for a list of the correct firmware supported.
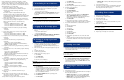
7 Zoning
Figure 1 shows a cluster cross-cable zoning configuration setup
Figure 1: Zoning Configuration
continued on reverse
Host A
Interconnect
LAN
FCA
SA
Top FC Switch
HSV Controller AFP1
FP1
FP2
FP2
HSV Controller B
Storage
Subsystem
Bottom FC Switch
S1 S2 S1 S2
FCA FCA FCA
Host B
Zoning
Top FC Switch
"Controllerzone"
SA
HSV Controller A FP1
HSV Controller B FP2
"Clusterzone"
Host A S1
Host B S1
HSV Controller A FP1
HSV Controller B FP2
Zoning
Bottom FC Switch
"Clusterzone"
Host A S2
Host B S2
HSV Controller B FP1
HSV Controller B FP2