
HP ProLiant Cluster HA/F500 for Enterprise Virtual Array Setup and Installation Guide


Managing Your ProLiant Cluster HA/F500
5. Remove all hardware devices that will be used in the new node from the node
being replaced and place them in the new node. Install all other hardware devices
in the new node.
6. If the new node is part of a rack system, place the server in the rack. Attach the
interconnect, LAN, and power cables.
IMPORTANT: Do not attach the Fibre Channel cables until the HBA drivers, Fibre
Channel software, and Secure Path software are installed.
7. Do not attach the Fibre Channel cables until the HBA drivers, Fibre Channel
software, and Secure Path software are installed.
If you are using the Microsoft operating system boot drives from the replaced node in
the new node, power on the new node and follow the steps described in the following
section.
Verifying Integration of the Replacement Node
After you have installed the replacement node and the new Microsoft operating
system boot drive (if necessary), verify integration of the replacement node into the
cluster:
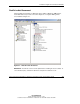
1. Start Microsoft Cluster Administrator and verify that all groups, resources, and
nodes are visible. When applicable, fail back applications and resources from the
original cluster node to the newly integrated node.
2. If you encounter problems:
a. Bring all applications offline on each node and shut down the servers.
b. Restart the servers and allow the Microsoft operating system and Microsoft
cluster software to start.
c. Use Microsoft Cluster Administrator to verify the cluster status.
d. If you still encounter problems, see Chapter 4, “Troubleshooting the ProLiant
Cluster HA/F500.”
HP ProLiant Cluster HA/F500 for Enterprise Virtual Array Setup and Installation Guide 3-13
HP CONFIDENTIAL
Writer: Bill Akers File Name: d-ch3
Codename: 49ers II Part Number: 323454-001 Last Saved On: 3/20/03 10:56 AM