
Compaq ProLiant Cluster HA/F500 for Enterprise Virtual Array Setup and Installation Guide

Managing Your ProLiant Cluster HA/F500
ProLiant Cluster HA/F500 for Enterprise Virtual Array Setup and Installation Guide 3-11
COMPAQ CONFIDENTIAL
Writer: Woody Jernigan File Name: d-ch3
Codename: 49er Part Number: 268374-002 Last Saved On: 5/28/02 3:03 PM
Before removing a shared storage system, use Microsoft Cluster Administrator to
bring offline all cluster groups and resources on both cluster nodes. This ensures that
the groups and resources are gracefully brought offline, rather than causing an abrupt
interruption of service by powering off the storage subsystem.
Adding and Configuring Physical Hard Drives
To add and configure new disk drives, see the following sections in Chapter 2:
• “Creating the Storage System and Virtual Disks”
• “Configuring Virtual Disks on the Host”
Adding a Physical Disk Resource to the Cluster
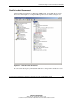
1. Open Cluster Administrator and connect to the cluster.
2. To add the disk resource to an existing group, skip to step 5. Otherwise, select
File, New, Group from the menu bar.
3. Enter a name (description is optional) for the new group. Click Next.
4. Select the preferred nodes and preference order for this group, then click Finish.
Click OK after creating the new group.
5. Select File, New, Resource.
6. Enter a name (description is optional) for the new resource.
7. Select Physical Disk for Resource Type.
8. Select the group for which you want to add the disk resource. Click Next.
9. Accept the default nodes for which the resource may be brought online.
Click Next.
10. Specify which resources you want the new disk resource to be dependent on.
Click Next.
11. Select the disk volume you want to assign to the disk resource and click Finish.
Click OK after creating the new resource.