
Clustering setup and installation guide

System Setup and Configuration
Compaq Smart Array Cluster Storage Clustering Setup and Installation Guide 3-7
COMPAQ CONFIDENTIAL
Writer: John Turner File Name: d-ch3 system setup and configuration.doc
Codename: Voyager CL+ Part Number: 272402-001 Last Saved On: 1/3/02 10:59 AM
3. Rerun the Support Paq for Windows 2000 to ensure that the latest Compaq
drivers are not overwritten by the service pack.
4. Insert the Management CD and install the management agents. Refer to the
Management CD documentation for detailed information.
Your cluster is configured. Go to “Verifying Creation of the Cluster” for the next
step.
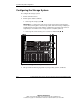
Verifying Creation of the Cluster
To verify the creation of the cluster:
1. From the desktop on either server node, select Start, Programs, Administrative
Tools, Cluster Administrator.
2. When prompted for the cluster or server name, enter the name or IP address of
one of the clustered virtual servers.
If the cluster has been created correctly, the names of both server nodes appear
on the left side of the Cluster Administrator window. Note the cluster name.
Verifying Server Node Failover
IMPORTANT: When running the failover test, start with the least complex test. Do not run any
client activity while testing failover events.
To verify failover of a server node:
1. From the desktop on each server node, select Start, Programs, Administrative
Tools, Cluster Administrator.
2. When prompted for the cluster or server name, enter the name or IP address of
one of the clustered virtual servers.
3. Check that all predefined resources and groups are online.
4. Check that the server to be powered down in the next step of this test owns some
of the resources and groups.
5. Power down one of the servers.