
Maintenance and Service Guide
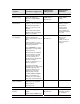


Table Of Contents
- Contents
- Introduction
- Product Information
- Removal and Replacement
- Disassembly Flowchart
- Removing the Battery
- Removing an SDRAM Module
- Removing the Wireless LAN Mini PCI Card
- Removing the Hard Disk Drive
- Recovering the Factory Software
- Replacing Small Parts
- Removing the Keyboard Cover
- Removing the Speaker Assembly
- Removing the Keyboard
- Removing the Switchboard PCA
- Removing the CD/DVD Drive
- Removing the Display Assembly
- Removing the Top Case
- Removing the Floppy Drive
- Removing the Infrared (I/R) PCA
- Removing the Audio PCA
- Removing the Heat Sink (with Fan)
- Removing the CPU Module
- Removing the RJ11/1394 Connector Module
- Removing the Motherboard
- Replacing Components on a Bottom Case
- Repairing the BIOS IC
- Removing Other Components
- Troubleshooting and Diagnostics
- Replaceable Parts
- Reference Information

3-20 Troubleshooting and Diagnostics Service Manual
Diagnostic Tools
This section describes the following diagnostic tools you can use for troubleshooting and repairing the
notebook:
• Notebook e-Diagtools diagnostic program (below)
• Power-on self-test (page 3-20)
• Sycard PCCtest 450 PC card (page 3-26)
• Windows Management Instrumentation (page 3-27)
• BIOS Setup utility (page 3-27)
e-Diagtools Diagnostic Program
The hardware diagnostic programs provide two levels of testing:
• User-level testing using a basic hardware test.
• Advanced testing using individual hardware tests.
The tests are designed to run after the system reboots, so that the notebook will be in a predictable state
during the tests. The tests are non-destructive, and are intended to preserve the state of the notebook. The
notebook reboots when you exit the program so drivers can be loaded.
Updating e-Diagtools
You can download the latest version of e-Diagtools using e-Diagtools for Windows.
Running e-Diagtools
The following procedure describes how to run e-Diagtools. The individual steps might differ slightly for
different versions of e-Diagtools.
1. Select Start > Turn Off Computer (Shut Down) or Restart.
2. When the HP logo appears, press F10 to start the diagnostic test.
The first time you run the program, you are prompted to select the language for the program.
3. When the menu appears, press F2 to run e-Diagtools.
4. When the Configuration Description appears, check the list of detected hardware.
5. Run the basic test. Press F2 to start the basic hardware test. The results appear when the test is
complete.
6. If you intend to exit without running the advanced tests, press F4 to view the Support Ticket.
Press
F3 to exit e-Diagtools.
7. Optional: run the advanced tests. Press F2 to open the advanced test screen.
8. Use the arrow keys and enter to select the test you want to run. Tests are listed only for detected
hardware.
9. Press F2 to run the selected tests and add the results to the Support Ticket.
10. After each run, press F2 to return to the advanced test screen, or press F4 to view the Support Ticket.