
Maintenance and Service Guide

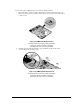
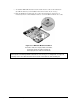

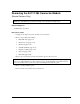
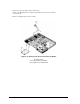

Table Of Contents
- Contents
- Introduction
- Product Information
- Removal and Replacement
- Disassembly Flowchart
- Removing the Battery
- Removing an SDRAM Module
- Removing the Wireless LAN Mini PCI Card
- Removing the Hard Disk Drive
- Recovering the Factory Software
- Replacing Small Parts
- Removing the Keyboard Cover
- Removing the Speaker Assembly
- Removing the Keyboard
- Removing the Switchboard PCA
- Removing the CD/DVD Drive
- Removing the Display Assembly
- Removing the Top Case
- Removing the Floppy Drive
- Removing the Infrared (I/R) PCA
- Removing the Audio PCA
- Removing the Heat Sink (with Fan)
- Removing the CPU Module
- Removing the RJ11/1394 Connector Module
- Removing the Motherboard
- Replacing Components on a Bottom Case
- Repairing the BIOS IC
- Removing Other Components
- Troubleshooting and Diagnostics
- Replaceable Parts
- Reference Information

Service Manual Removal and Replacement 2-43
4. On models using an AMD CPU, proceed with the following substeps:
a. Place a flat-blade screwdriver (with a 3mm blade) into the slot at the angle shown in
Figure 2-29 and move the screwdriver in the directon shown by the arrow until a Select
is felt or heard.
Figure 2-29 AMD CPU Module Release
HP Pavilion 4x00, HP Compaq nx9005 and nx9000,
Compaq Evo Notebook N1050v and N1010v,
and Compaq Presario 2100 and 1100 Models
b. Carefully grasp the CPU module bythe edges and lift the module off the socket
on the motherboard (see Figure 2-30).
Figure 2-30. AMD CPU Module Removal
HP Pavilion 4x00, HP Compaq nx9005 and nx9000,
Compaq Evo Notebook N1050v and N1010v,
and Compaq Presario 2100 and 1100 Models