
Maintenance and Service Guide
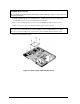
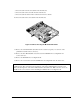


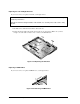
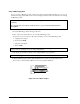
Table Of Contents
- Contents
- Introduction
- Product Information
- Removal and Replacement
- Disassembly Flowchart
- Removing the Battery
- Removing an SDRAM Module
- Removing the Wireless LAN Mini PCI Card
- Removing the Hard Disk Drive
- Recovering the Factory Software
- Replacing Small Parts
- Removing the Keyboard Cover
- Removing the Speaker Assembly
- Removing the Keyboard
- Removing the Switchboard PCA
- Removing the CD/DVD Drive
- Removing the Display Assembly
- Removing the Top Case
- Removing the Floppy Drive
- Removing the Infrared (I/R) PCA
- Removing the Audio PCA
- Removing the Heat Sink (with Fan)
- Removing the CPU Module
- Removing the RJ11/1394 Connector Module
- Removing the Motherboard
- Replacing Components on a Bottom Case
- Repairing the BIOS IC
- Removing Other Components
- Troubleshooting and Diagnostics
- Replaceable Parts
- Reference Information

Service Manual Removal and Replacement 2-55
Reassembly Notes
NOTE: After replacing the display assembly or motherboard, you must use the Service Utilities
floppy disk to reprogram the EEPROM on the motherboard for the new display.
1. Download the notebook Series service package from the Partnership Web site (see page vii),
and create a Service Utilities floppy disk as described in the package’s Readme file.
2. Plug in an AC adapter.
3. Insert the Service Utilities floppy disk in the floppy drive. If the unit has no internal floppy
drive, connect a USB floppy drive.
4. Turn on the notebook.
5. When you see the HP logo, press esc to display the boot menu, and then boot from the floppy drive.
6. Select the option to update the display/LCD identification stored on the motherboard.
If you are replacing the CPU module, you must also replace the thermal pad on the heat sink
(see page 2-41).
Wireless Models Only
• Before installing the motherboard, make sure the round coaxial cables from the antenna PCAs
are held in place by the clips in the bottom case.
• Make sure there is sufficient length to the front antenna PCA cables so they can easily be
connected to the Mini PCI card.