
Compaq Factory-Installed Operating System Software for Microsoft Windows 2000 Advanced Server on ProLiant CL380 Servers Installation Guide


22 Compaq Factory-Installed Software for Windows 2000 Advanced Server on ProLiant CL380 Servers
Compaq Confidential – Need to Know Required
Writer: Michele Richardson Project: Compaq Factory-Installed Software for Windows 2000 Advanced Server on ProLiant CL380 Servers Comments:
Part Number: 191234-003 File Name: 192134-003.doc Last Saved On: 3/12/01 11:25 AM
Verifying Server Node Failover
NOTE: When running the failover test, start with the least complex test. Do not run any
client activity while testing failover events.
Follow these steps to verify failover of a server node:
1. Select Start, Programs, Administrative Tools (Common), then
Cluster Administrator from the desktop on both server nodes.
2. Enter the name or IP address of one of the clustered virtual servers when
prompted for the cluster or server name.
3. Verify that all predefined resources and groups are online. Verify that
some of the resources and groups are owned by the server node being
powered down so that a failure event will result in a failover of
resources and groups.
4. Power down one of the server nodes.
5. Within several seconds, Cluster Administrator running on the surviving
node will bring online all of the predefined resources and groups that
were previously owned by the powered-down server node.
NOTE: This screen may not update automatically. If, after a minute, the powered-down
server node’s resources and groups do not come online, refresh the screen by pressing
the F5 key.
If the powered-down server node’s resources and groups do not come online after
refreshing the screen, refer to the operating system documentation for troubleshooting
information.
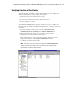
Verifying Network Client Failover
After verifying that each server node is running correctly as a part of the
cluster, use the following steps to verify that the network clients can interact
with the cluster.
1. Ensure that both server nodes are running. Use Cluster Administrator
to verify that all groups and resources are online.
2. For each hard drive in the shared storage, Cluster Server automatically
creates a cluster group that consists of a single resource, the hard drive.
Use Cluster Administrator to add an IP address as another resource to
one of these groups. (Do not use the cluster group.)
3. Save the changes and return to the main Cluster Administrator screen.