
Compaq ProLiant CL380 Software User Guide

2-8 Compaq ProLiant CL380 Software User Guide
Compaq Confidential – Need to Know Required
Writer: Linda Arnold Project: Compaq ProLiant CL380 Software User Guide Comments:
Part Number: 157839-004 File Name: c-ch2 System Setup and Configuration for Microsoft Windows 2000 Advanced Server.doc Last Saved
On: 12/14/00 8:48 AM
8. Select the desired RAID level and click Continue.
9. Click Finish.
After the system reboots, SmartStart will finish copying the system
partition to the hard drive.
10. When prompted, replace the SmartStart CD with the operating system
CD. SmartStart is no longer involved in the installation process.
11. Insert the Windows 2000 Advanced Server CD in the drive and start the
installation of the operating system by booting directly from the
operating system CD. Do not boot the system from diskettes built from
the CD.
IMPORTANT: Do not install the Cluster Service component of Microsoft Windows 2000
Advanced Server at this time. The Cluster Service component will be added on both nodes
after you configure the shared storage.
12. After installing Windows 2000 Advanced Server, install the Compaq
Support Paq for Windows 2000 located on the SmartStart and Support
Software CD. Accept all devices chosen by the Compaq Support Paq for
Windows 2000 and restart the system when the installation completes.
13. Install the CR3500 Configuration Utility located on the SmartStart and
Support Software CD and restart the system.
IMPORTANT: Do not run the CR3500 Configuration Utility at this time. You will use the
utility to configure the shared storage after the operating system has been installed on
both server nodes.
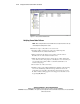
IMPORTANT: If the Found New Hardware wizard appears for the CR3500 SCSI Array
Device when the system restarts, follow these steps:
1. Click Next.
2. Choose Display a list of known drivers for this device so that I can choose a specific
driver.
3. Select Other Devices.
4. Select Unknown under Manufacturers, and select Unsupported Device under Model.
5. Click Finish.
14. Press Print Screen to access the KVM (Keyboard/Video/Mouse) switch
and choose server node 2 from the list.