
Compaq ProLiant CL380 User Guide

Installing the ProLiant CL380 Tower Model 2-7
Compaq Confidential – Need to Know Required
Writer: Marcello Frau Project: Compaq ProLiant CL380 User Guide Comments:
Part Number: 118128-003 File Name: c-ch2 Installing a Tower ProLiant CL380.doc Last Saved On: 8/28/00 4:33 PM
Installing the ProLiant CL380
Tower Model
A brief summary of the steps required to install your Compaq ProLiant CL380
follows, then more information about each of these steps is presented in
sections later in this chapter.
1. Select an appropriate site for your tower based on the information
outlined previously.
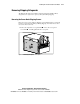
2. Unpack the system.
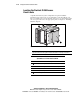
3. Remove the shipping safeguards.
a. Remove the server node shipping screws.
b. Remove the server node shipping bracket.
c. Remove the expansion board shipping bracket.
4. Install the options, such as PCI expansion boards.
IMPORTANT: Install hardware options before you run the System Configuration Utility.
The System Configuration Utility is run during the SmartStart portion of the installation
sequence.
NOTE: For detailed instructions, see Chapter 4, “Installing Hardware Options,” and
Chapter 5, “Cabling Guidelines,” or refer to the individual option kits.
5. Set the switches. These switches include:
G System board switches
G Processor switch settings
G SCSI ID switch settings. This applies only to the tape drives. Hard
drives in the ProLiant CL380 all have IDs automatically set by back
planes.
NOTE: If changes to the switch settings are required, see Appendix D, “Switches and
Jumpers.”