White Paper April 2001 13XT-0401B-WWEN Prepared by Compaq High Availability Compaq Computer Corporation Contents Pre-migration Preparation ...........3 Migration Scenario 1: HA/F100 with Windows NTS/E to HA/F100 with Windows 2000 Advanced Server................................................6 Migration Scenario 2: HA/F200 with Windows NTS/E to HA/F200 with Windows 2000 Advanced Server..............................................
Upgrading Compaq ProLiant Clusters HA/F100 and HA/F200 2 Notice ©2001 Compaq Computer Corporation.
Upgrading Compaq ProLiant Clusters HA/F100 and HA/F200 3 Pre-migration Preparation All of the procedures outlined in this chapter preserve the data on the cluster’s external storage systems. On a case-by-case basis, some of the procedures allow the cluster to be upgraded while continuing to service clients. These upgrades are called “rolling upgrades.” During these rolling upgrades, however, the cluster will be operating in a degraded state since one of the servers will be unavailable to clients.
Upgrading Compaq ProLiant Clusters HA/F100 and HA/F200 f. 4 Power on the storage, wait for the drives to spin, and then power on Node 1. IMPORTANT: These procedures may be updated over time. For additional information on migrating to Windows 2000 Advanced Server visit the Microsoft website (http://www.microsoft.com) or the Compaq High Availability website (http://www.compaq.com/highavailability).
Upgrading Compaq ProLiant Clusters HA/F100 and HA/F200 o Microsoft Windows 2000 Advanced Server o Microsoft Windows NT Server 4.
Upgrading Compaq ProLiant Clusters HA/F100 and HA/F200 Migration Scenario 1: HA/F100 with Windows NTS/E to HA/F100 with Windows 2000 Advanced Server The migration of HA/F100 with Windows NTS/E to HA/F100 with Windows 2000 Advanced Server can be performed while keeping your cluster online (a rolling upgrade) provided that the firmware levels of all RA4000 controllers are at the same level and v2.58 or later. IMPORTANT: Back up all data before beginning the migration process.
Upgrading Compaq ProLiant Clusters HA/F100 and HA/F200 2. Using Add/Remove Programs in the Control Panel, remove any cluster fixes that may be installed on node 1. 3. Run the Compaq Windows 2000 Primer Utility to remove any conflicting device drivers or applications that may cause problems during the install or operation of Windows 2000 Advanced Server. a. The Primer Utility only removes Compaq Utilities that are not compatible with Windows 2000. b.
Upgrading Compaq ProLiant Clusters HA/F100 and HA/F200 4. Apply Service Pack 6a to node 1 and reboot when prompted. 5. Upgrade Node 1 to Windows 2000 Advanced Server: a. Once the node has been rebooted: i. Insert the Windows 2000 Advanced Server CD into the CDROM drive. ii. If the Autorun feature for CDs has been turned off, select Start and then Run. iii. At the prompt type X:\Setup.exe, where “X” is the drive letter of your CD-ROM drive. iv. When asked if you want to upgrade Windows, select “Yes”.
Upgrading Compaq ProLiant Clusters HA/F100 and HA/F200 b. Select the “Upgrade to Windows 2000” option and click “Next”. c. Select the “I accept this agreement” option and click “Next”.
Upgrading Compaq ProLiant Clusters HA/F100 and HA/F200 d. During the upgrade, the Microsoft setup process will automatically restart the computer after 15 seconds or click the “Finish” button to restart manually.
Upgrading Compaq ProLiant Clusters HA/F100 and HA/F200 11 e. The upgrade process is automatic and will take some time. Please be patient. f. When the upgrade is complete, log on to the node as the administrator. 6. Install the latest Compaq drivers and server support software by running the Compaq Support Paq for Windows 2000 on Node 1: a. Insert the SmartStart CD and select “Start” and then “Run”. In the displayed dialog box, type “X:\cpqsupsw\ntcsp\setup.
Upgrading Compaq ProLiant Clusters HA/F100 and HA/F200 12 7. If DNS is not already installed, set up the DNS client on Node 1: a. Right-click “My Network Places” and click “Properties”. b. Right-click on the network connection that the clients will use to connect to the domain controller and click “Properties”. c. The Properties screen displays the current options available for the selected network card. Highlight “Internet Protocol (TCP/IP)”, and click “Properties”. d.
Upgrading Compaq ProLiant Clusters HA/F100 and HA/F200 j. 13 After the client setup is complete, select “Start”, “Shutdown”. k. From the shutdown screen, select “Log Off Administrator”, then log back into the system as the administrator (This ensures that the domain controller has properly authenticated the machine and user ID.) 8. Install Windows 2000 Advanced Server Service Pack 1 on Node 1 and reboot the system when prompted. 9.
Upgrading Compaq ProLiant Clusters HA/F100 and HA/F200 10. Migration of Node 2 Cluster d. Upgrade Node 2 by repeating steps 1 through 9 for Node 2 and then continuing with Step 11. 11. Verify the cluster by running the Compaq Cluster Verification Utility. a. Execute the startup.exe file located on the Compaq Cluster Verification Utility CD. b. Select the “Run Cluster Verification Utility” option. c. Select the “Compaq ProLiant Cluster HA/F100” option d.
Upgrading Compaq ProLiant Clusters HA/F100 and HA/F200 15 Migration Scenario 2: HA/F200 with Windows NTS/E to HA/F200 with Windows 2000 Advanced Server: The Migration of HA/F200 with Windows NTS/E to HA/F200 with Windows 2000 Advanced Server can be performed while keeping your cluster online (a rolling upgrade) provided that the firmware levels of all RA4000 controllers are at the same level and v2.58 or later. IMPORTANT: Back up all data before beginning the migration process.
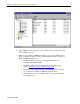
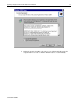
Upgrading Compaq ProLiant Clusters HA/F100 and HA/F200 1. Migration of Node 1 Cluster a. Move all of the cluster groups, including the cluster group, to Node 2 using the Cluster Administrator Utility. b. Open Cluster Administrator by clicking Start, Programs, Administrative Tools, Cluster Administrator. c. Referring to the screen shot below, right click on “Cluster Group” and select “Move Group”. d.
Upgrading Compaq ProLiant Clusters HA/F100 and HA/F200 17 b. The Primer Utility can be downloaded from the following Compaq website: http://www.compaq.com/partners/microsoft/. c. Execute the Primer Utility and click on the Cleanup button to begin the process that removes Windows 2000 non-supported utilities. d. After the Primer has run, you will be asked to reboot the node to finish the cleanup process. 4. Using Add/Remove Programs in the Control Panel, remove Compaq Redundancy Manager from node 1. 5.
Upgrading Compaq ProLiant Clusters HA/F100 and HA/F200 b. Select the “Upgrade to Windows 2000” option and click “Next” button. c. Select the “I accept this agreement” option and click “Next” button.
Upgrading Compaq ProLiant Clusters HA/F100 and HA/F200 e. During the upgrade, the Microsoft setup process will automatically restart the computer after 15 seconds or click the “Finish” button to restart manually.
Upgrading Compaq ProLiant Clusters HA/F100 and HA/F200 20 e. The upgrade process is automatic and will take some time. Please be patient. f. When the upgrade is complete, log on to the node as the administrator. 7. Install the latest Compaq drivers and server support software by running the Compaq Support Paq for Windows 2000 on Node 1: a. Insert the SmartStart CD and select “Start” and then “Run”. In the displayed dialog box, type “X:\cpqsupsw\ntcsp\setup.
Upgrading Compaq ProLiant Clusters HA/F100 and HA/F200 21 Note: After the Windows 2000 Advanced Server upgrade is complete the Cluster Service may fail to start since the DNS client for Node 1 has not been set up. The problem that occurs is an authentication error with the user account used to start the Cluster Service. The error message is expected and will be resolved after the DNS client is set up. 8. If DNS is not already installed, set up the DNS client on Node 1: a.
Upgrading Compaq ProLiant Clusters HA/F100 and HA/F200 22 m. After the client setup is complete, select Start, then select Shutdown. From the shutdown screen, select “Log Off Administrator” and log back into the system. As the administrator (This ensures that the domain controller has properly authenticated the machine and user ID.) 9. Install Windows 2000 Advanced Server Service Pack 1 on Node 1 and reboot when prompted. 10.
Upgrading Compaq ProLiant Clusters HA/F100 and HA/F200 23 11. Install Secure Path on Node 1. a. Insert the Secure Path CD to automatically start the Secure Path installation process. Alternatively, double -click the following file on the CD: “X:\SPInstall\setup.exe” where “X” is the drive letter of your CD-ROM Drive. b. During the installation, you are required to configure your clients. c. Remove the Compaq SANworks Secure Path CD from the CD-ROM Drive. d. Reboot the node when prompted.
Upgrading Compaq ProLiant Clusters HA/F100 and HA/F200 15. Install your applications, managing and monitoring software as needed. These may include Compaq Insight Manager, Compaq Insight Manager XE, Compaq Intelligent Cluster Administrator, and other applications needed on this cluster.
Upgrading Compaq ProLiant Clusters HA/F100 and HA/F200 25 Migration Scenario 3: HA/F100 with Windows 2000 Advanced Server to HA/F200 with Windows 2000 Advanced Server The Migration of HA/F100 with Windows 2000 Advanced Server to HA/F200 with Windows 2000 Advanced Server can be performed while keeping your cluster online (a rolling upgrade) provided that the firmware levels of all RA4000 controllers are at the same level and v2.58 or later.
Upgrading Compaq ProLiant Clusters HA/F100 and HA/F200 d. Repeat b & c Steps until all Resource Groups listed in the Cluster Administrator display have been moved to Node 2, called TEST2 in the sample screen shot. Note: For help on moving cluster groups, refer to the Microsoft clustering documentation that came with your operating system. 2. Install the latest Compaq drivers and server support software by running the Compaq Support Paq for Windows 2000 on Node 1: a.
Upgrading Compaq ProLiant Clusters HA/F100 and HA/F200 27 a. Shut down Node 1 and install the second host bus adapter, additional redundant RA4000 Controller(s), the additional Fibre Channel storage hub or FC-AL switch and cables as necessary.
Upgrading Compaq ProLiant Clusters HA/F100 and HA/F200 6. Install Secure Path on Node 1. a. Insert the Secure Path CD to automatically start the Secure Path installation process. Alternatively, double -click the following file on the CD: “X:\SPInstall\setup.exe” where “X” is the drive letter of your CD-ROM Drive. b. During the installation, you are required to configure your clients. c. Remove the Compaq SANworks Secure Path CD from the CD-ROM Drive. d. Reboot the node when prompted.
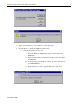
Upgrading Compaq ProLiant Clusters HA/F100 and HA/F200 e. Enter the second cluster computer name and click “add”. f. Click the “Finish” button for the Compaq Cluster Verification Utility to display your Cluster configuration verification. 9. Verify that Secure Path is running properly and that the redundant paths are operational by starting the Secure Path Manager Utility. Note: See the Secure Path documentation for details on running this program. 10.
Upgrading Compaq ProLiant Clusters HA/F100 and HA/F200 30 Migration Scenario 4: HA/F100 Windows NTS/E to HA/F200 Windows 2000 Advanced Server The migration of HA/F100 Windows NTS/E to HA/F200 Windows 2000 Advanced Server can be performed while keeping your cluster on-line (a rolling upgrade) provided that the firmware levels of all RA4000 controllers are at the same level of v2.58 or later. IMPORTANT: Back up all data before beginning the migration process.
Upgrading Compaq ProLiant Clusters HA/F100 and HA/F200 To migrate your cluster, follow these steps: 1. Migration of Node 1 in a cluster a. Move all of the cluster groups, including the cluster group, to Node 2 using the Cluster Administrator Utility. b. Open Cluster Administrator by clicking Start, Programs, Administrative Tools, Cluster Administrator. c. Referring to the screen shot below, right click on “Cluster Group” and select “Move Group”. d.
Upgrading Compaq ProLiant Clusters HA/F100 and HA/F200 a. The Primer Utility only removes Compaq Utilities that are not compatible with Windows 2000. b. The Primer Utility can be downloaded from the following Compaq website: http://www.compaq.com/partners/microsoft/. c. Execute the Primer Utility and click on the Cleanup button to begin the process that removes Windows 2000 non-supported utilities. d. After the Primer has run, you will be asked to reboot the node to finish the cleanup process. 4.
Upgrading Compaq ProLiant Clusters HA/F100 and HA/F200 b. Select the “Upgrade to Windows 2000” option and click “Next”. c. Select the “I accept this agreement” option and click “Next”.
Upgrading Compaq ProLiant Clusters HA/F100 and HA/F200 d. During the upgrade, the Microsoft setup process will automatically restart the computer after 15 seconds or click the “Finish” button to restart manually.
Upgrading Compaq ProLiant Clusters HA/F100 and HA/F200 35 e. The upgrade process is automatic and will take some time. Please be patient. f. When the upgrade is complete, log on to the node as the administrator. Note: After the Windows 2000 Advanced Server upgrade is complete the Cluster Service may fail to start since the DNS client for Node 1 has not been set up. The problem that occurs is an authentication error with the user account used to start the Cluster Service.
Upgrading Compaq ProLiant Clusters HA/F100 and HA/F200 i. 13XT-0401B-WWEN Then click on the “OK” button.
Upgrading Compaq ProLiant Clusters HA/F100 and HA/F200 j. 37 After the client setup is complete, select Start and then select Shutdown. 7. From the shutdown screen, select Log Off Administrator, then log back into the system the Administrator (This ensures that the domain controller has properly authentic ated the machine and user ID.) 8. Install the latest Compaq drivers and server support software by running the Compaq Support Paq for Windows 2000 on Node 1: a.
Upgrading Compaq ProLiant Clusters HA/F100 and HA/F200 38 current version of the driver on the node or due to a lack of hardware on the node. 9. Install Windows 2000 Service Pack 1 on Node 1 and reboot when prompted. 10. Verify that the Cluster Service has started and that Node 1 has rejoined the cluster. a. Open Cluster Administrator by clicking Start, Programs, Administrative Tools, Cluster Administrator. b. As the Cluster Administrator opens, an error may display.
Upgrading Compaq ProLiant Clusters HA/F100 and HA/F200 b. Turn on Node 1 and run the System Configuration Utility by pressing “F10” when prompted during boot. c. Verify the configuration changes to the system (a host bus adapter was added). d. Save configuration changes and reboot. 12. Add the Fibre Channel host bus adapter driver when the “Windows 2000 Found New Hardware Wizard” appears. a. Click Next on the “Found New Hardware Wizard” window b.
Upgrading Compaq ProLiant Clusters HA/F100 and HA/F200 40 d. Reboot the node when prompted. Note: For more detailed information on Secure Path, refer to the Secure Path documentation. 14. Migrating Node 2 in a cluster. a. Upgrade Node 2 by repeating steps 1 through 13 for Node 2 and then continuing with Step 15. 15. Verify the cluster by running the Compaq Cluster Verification Utility. a. Execute the startup.exe file located on the Compaq Cluster Verification Utility CD. b.
Upgrading Compaq ProLiant Clusters HA/F100 and HA/F200 17. Install your applications, managing and monitoring software as needed. These may include Compaq Insight Manager, Compaq Insight Manager XE, Compaq Intelligent Cluster Administrator, and other applications needed on this cluster.
Upgrading Compaq ProLiant Clusters HA/F100 and HA/F200 42 Migration Scenario 5: HA/F100 Windows NTS/E to HA/F200 Windows NTS/E The Migration of HA/F100 Windows NTS/E to HA/F200 Windows NTS/E cannot be performed as a rolling upgrade. The cluster must be shut down causing the cluster to be unavailable to clients during the migration. IMPORTANT: Back up all data before beginning the migration process. The basic steps to this upgrade include: 1. Upgrade the operating system drivers 2.
Upgrading Compaq ProLiant Clusters HA/F100 and HA/F200 43 c. Remove the Compaq Redundancy Manager (Fibre Channel) CD from the CDROM drive. d. Reboot the node when prompted to do so. Note: For more information about Redundancy Manager, refer to the online documentation (CPQDXCFG.HLP) on the CD. 4. Install new hardware: a. Shut down both nodes and install the second host bus adapters, additional redundant RA4000 Controllers, the additional Fibre Channel storage hub or FCAL switch and cables as necessary.
Upgrading Compaq ProLiant Clusters HA/F100 and HA/F200 d. Save configuration changes and reboot. 5. Power on the storage (wait for the drives to spin) and power on both nodes. 6. Verify the cluster by running the Compaq Cluster Verification Utility. a. Execute the startup.exe file located on the Compaq Cluster Verification Utility CD. b. Select the “Run Cluster Verification Utility” option. c. Select the “Compaq ProLiant Cluster HA/F200” option. d. Enter the first cluster computer name and click “add” e.
Upgrading Compaq ProLiant Clusters HA/F100 and HA/F200 45 Summary To summarize the migration of Compaq ProLiant Clusters HA/F100 and HA/F200 the following steps are employed in this document. • Read each migration procedure thoroughly before starting it. • Check the firmware level on each RA4000 controller including new controllers before beginning the migration procedure. • Upgrade the RA4000 Controller if necessary.