
Storage Resource Manager Enterprise Edition Installation Guide


7–6 Storage Resource Manager Enterprise Edition
Security
5. Enter the domain where the SQL Server, SRM Agents, and SRM Server will be
installed (ENGTEST2 in this example) in the Trusting Domain field.
6. Enter the password in the Initial Password field.
7. Re-enter the password in the Confirm Password field. Save this password because
you will need it during the next procedure.
8. Click OK. The Domain is now a trusting domain.
On the Trusting Domain (the domain of the SQL Server, SRM Agent and SRM Server.
In this example, ENGTEST2):
1. Go to Start > Programs > Administrative Tools > User Manager for Domains.
2. Choose Policies > Trust Relationships. The Trust Relationships dialog box
displays.
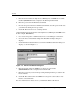
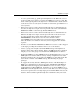
3. Click Add in the Trusted Domains section. The Add Trusted Domain dialog box
displays, as shown in Figure 7–3.
Figure 7–3: Add Trusted Domain dialog box
4. Enter the domain where the SRM Service Login Account resides
(ENGINEERING in this example) in the Domain field.
5. Enter the password you used in the preceding Trusting Domain procedure in the
Password field.
6. Click OK. The domain where the SRM Service Login Account resides is now
listed as a trusted domain.
For more information on trusts, refer to your Windows NT documentation.