TL881/TL891 Family MiniLibrary System Drive Upgrade Procedure Second Edition (July 2000) Part Number 127511-002 Compaq Computer Corporation Compaq Confidential – Need to Know Required Writer: Bob Young Project: Compaq StorageWorks TL881/TL891 Family MiniLibrary System Drive Upgrade Procedure Comments: Part Number: 127511-002 File Name: a-frnt.
Notice © 2000 Compaq Computer Corporation. Compaq, the Compaq logo, and StorageWorks Registered in U. S. Patent and Trademark Office. All other product names mentioned herein may be trademarks or registered trademarks of their respective companies. Compaq shall not be liable for technical or editorial errors or omissions contained herein. The information in this document is subject to change without notice.
Contents About This Guide Text Conventions.........................................................................................................v Symbols in Text..........................................................................................................vi Symbols on Equipment...............................................................................................vi Getting Help ...........................................................................................................
iv Compaq StorageWorks TL881/TL891 Family MiniLibrary System Drive Upgrade Procedure List of Figures Figure 1. Figure 2. Figure 3. Figure 4. Parts location .............................................................................................. 2 Removing the skin cover ............................................................................ 4 Removing the cover plate ........................................................................... 6 Drive caddy ......................................
About This Guide This guide is designed to be used as step-by-step instructions for upgrading and as a reference for future upgrades. Text Conventions This document uses the following conventions to distinguish elements of text: Keys Keys appear in boldface. A plus sign (+) between two keys indicates that they should be pressed simultaneously. USER INPUT User input appears in a different typeface and in uppercase. FILENAMES File names appear in uppercase italics.
vi Compaq StorageWorks TL881/TL891 Family MiniLibrary System Drive Upgrade Procedure Symbols in Text These symbols may be found in the text of this guide. They have the following meanings. WARNING: Text set off in this manner indicates that failure to follow directions in the warning could result in bodily harm or loss of life. CAUTION: Text set off in this manner indicates that failure to follow directions could result in damage to equipment or loss of information.
About This Guide Any surface or area of the equipment marked with these symbols indicates the presence of a hot surface or hot component. If this surface is contacted, the potential for injury exists. WARNING: To reduce the risk of injury from a hot component, allow the surface to cool before touching. Power Supplies or Systems marked with these symbols indicate the equipment is supplied by multiple sources of power.
viii Compaq StorageWorks TL881/TL891 Family MiniLibrary System Drive Upgrade Procedure In North America, call the Compaq Technical Phone Support Center at 1 1-800-OK-COMPAQ . This service is available 24 hours a day, 7 days a week. Outside North America, call the nearest Compaq Technical Support Phone Center. Telephone numbers for world wide Technical Support Centers are listed on the Compaq website. Access the Compaq website at http://www.compaq.com.
Adding a Second Drive Introduction This guide explains how to add a second tape drive to the Compaq TM StorageWorks TL881/TL891 Family MiniLibrary System . IMPORTANT: All screws that do not use lock washers, captive washers, or lock nuts must have Loctite 222 applied when parts are reassembled in the field. If you ignore this step, you might cause premature failure of the mechanism.
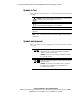
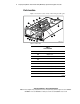
2 Compaq StorageWorks TL881/TL891 Family MiniLibrary System Drive Upgrade Procedure Parts Location Figure 1 shows the location of most of the field-replaceable parts. 5 6 4 3 2 7 1 8 9 14 13 12 11 10 SHR-1719 Figure 1.
Adding a Second Drive Table 1 Parts Location continued Figure Legend Description : AC power switch ; Control panel < Unlock/Open button and locked indicator = Magazine security lock > Leadscrew General Procedure NOTE: If the Base Module is part of an expanded TL881/TL891 Family MiniLibrary System, refer to the Compaq StorageWorks TL881/TL890/TL891 Family MiniLibrary System Maintenance and Service Guide for information on removing the Base Module from the MiniLibrary system.
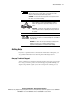
4 Compaq StorageWorks TL881/TL891 Family MiniLibrary System Drive Upgrade Procedure Removing and Replacing the Skin Cover (Desktop Models Only) The skin cover is held in place by two screws on each side of the Base Module (Figure 2). SHR-1720 Figure 2. Removing the skin cover Removing To remove the skin cover from the Base Module: 1. Remove the two screws on each side of the Base Module. 2. Grasp the cover at the lower edge of each side and then lift it straight up.
Adding a Second Drive Replacing To replace the skin cover on the Base Module: 1. Slide the skin cover over the module until it touches the front panel. 2. Insert the four screws (2 each side) through the skin cover into the Base Module. Do not tighten the screws yet. 3. Position the front edge of the skin cover so that it is flush against the back of the front panel. 4. Tighten the four screws (2 each side) into the Base Module.
6 Compaq StorageWorks TL881/TL891 Family MiniLibrary System Drive Upgrade Procedure Replacing To replace the cover plate on the Base Module: 1. Place the cover plate on the Base Module so that it overhangs one-half inch at the rear of the module (Figure 3). 2. Slide the cover plate toward the front of the Base Module until the cover plate touches the front panel. 3. Tighten the captive screw in the center of the cover plate. 4. Connect the power and interface cables at the rear of the module. 5.
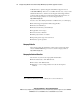
Adding a Second Drive Removing To remove the drive caddy assembly from the Base Module: 1. Remove the cover plate as described in “Removing and Replacing the Cover Plate.” 2. Disconnect the SCSI cable connectors ( 1 Figure 4) from the controller SCSI extension cable. 7 5 2 1 7 5 3 4 6 4 SHR-1722 Figure 4.
8 Compaq StorageWorks TL881/TL891 Family MiniLibrary System Drive Upgrade Procedure 3. Disconnect the drive power Y cable 2 from the power supply connector. 4. Disconnect the drive 1 RS-422 cable 3 from the controller PWB end. 5. Remove two M4 x 8 mm flat-head screws 4 from along the upper edge of the drive caddy assembly. 6. Remove two M4 extension screws 5 from the top of the drive caddy assembly.
Adding a Second Drive 4. Connect the drive 0 and drive 1 RS-422 cables 3 to the controller PWB. 5. Connect the drive power cable 2 to the power supply connector. 6. Connect the SCSI cable connectors 1 to the controller SCSI extension cable. 7. Replace the cover plate as described in “Removing and Replacing the Cover Plate.” Installing the Second Tape Drive To install the second tape drive: 1.
10 Compaq StorageWorks TL881/TL891 Family MiniLibrary System Drive Upgrade Procedure 8. Connect the unused connector on the SCSI cable to the drive just installed. 9. Install the RS-422 cable supplied with the kit, sliding it under the clamps so that the connector is adjacent to the connector on top of the new drive. 10. Install the RS-422 cable removed in step 3 over the top of the new RS-422 cable so that the connector is adjacent to the connector on top of the original drive. 11.