
OfficeJet Pro X series - Ink Service Container Replacement Guide


5
DE
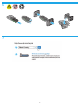
After you have installed the replacement duplexer/ink container, follow these steps to reset the duplex module counter.
1. Determinethermwareversiononyourprinter.Thestepsforobtainingthermwareversionwilldierdependingonyourprintermodel.
Findyourprintermodelintheoptionsbelow,andthenfollowthestepsprovidedtoobtainthermwareversion.
For X476, X551, and X576 models:
a.FromtheHomescreenontheprintercontrolpanel,touchthe“?”thatappearsatthetoprightcornerofthescreen.
b.TouchPrinter Information.
c.Ontheprinterinformationscreen,lookforthelinelabeledFW Version.
TheFWversionnumberisastringoflettersandnumbers.
d.Todeterminethermwareversion,lookforthefournumbersthatappearbeforethetwolettersattheend.
Forexample,ifthermwareversionnumberisLWP1CN1548AR,then“1548”indicatestheversion.
For X451 models:
a.FromtheHomescreenontheprintercontrolpanel,pressthebuttonnexttoSetup.
b.PressthebuttonnexttoPrint Reports.
c.PressOKnexttoPrinterStatusReport.
d.OnthePrinterStatusReport,lookforthelinethatshowsFirmware Version.
Thermwareversionnumberisastringoflettersandnumbers.
e.Todeterminethermwareversion,lookforthefournumbersthatappearbeforethetwolettersattheend.
Forexample,ifthermwareversionnumberisLWP1CN1548AR,then“1548”indicatestheversion.
2.Resettheduplexmodulecounter.Thestepstoresettheduplexmodulecounterdierdependingonthermwareversionandmodelof
your printer.
For units running rmware version 1548 or later,ndyourprintermodelintheoptionsbelow,andthenfollowthestepsprovidedtoreset
the duplex module counter.
For X476, X551, and X576 models:
a.FromtheHomescreen,touchtheRightarrow(
),andthentouchtheSetupicon( ).
b.TouchTools.
c.Touchthedownarrow(
) until Replace Duplex Module appears.
d.TouchReplace Duplex Module then touch OK.
For X451 models:
a.FromtheHomescreen,pressthebuttonnexttoSetup.
b.PressthebottomrightATMbuttonuntilTools displays, and press OK.
c.PressthebottomrightATMbuttonuntilReset Duplex Module displays, and then press OK.
For units running rmware versions older than 1548,ndyourprintermodelintheoptionsbelow,andthenfollowthestepsprovidedto
reset the duplex module counter.
For X476, X551, and X576 models:
a.FromtheHomescreen,touchtheBackbutton(
) four times.
b.TouchtheSupport menu.
c.TouchtheRightarrowbutton(
) until System Conguration Menu displays, and then touch OK.
d.TouchtheRightarrowbutton(
) until Service Ink Container or Duplex Module displays, and then touch OK.
e.TouchtheRightarrowbutton(
) until Replace Duplex Module displays, and then touch OK.
Themessage“Installed New Duplex Module?” will display on the screen.
f.TouchOK to reset the counter.
g.TouchtheCancelbutton(
)aboutfourtimesuntilyoureturntotheHomeScreen.
For X451 models:
a.FromtheHomescreen,presstheBackbutton(
)togettotheinklevelsscreen.
b.Fromtheinklevelsscreen,presstheBackbutton(
),presstheCancelbutton( ),andthenpresstheBackbutton( ) two more
times.TheSupportMenuoptionwilldisplay.
c.PressOK.
d.PressthebottomrightATMbuttonuntilService Ink Container or Duplex Module displays, and then press OK.
e.PressthebottomrightATMbuttonuntilReplace Duplex Module displays, and then press OK.
Themessage“Installed New Duplex Module?” will display on the screen.
f.PressOK to reset the counter.
g.PresstheCancelbutton(
) to return to the Home screen.