
Installing Microsoft Windows on an HP ProBook or EliteBook Notebook PC and creating an image


3
IMPORTANT
Make sure you have the latest compatible versions of drivers and
enhancements (Table 1). In addition, you must have a Microsoft
operating system license for each system on which you install
Windows XP Professional or Windows 7 Professional. The Windows
7 Professional license allows you to use Windows 7 Professional,
Windows XP Professional or Windows Vista Business.
Installing the OS, drivers, and enhancements
This section provides guidelines for users performing a clean installation of Windows on a supported
HP business notebook PC.
For more information on installing Windows, refer to the Microsoft website at
http://windows.microsoft.com/help.
IMPORTANT
Follow the installation instructions in the order provided. Failure to
complete these steps in the proper order can result in an unsuccessful
or unstable installation. These instructions are independent of the
operating system currently installed on the notebook PC.
1. Depending on the particular Internet connection(s) being used, download the driver(s) for the
network interface card and/or wireless LAN adapter driver. Save to a USB storage device or
optical media.
– Contact your network administrator to properly set up the networking components of Windows.
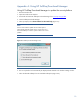
2. Change the boot order in F10 Setup so the optical drive is the first boot device.
3. Boot with the Windows OS recovery disk provided by HP; follow the on-screen instructions for
installation.
– OS recovery media from HP does not require a product ID or key for installation on a supported HP
business notebook PC.
– HP recommends that you retain the HP_TOOLS partition to provide support for HP QuickLook, the
F10 Setup graphical user interface, and HP diagnostics. For more information, refer to the white
paper, “HP Business Notebook Computer EFI Guidelines.”
– Older Windows XP OS media does not include serial ATA (SATA) drivers. For more information on
loading SATA drivers, refer to the white paper, “Modifying a Windows XP installation to support
SATA Native Mode on HP Business Notebooks.”
– If using Advanced format hard drives (4K sector drives), please refer to the HP white paper
“Preparing Advanced Format hard drives for Microsoft Windows installations on HP Business
Notebook PCs and desktop PCs.”
4. Install the appropriate communications driver from either the Driver Recovery DVD or USB storage
device (Step 1 above) and configure your Internet connection.
– For Windows XP, install the Microsoft Universal Audio Architecture (UAA) Bus Driver and Essential
System Updates, then reboot prior to installing the audio and modem drivers. The audio driver may
require manual installation. (NOTE: The Universal Audio Architecture (UAA) Bus driver is integrated
into Service Pack (SP) 3 and does not need to be installed separately).