
EFI Preboot Guidelines and Windows 8 UEFI Secure Boot for HP Business Notebooks and Desktops PPS Business Notebook and Desktop Technical white paper


10
Simply disabling Secure Boot will not change the mode. While still in User Mode, the keys currently enrolled in the
system are preserved. The remainder of the section is grayed out.
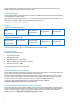
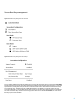
The user then has to then select “Clear Secure Boot Keys.” Then the BIOS goes to “Setup UserMode” (Figure 4). And the
mode section becomes available.
Figure 5: BIOS Setup User Mode selection for notebooks
Now that the system is in Setup Mode, the user can choose HP Factory keys vs. Customer Keys. When the user selects
Customer Keys, there is actually no key in the BIOS database. The user has to use an application in the OS to get the
keys (PK, KEK, dbs) into the BIOS.
NOTE: if the user tries to import the HP PK again when the selection is the Customer Keys, the BIOS will reject the PK.
The BIOS will stay in Custom Mode until the user re-enables Secure Boot. The BIOS then changes to User Mode. And the
bottom section will be grayed out again.
When Secure Boot verification fails
The operating system’s boot loader file bootmgfw.efi or Bootx64.efi, located under the ESP\Microsoft\boot
partition, is signed in accordance with the Windows Authenticated Portable Executable Signature Format specification.
If the file is modified in any way, the boot loader authentication will fail. Upon failure the firmware displays a dialog box
with the following error message: "Selected boot image did not authenticate." The dialog box requires acknowledgment,
and once it is given, the system is shut down.
The BIOS Signing Key
“System.Fundamentals.Firmware.UEFISecureBoot” - It is mandatory to sign for all firmware components using RSA-
2048 with SHA-256. This is the default policy for acceptable signature algorithms).
2
2
A section of the Windows Hardware Certification Kit (WHCK, formerly called the Windows Logo Kit)
http://msdn.microsoft.com/en-us/windows/hardware/gg487530.aspx