
OSD with MDT & WDS on the HP ElitePad 900


Technical white paper | Product, solution, or service
7
Image Creation & Capture, and Redeploying
If doing an image creation & capture, please take note of the following:
• For the creation and capture process:
– Install the root certificate update so redeployments do not need to run this step.
– It is recommended to not add the task sequence step to install the HP ElitePad 900 Driver & Firmware Update.
This should be done as part of the redeployment process, as matching drivers, firmware, and BIOS versions in the
package work best if installed together.
Note
You will need to use a mouse and keyboard to operate the tablet running the reference image if the Driver & Firmware
update package is not installed.
• For the redeployment process:
– If the root certificate update is already installed in the captured image, this step is then not necessary in
the redeployment phase
– It is required to add the task sequence step to install the HP ElitePad 900 Driver & Firmware Update.
This should be done as part of the redeployment process, as matching drivers, firmware, and BIOS
versions are required for optimum operation..
Issue with Image Capture
As of the writing of this document (March 1
st
, 2013), there is a bug with MDT that prevents completion of the image capture
process on UEFI IA-32 machines (such as the HP ElitePad 900). OSD with MDT works fine if image capture is not done.
In line 304 of LTIApply.wsf, the path to a needed EFI bootfile is hardcoded to the x64 architecture, which results in a failure
on 32-bit EFI platforms. Furthermore, even after working around this bug, upon reboot to do the actual image capture, a
missing file EFI\Boot\Microsoft\bcd error message appears. An update to MDT from Microsoft will need to be provided to fix
the issue.
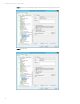
Adding Boot Image to WDS
Before adding the boot image into WDS, update the distribution share in MDT to ensure network drivers are added to the
boot image.
The boot image located in the Boot folder in the distribution share (by default is it named LiteTouchPE_x86.wim) is the
image to be imported into WDS. Note: The x86 version must be used.
In WDS, proceed to add a boot image. When specifying the location of the boot image, navigate to the location of the boot
image. Once imported setup any additional configuration options as needed.
Figure 6. WDS with boot image imported
After Deployment
The Bios Setup F10 menu option is not available on the ElitePad 900. Hence, in order to view and edit BIOS settings on the
ElitePad 900, you will need to install the HP BIOS Settings utility. (web link)