HP ThinPro 4.
© Copyright 2013 Hewlett-Packard Development Company, L.P. Microsoft and Windows are U.S. registered trademarks of Microsoft Corporation. Confidential computer software. Valid license from HP required for possession, use or copying. Consistent with FAR 12.211 and 12.212, Commercial Computer Software, Computer Software Documentation, and Technical Data for Commercial Items are licensed to the U.S. Government under vendor's standard commercial license.
About this book CAUTION: Text set off in this manner indicates that failure to follow directions could result in damage to equipment or loss of information. NOTE: Text set off in this manner provides important supplemental information. This guide provides the network administrator with instructions for configuring HP ThinPro 4.2 and explains the various configuration utilities.
iv About this book
Table of contents 1 Introduction ..................................................................................................................................................... 1 Using HP ThinPro ................................................................................................................................. 1 Identifying the taskbar components ..................................................................................... 2 2 Setup and installation ..............................
Client aggregation ............................................................................................. 23 Client aggregation overview ............................................................. 23 Configuring client aggregation .......................................................... 24 Disabling client aggregation ............................................................. 27 Display preferences ..........................................................................................
Certificates ........................................................................................................ 42 Importing certificates ........................................................................ 43 Removing certificates ....................................................................... 43 Viewing certificates ........................................................................... 44 DHCP Option Manager ...........................................................................
viii
1 Introduction The HP ThinPro operating system reinvents user interface simplicity with a single console interface for dashboard access to all user and administrative touch points. A default Connection Manager view integrates traditional connection types with the latest Virtual Desktop Infrastructure (VDI) broker connections with shared access to settings. Administrators are only one click away from the Easy Config setup wizard, Control Panel, and System Information layers.
You must log in with administrator permissions to access all components of the HP ThinPro window. When the thin client is in Administrative Mode, the following changes occur: ● The top section of the window changes from blue to red. ● The window title adds the text (Administrative Mode). HP ThinPro opens by default in the User Mode. To switch to the Administrative Mode: 1. Click the HP logo in the bottom left of the screen. -orPosition your cursor in the screen background and right-click. 2.
2 Setup and installation HP ThinPro has a wizard-driven interface to simplify the configuration process of a thin client. Easy Tools Wizard The Easy Tools Wizard simplifies the configuration and maintenance processes for the ThinPro software. The wizard opens automatically the first time you turn on your thin client. To start the wizard after the initial setup, click the hp icon in the left pane. The Easy Tools Wizard has two main components: Easy Update and Easy Config.
3 Reference This section describes all utilities and procedures available to administrators and users in the HP ThinPro control center. Click one of the three buttons in the left pane to access the corresponding window: ● Connections on page 4: Access and manage remote connections in the Connections window. ● Control Panel on page 22: Configure peripherals, set up the user experience, personalize the desktop, and manage various utilities on the five Control Panel tabs.
The Connections window lists all connections that you can assign to users. You can add, edit, and delete connections from this window. ● Connection Name: Displays the name of the connection. You cannot change the connection name from this column. ● Type: Displays the type of connection (ICA, RGS, RDP, TeemTalk, VMware View, Web Browser, etc.). You cannot change the connection type from this column. ● Status: Displays the status, active or inactive, of the connection.
Table 3-1 Citrix ICA connection options (continued) Option Description Enable Windows Alert Sound Enable the Windows alert sound. ICA Acceleration (LAN Only) Enable ICA Acceleration. Allow Backing Store Allow for backing store. Use Server Redraw Use the server's redraw functionality. Disable Info Box Before Connecting Do not display the information box displayed before a connection is completed. Use Asynchronous COM-port Polling Use asynchronous polling of the COM port.
Table 3-3 Citrix ICA connection window options Option Description Enable Seamless Window Allows you to display a single window on the local ThinPro desktop as if it were a native application. Default Window Size Establish the default window size. Options are: Full Screen, Fixed Size, Percentage of Screen Size. Default Window Colors Establish the default window colors. Options are: 16, 256, 16-bit, 24-bit, Automatic.
Table 3-6 Citrix ICA connection keyboard shortcuts options (continued) Option Description Stop Direct key handling Not enabled when the option Handling of keyboard shortcuts is set to Translated. List of individual function keys and their mappings. Only enabled when Handling of keyboard shortcuts is Translated or Direct in full screen desktops only. Table 3-7 Citrix session options Option Description The Auto Logout Delay box applies to Citrix servers using multiple published resources.
RDP The configuration options for an RDP connection are: Table 3-9 RDP connection general options Option Description Send hostname as Send your thin client's MAC address or hostname as the hostname specified to the remote system. Multimedia Redirection Select 1 to enable multimedia redirection. Select 0 to disable multimedia redirection. Add The Add button is used to create new connections. When a new connection is created, you are guided to set connection-specific options by a wizard interface.
● Web browser on page 15 ● RGS on page 16 ● VMware View on page 16 ● XDMCP on page 18 ● SSH on page 19 ● Telnet on page 20 ● Custom on page 20 Citrix ICA 1. To add a Citrix ICA connection, click Connections > Add > Citrix. 2. Set the Citrix ICA configuration options: Table 3-11 Citrix ICA connection network settings Option Description Name The connection name. Server URL The URL of the server. Username The username to use for the connection.
RDP Microsoft Remote Desktop Protocol (RDP) enables Windows-based applications to communicate over network connections. It is installed on all versions of Windows later than Windows NT. 1. To add an RDP connection, click Connections > Add > RDP. 2. Set the appropriate network options: Table 3-13 RDP connection network settings Option Description Name The Browse button allows you to browse for the remote system. Address The IP address of the remote system.
Click Next to continue. 4. Set the appropriate options: Table 3-15 RDP connection options settings Option Description Enable motion events Enable motion events for this connection. Enable data compression Use data compression for this connection. Enable encryption Encrypt communications for this connection. Force bitmap updates Force bitmap updates. Attach to console Attach to the console port. Hostname to send The hostname to send to the remote system for this connection.
Click Next to continue. 7. Set the appropriate advanced options (refer to Table 3-10 New connection advanced settings on page 9). 8. Click Finish to save your settings and close the wizard. NOTE: To enable RDP USB Redirection, use the USB Manager utility. See USB Manager on page 29 for instructions.
Table 3-19 New TeemTalk creation wizard connection advanced options settings (continued) Option Description Auxiliary Ports The TeemTalk auxiliary ports settings. Hotspots The TeemTalk hotspots settings. Click Next to continue. 4. Set the appropriate preferences: Table 3-20 New TeemTalk creation wizard connection preferences options settings Option Description Preferences Displays the preferences shown in Table 3-21 TeemTalk preferences on page 14.
Table 3-22 New TeemTalk creation wizard connection finalization settings 7. Option Description Create an icon on the desktop Select this option if you wish to have a desktop icon created for this connection. Summary Session Information Displays a summary of the session that is to be created. Click Finish to save your settings and close the wizard. Adding a TeemTalk connection manually 1. To add a TeemTalk connection manually, click Connections > Add. 2.
RGS 1. To add an RGS connection, click Connections > Add > RGS. 2. Set the appropriate configuration options: NOTE: For more information about RGS, see the HP Remote Graphics Software User Guide. Table 3-25 New RGS connection configuration settings Option Description Name The connection name. Select one of the RGS connection modes, either Normal Mode or Directory Mode. Mode - Servers If you select Normal Mode, type the hostname or IP address of the system running the RGS Sender.
Table 3-26 VMware View connection network settings (continued) Option Description Domain The domain to use for the connection. Desktop The desktop to use for the connection. Click Next to continue. 3. Set the appropriate options: Table 3-27 VMware View general settings options settings Option Description Login options Automatic login Login automatically when the connection is established. Allow Smartcard login Allow a locally-connected smart card to provide login credentials.
To start a desktop connection using PCoIP instead of RDP: 1. Click Connections > Add. 2. Select a connection in the Connections window and click Connect. Type the host name or IP address of the View Connection Server in the field, if necessary. 3. Type the user name, password, and domain names in the corresponding fields and click Connect. 4. Click the arrow on the right side of the Desktop pool. Select Protocols > PCoIP. 5. Click Connect.
SSH Secure shell (SSH) is the most common way to gain remote command line access to UNIX-like operating systems, such as Linux, BSD, and HP-UX. SSH is also encrypted. 1. To add an SSH connection, click Connections > Add. 2. Select SSH and set the appropriate configuration options: Table 3-30 New SSH connection configuration settings Option Description Name The connection name. Network Address The IP address of the remote system. Port The remote port to use for the connection.
Telnet Telnet is an older method of gaining remote command line access. It is not encrypted. 1. To add a Telnet connection, click Connections > Add. 2. Select Telnet and set the appropriate configuration options: Table 3-31 New Telnet connection configuration settings Option Description Name The name of the connection. Address The IP address of the remote system. Port The port to use on the remote system. Style Foreground color The foreground color. Background color The background color.
Copy To copy a connection: ▲ Click a selection under Connection Name and then click Copy. A copy of the connection appears in the list under Connection Name. Delete To delete a connection: ▲ Click a selection under Connection Name and then click Delete. The connection is removed from the list under Connection Name. Edit 1. To edit a connection, click a selection under Connection Name and then click Edit. The connection settings window for that connection opens. 2. Edit the connection and click Apply.
Control Panel Control Panel utilities are organized under four tabs: ● Peripherals on page 22 ● Setup on page 30 ● Management on page 35 ● Advanced on page 42 All Control Panel items are available for use when you are in Administrator Mode; in nonAdministrator mode, only the items allowed by the configuration are available. This list of Control Panel items can be modified while in Administrator Mode by using the Setup tab and then the HP ThinPro Configuration tool.
● Touch screen on page 29 ● USB Manager on page 29 Client aggregation The thin client supports up to four monitors. If you need additional screen real estate, client aggregation allows up to four thin clients to be combined together, controlled by a single keyboard and mouse. Because each thin client supports up to four monitors, client aggregation allows up to four computers and 16 monitors to be controlled by a single keyboard and mouse, without the need for additional hardware or software.
In this configuration, moving the mouse pointer off the right side of the thin client A monitors will cause it to appear on the upper 1/3 of the left side of the thin client D monitors. Similarly, moving the mouse pointer off the right side of the thin client B monitors will cause it to appear in the middle 1/3 of the left side of the thin client D monitors.
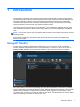
Configuring the aggregation clients Perform this procedure on each aggregation client: 1. Double-click Client Aggregation. 2. Click Client. 3. Type the server hostname or IP address of the aggregation server in the field. 4. Click Apply to apply the changes. Configuring the aggregation server To configure the aggregation server: 1. Double-click Client Aggregation. 2. Click Server. 3. The aggregation server thin client is displayed in a purple box that contains its hostname.
4. Click the location in the 4x4 grid where you want to place the first aggregation client, and enter its hostname or IP address. In the following illustration, the aggregation client at IP address 16.125.19.91 is positioned in the first row, first column of the 4x4 grid. Press Enter when done— aggregation clients are displayed in green boxes. 5. In this same manner, position up to two additional aggregation clients in the 4x4 grid, for a total of up to three aggregation clients.
Disabling client aggregation To disable client aggregation: 1. Double-click Client Aggregation. 2. Select Disabled. 3. Click Apply and Closed. Display preferences This utility allows you to add, edit, and delete profiles. A profile is a display specification, which includes resolution, refresh rate, bit depth, and whether or not the display should be rotated.
Editing a profile To edit a profile: 1. Double-click Display Preferences. 2. Select a profile in the Profiles list. 3. Edit the Profile Settings and Display Configuration as desired. 4. Click Test Settings to check the profile. 5. Click Apply, and then click Close to save your changes and close the dialog box. Deleting a profile To delete a profile: 1. Double-click Display Preferences. 2. Select a profile in the Profiles list and click Delete. 3.
SCIM input method setup This is a graphical user interface (GUI) setup utility for the Smart Common Input Method platform. It is used to set up Chinese and Japanese input methods on the thin client itself. For more information on this open source program, go to the Smart Common Input Method Platform website at http://sourceforge.net/apps/mediawiki/scim/index.php?title=Main_Page. ▲ Double-click SCIM Input Method Setup. Sound This allows you to specify audio parameters. 1. Double-click Sound. 2.
To set USB mounting preferences: 1. Double-click USB Manager. 2. Select one of the following remote protocols: ● Citrix ● Local ● RDP ● VMware View 3. If the setting is Local, you can also specify: allow devices to be mounted and mount devices read-only. 4. Click OK to save your preference and close the dialog box. Setup These utilities enable you to set up the thin client to your requirements.
3. 4. To change the desktop background color: a. Select Color. b. Under the Select Color dialog box, choose a new Basic Color or define a Custom Color. c. Click Apply. To change the desktop background orientation or style: a. Under Style, select one of the following settings: Center, Tile, Stretch, Fit, or Fill. b. Click Apply. 5. To restore the default background images, select Restore Default and click Apply . 6. To save your changes and close HP Background Manager, clickOK.
NOTE: The language can also be set by configuring Dynamic Host Configuration Protocol (DHCP) tag 192 as a string whose value is English, German, Spanish, French, Japanese, or Simplified Chinese. Network To configure network settings: 1. In the HP ThinPro Control Panel, double-click Network. 2. Configure the Wired tab: a. Enable IPv6—Check to use IPv6 connection. Default is IPv4. b. Ethernet Speed—List of Link speed/Duplex mode pairings available. c.
● 3. 4.
Screensaver To configure the screensaver: 1. In the HP ThinPro Control Panel, double-click Screensaver. 2. Select the Screensaver settings: a. Select Enable screensaver, or clear the selection if you do not want a screensaver. b. Select the number of minutes of inactivity after which to activate the screensaver. Type the number in the field or use the up or down arrow keys to select a number. c. Select Require password on resume, if desired. d. Select the Mode: e. 3. 4.
NOTE: This option is not available on all models. Setting connections and Control Panel user permissions To set user permissions on the Connections and Control Panel tabs: 1. Double-click HP ThinPro Configuration. 2. Click Connections in the left panel and select authorized connections by selecting or clearing check boxes. 3. Click Control Panel in the left panel and select authorized applications by selecting or clearing check boxes. 4. Click Apply, then click OK to close the dialog box.
AD/DDNS Manager This control allows you to add the thin client to an Organizational Unit of the Active Directory Server, and to enable automatic Dynamic DNS updates of the thin client's name and IP-address association. It does not enable authentication against the Active Directory database. 1. Double-click AD/DDNS Manager. 2. Type the following information in the fields: ● Active Directory Domain ● Organizational Unit for Machine (OU) ● Administrator User Name ● Administrator User Password 3.
To access these functions: 1. Double-click Factory Reset. 2. Click the button that will accomplish the task you desire. HP Automatic Update To configure HP Automatic Update: 1. Double-click HP Automatic Update. 2. Click Enable HP Automatic Update on system startup if you wish to have this system updated on restarts. 3. If the previous option is enabled, you can click Enable manual configuration if you wish to supply the server address via ftp, http, or https.
Use the captured images and settings to replicate (deploy) on different systems or to restore the current capture back to its original setting after settings are altered. NOTE: HP ThinState is not a standalone tool and can only be accessed by the administrator from within the thin client image.
4. Select FTP or HTTP protocol. Type the remote server information in the fields. NOTE: Username and Password are not required if you are using HTTP protocol. Be sure of the image file you are using: neither content nor size are verified before the image upgrade begins. 5. Click Finish. When the image capture begins, all applications stop and a new window appears showing the copy progress. If a problem occurs, click Details for information. The desktop reappears after restoration is complete.
Deploy HP ThinPro image from a bootable USB flash drive To install an HP ThinPro image from a bootable USB flash drive: 1. Turn off the target thin client. 2. Insert the bootable USB flash drive. 3. Turn on the thin client. The screen remains black for 10-15 seconds while the thin client detects and boots from the bootable USB flash drive. NOTE: If the thin client fails to boot from the USB flash drive, try unplugging all other USB devices and repeat the procedure.
The HP ThinPro configuration restoration is complete. Capture an HP ThinPro configuration to a USB drive 1. Attach a USB key to the thin client. 2. Double-click ThinState. 3. Select the HP ThinPro configuration, and then click Next. 4. Select save the configuration, and then click Next. 5. Click on a USB key, and then click Next. 6. Select the USB key. 7. Click Browse. 8. Navigate to the desired location on the USB key and assign a file name to the profile. 9. Click Save. 10. Click Finish.
5. Select VNC Notify User to Allow Refuse to display a message when someone uses VNC to access the thin client and allow a user to refuse VNC access. a. Select VNC Show Timeout for Notification and set a time delay to allow the user to refuse. b. Type a User Notification Message in the field. 6. Select Re-set VNC server right now and click OK to reset the VNC server. 7. Click OK to save the settings and exit the dialog box.
Importing certificates This section describes how to import certificates from a URL or file. To import certificates: 1. In the HP ThinPro Control Panel, double-click Certificates. 2. In the Certificate Manager, select an option indicating the type of certificate you want to import, as follows: 3. 4. ● Local Root Certificate Authorities ● Root Certification Authorities ● Personnel Certificates ● Private Keys To import a certificate from a URL: a.
3. 4. To remove a certificate, do the following: a. In the Certificate Manager, select the certificate you want to remove. b. Click Remove. When completed, click Close. Viewing certificates This section describes how to view certificates in the Certificate Manager. To view certificates: 1. In the HP ThinPro Control Panel, double-click Certificates. 2.
DHCP Option Manager The DHCP Option Manager displays details of the DHCP tags that are requested by the client. You can direct the thin client to request or ignore specific DHCP tags by enabling the tag request in the Requested column. When a pencil is shown next to the DHCP Code, the code itself can be changed, in case you have a conflict in your DHCP server over a particular code number.
3. To Edit a keyboard shortcut: a. Click the keyboard shortcut section you would like to Edit. i. Click Command if you would like to edit the command. Enter in the comment or Select from directory and browse for the program/action you would like to run. ii. Click Shortcut if you would like to edit the shortcut. Perform the key combination you would like to trigger this new program/action you would like to run. b. 4. Click OK. To Delete a keyboard shortcut: a.
General The General tab displays the following information: ● ● ● BIOS (Basic Input/Output System) and OS (operating system) ◦ Serial Number ◦ BIOS Version ◦ BIOS Release Date ◦ OS Build ID ◦ OS Kernel Version System ◦ Platform ◦ CPU (Central Processing Unit) Speed ◦ Processor Flash and Memory ◦ Free ◦ Used ◦ Installed Network The Network tab displays the following information: ● ● Interface ◦ Name ◦ State ◦ Type ◦ IP Address ◦ Network Mask ◦ MAC (Media Access Control)
Net tools The Net Tools tab allows you to run a test: 1. Click System Information > Net Tools. 2. Select the tool: ● Ping ● DNS Lookup ● Trace Route 3. Identify the host and set the diagnostic parameters. 4. Click Start Process. 5. To clear the diagnostic log, click Clear Log. Software information The Software Information tab displays the name and version of the main software installed. System logs The System Logs display log information.
Index A Active Directory manager 36 AD/DDNS Manager 36 adding connection Citrix ICA 10 Custom 20 ICA 10 RDP 11 RGS 16 SSH 19 TeemTalk 13 Telnet 20 VMware View 16 web browser 15 XDMCP 18 adding display profile 27 administrator, log in as 2 advanced utilities 42 Agent Configure Manager 37 aggregation client configuration 25 client, disabling 27 client, overview 23 server configuration 25 aggregation, client 23 B background manager 30 C CDA mode 42 certificates 42 Citrix Desktop Appliance 42 Citrix ICA adding
HP ThinPro introduction 1 HP ThinPro, installation 3 I ICA adding connection 10 configuring connection 5 options 10 installation, HP ThinPro 3 K keyboard layout 28 keyboard shortcuts 45 L language 31 logs, system 48 M management utilities 35 monitor configuration 24 monitors, multiple, setup 24 mouse 28 Mousepad 45 N net tools, system information 48 network 32 network, system information 47 O options Citrix ICA 10 Custom 20 ICA 10 RDP 11 RGS 16 SSH 19 TeemTalk 13 Telnet 20 VMware View 16 web browser 15 XD